jimmyd17
New Member
- Joined
- Dec 12, 2005
- Messages
- 142
- Reaction score
- 2
- Points
- 0
- Location
- Croydon, VIC
- Members Ride
- VY Adventra LS1
Car - 2001 VXII Acclaim
Task - To remove the factory head unit and replace it with a better aftermarket one.
Reason - Because the standard head units in VT-VX's are bin worthy.
Tools / Consumables needed
an old coat hanger
side cutters
the following tools aren't needed if you buy an adapter plug
wire stripper
solering iron
solder
electrical tape
REMOVING OLD HEAD UNIT
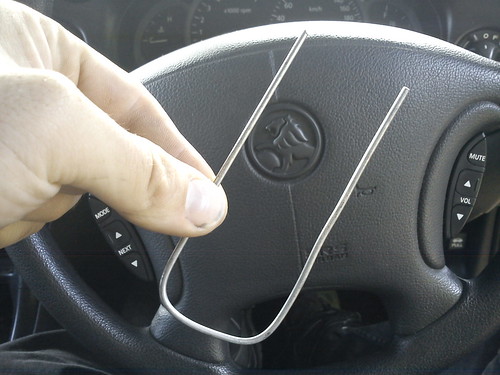
1. Make two U-shape tools out of an old coat hanger.
2. Insert these tools into the four holes on the old head unit. You may need to push these sideways to unclick the mount. It should fairly easily pop out.
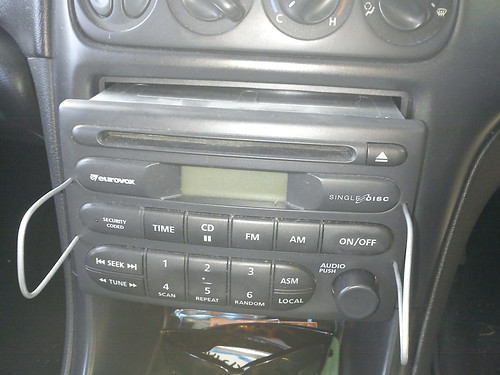
3. Slide the head unit out far enough to get your hand in to undo the loom plug (you'll need to press the little tab for it to come out) and also pull out the antenna plug.
INSTALLING NEW HEAD UNIT
1. Push the bracket for your new head unit into place. It should be a pretty tight fit. If it's not tight, you will need to fix it into place with screws or rivets. Mine was tight enough, so there was no need to screw or rivet it in.
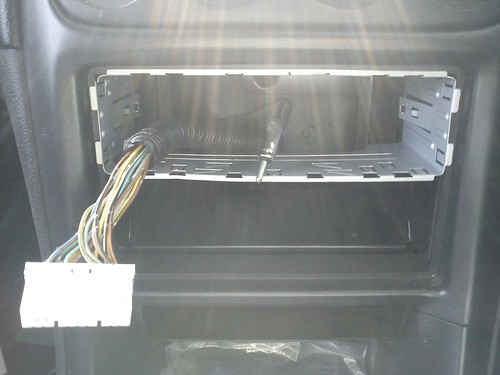
2. Feed your loom plug and antenna plug through the bracket.
From this point on, you have two options...
Option #1 - buy a loom adapter to suit your brand of head unit and your car. This is a much easier option and should only cost $20 or so. Most places that sell car audio stuff should stock various brand adapters to suit commodores. If you go for this option, you can skip the next section.
Option #2 - cut into your existing loom and join/solder the wires needed onto the head unit wires. This is what I did. Read on...
CUTTING INTO LOOM AND SOLDERING THE NEEDED WIRES
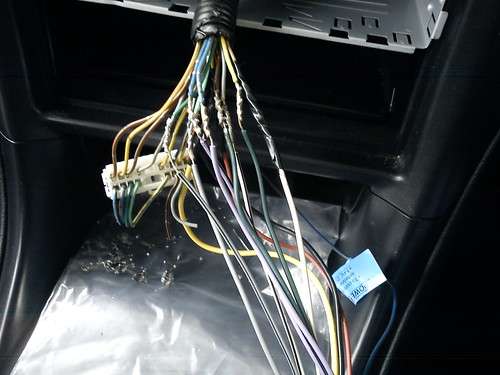
1. First of all you need to determine which wire is which and which ones you'll need to cut. I decided to leave the factory plug attached, so that if I ever wanted to put the factory head unit back in, it wouldn't be too hard. For the wires I did need to cut, I cut them about an inch from the plug so there is enough wire to strip if ever needed to replace back to stock. For the wires that aren't needed for the new head unit, I did not cut them.
Factory Holden Wire Colours (thanks to Tasmaniak https://forums.justcommodores.com.au/threads/vk-vz-stereo-wiring-colours.14909)
Accesories - Yellow
Constant - Orange/White
Illumination - Brown/White
Earth - Black/White
12V OUTPUT - Yellow/Red
Radio Mute - Yellow/Black (VT onwards)
Antenna up - White (VR onwards)
Antenna down - Blue (VR onwards)
Illumination OUTPUT - Grey (VT onwards)
Speakers
Front Left (+) Tan
Front Left (-) Grey
Front Right (+) Light/Green
Front Right (-) Dark/Green
Rear Left (+) Brown/Black
Rear Left (-) Yellow/Blue
Rear Right (+) Blue/Orange
Rear Right (-) Blue/Black
2. Next, You'll need to know which wires from your new head unit plug corrosopond to the factory wires. If you've bought a new head unit, it should come with a wiring diagram explaining which wire is for what.
For my JVC head unit, the wire colours were:
Accesories - Red
Constant - Yellow
Earth - Black
Antenna - Blue
Speakers
Front Left (+) White
Front Left (-) White/black
Front Right (+) Grey
Front Right (-) Grey/black
Rear Left (+) Green
Rear Left (-) Green/black
Rear Right (+) Purple
Rear Right (-) Purple/black
3. Once you have determined which wire is which for both the car loom, and your new head unit, you can start cutting the loom wires you'll need to connect to your head unit.
4. Strip your earth wires first and twist the ends of them. Then twist them together so they are facing each other neatly and solder them together. Wrap some electrical tape around your solder so that you won't short out your power wires on the earth and blow a fuse.
5. Strip all the rest of the wires you'll need and twist them all together.
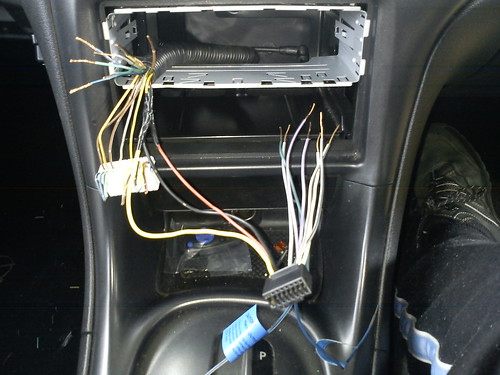
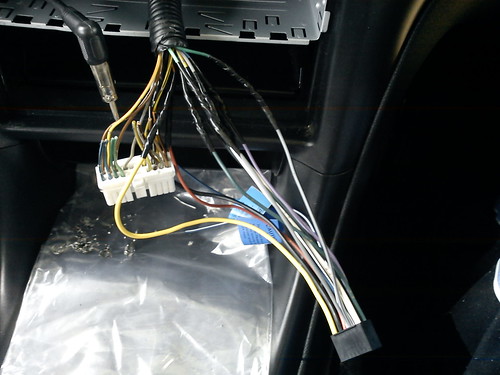
Note: In the above photo, I have joined, soldered and taped the Earth, Accessories & Constant power before I joined the speaker wires. Make sure you do these 3 one at a time so that they can't short out on each other! For the speaker wires, its not as critical, so you can do them all at once.
6. Twist the rest of your speaker wires together, and solder them all up.
7. Wrap electrical tape around all your solder joines to make sure none of them can short on each other.
Okay, thats all your wires done!
FITTING YOUR NEW HEAD UNIT
1. Get your new head unit (without the detachable face attached) and plug in your adapted loom plug, and also the antenna plug.
2. Gently slide your new head unit into its bracket mount. Make sure it firmly sits where you intend it to stay. If its not a tight fit and there is too much movement, you may need to screw the bracket mount into place first with self tapping screws. This is also a good idea to make it harder to steal.
3. Fit your surround and fascia on.
4. Clip into place a storage tray to fill the gap underneath. I bought mine from Autobarn for about $20
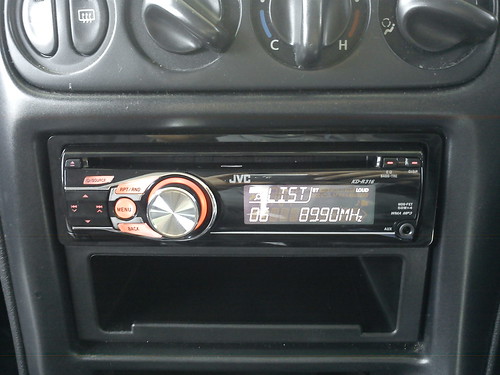
5. Enjoy the much better sound quality!
I also decided to replace the factory speakers, however I was surprised at the massive improvement from replacing just the head unit, but retaining the factory speakers. it sounded 100x better even with the stock speakers. In my opinion, the head unit really was the weak link of the factory sound system.
Hope this guide helps. Feel free to add any constructive critisism, advise or tips.
Cheers,
James
Task - To remove the factory head unit and replace it with a better aftermarket one.
Reason - Because the standard head units in VT-VX's are bin worthy.
Tools / Consumables needed
an old coat hanger
side cutters
the following tools aren't needed if you buy an adapter plug
wire stripper
solering iron
solder
electrical tape
REMOVING OLD HEAD UNIT
1. Make two U-shape tools out of an old coat hanger.
2. Insert these tools into the four holes on the old head unit. You may need to push these sideways to unclick the mount. It should fairly easily pop out.
3. Slide the head unit out far enough to get your hand in to undo the loom plug (you'll need to press the little tab for it to come out) and also pull out the antenna plug.
INSTALLING NEW HEAD UNIT
1. Push the bracket for your new head unit into place. It should be a pretty tight fit. If it's not tight, you will need to fix it into place with screws or rivets. Mine was tight enough, so there was no need to screw or rivet it in.
2. Feed your loom plug and antenna plug through the bracket.
From this point on, you have two options...
Option #1 - buy a loom adapter to suit your brand of head unit and your car. This is a much easier option and should only cost $20 or so. Most places that sell car audio stuff should stock various brand adapters to suit commodores. If you go for this option, you can skip the next section.
Option #2 - cut into your existing loom and join/solder the wires needed onto the head unit wires. This is what I did. Read on...
CUTTING INTO LOOM AND SOLDERING THE NEEDED WIRES
1. First of all you need to determine which wire is which and which ones you'll need to cut. I decided to leave the factory plug attached, so that if I ever wanted to put the factory head unit back in, it wouldn't be too hard. For the wires I did need to cut, I cut them about an inch from the plug so there is enough wire to strip if ever needed to replace back to stock. For the wires that aren't needed for the new head unit, I did not cut them.
Factory Holden Wire Colours (thanks to Tasmaniak https://forums.justcommodores.com.au/threads/vk-vz-stereo-wiring-colours.14909)
Accesories - Yellow
Constant - Orange/White
Illumination - Brown/White
Earth - Black/White
12V OUTPUT - Yellow/Red
Radio Mute - Yellow/Black (VT onwards)
Antenna up - White (VR onwards)
Antenna down - Blue (VR onwards)
Illumination OUTPUT - Grey (VT onwards)
Speakers
Front Left (+) Tan
Front Left (-) Grey
Front Right (+) Light/Green
Front Right (-) Dark/Green
Rear Left (+) Brown/Black
Rear Left (-) Yellow/Blue
Rear Right (+) Blue/Orange
Rear Right (-) Blue/Black
2. Next, You'll need to know which wires from your new head unit plug corrosopond to the factory wires. If you've bought a new head unit, it should come with a wiring diagram explaining which wire is for what.
For my JVC head unit, the wire colours were:
Accesories - Red
Constant - Yellow
Earth - Black
Antenna - Blue
Speakers
Front Left (+) White
Front Left (-) White/black
Front Right (+) Grey
Front Right (-) Grey/black
Rear Left (+) Green
Rear Left (-) Green/black
Rear Right (+) Purple
Rear Right (-) Purple/black
3. Once you have determined which wire is which for both the car loom, and your new head unit, you can start cutting the loom wires you'll need to connect to your head unit.
4. Strip your earth wires first and twist the ends of them. Then twist them together so they are facing each other neatly and solder them together. Wrap some electrical tape around your solder so that you won't short out your power wires on the earth and blow a fuse.
5. Strip all the rest of the wires you'll need and twist them all together.
Note: In the above photo, I have joined, soldered and taped the Earth, Accessories & Constant power before I joined the speaker wires. Make sure you do these 3 one at a time so that they can't short out on each other! For the speaker wires, its not as critical, so you can do them all at once.
6. Twist the rest of your speaker wires together, and solder them all up.
7. Wrap electrical tape around all your solder joines to make sure none of them can short on each other.
Okay, thats all your wires done!
FITTING YOUR NEW HEAD UNIT
1. Get your new head unit (without the detachable face attached) and plug in your adapted loom plug, and also the antenna plug.
2. Gently slide your new head unit into its bracket mount. Make sure it firmly sits where you intend it to stay. If its not a tight fit and there is too much movement, you may need to screw the bracket mount into place first with self tapping screws. This is also a good idea to make it harder to steal.
3. Fit your surround and fascia on.
4. Clip into place a storage tray to fill the gap underneath. I bought mine from Autobarn for about $20
5. Enjoy the much better sound quality!
I also decided to replace the factory speakers, however I was surprised at the massive improvement from replacing just the head unit, but retaining the factory speakers. it sounded 100x better even with the stock speakers. In my opinion, the head unit really was the weak link of the factory sound system.
Hope this guide helps. Feel free to add any constructive critisism, advise or tips.
Cheers,
James
") They truly are rubbish head units haha
They truly are rubbish head units haha