Hot-Rod
SuPaFlY -LiV3 Surviv3 Di3
- Joined
- Sep 9, 2005
- Messages
- 332
- Reaction score
- 12
- Points
- 18
- Location
- Oz
- Website
- forums.justcommodores.com.au
- Members Ride
- VX Commodore Series 2
I am not a mechanic. Please only use this as a Guide. Take all necessary precautions when working on your car including gloves and eye wear protection. I undertook this repair with the help of a Gregorys Mechanic Book and generalised knowledge of my Ecotec Motor and components. If I could do it I am sure most others could as well. The repair by myself took a hard 6 hours of work. If you can't spare at least a day then I would leave this to a mechanic.
Things you will need:
Engine Oil, Oil flush (approx $35 bucks)
Coolant, coolant flush, new radiator cap (approx $50 bucks as I use genuine Castrol Coolant)
Thermostat, Thermostat Gasket (Ecotec Motor Tridon TTG46) (approx $24 bucks)
New Inlet Manifold Gasket Set, Instant Gasket Sealant RTV or equivalent (approx $140 bucks as I used a lifetime gasket set aluminium one)
A good set of Screw Drivers and Ratchets, a rubber mallet, Fuel Disconnect Tool
Turps/Petrol, Razor Blade tool
MONEY SAVED
I would guess this job would cost 4 hours labour in a mechanics shop, the current going rate is about $100 bucks an hour. Plus your guaranteed a mechanic would be using cheap coolant, oils, the cheap plastic gasket set, not quality products like I have used. So assuming this the mechanics price would be around $500 - $600 bucks, could be wrong though maybe someone can assist with this. So easily I've saved $200 - $300 bucks doing it myself and now I've got more of an understanding of my engine from doing it.
Step 1
Turn engine on. Open bonnet and remove Fuel Relay Fuse from Fuse boxs in engine bay. Check your diagram to confirm which fuse it is. Wait until engine stalls. Attempt to crank at least 10 times to try and reduce fuel in fuel lines and injector fuel rails.
Step 2
Remove Battery. This is to prevent any unintended sparks from hitting a Positive lead in the Engine Bay which could potentially damage components or computer hardware.
Step 3
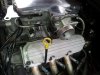
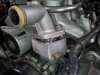
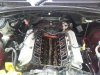
Time to get dirty. Start by removing the air box and piping to the plenum. Don't forget to remove the Air Box Sensor and the MAF sensor.
Step 4
Remove the Throttle Bracket which is attached by three bolts on the rear. Pry off the throttle cable from the nob with a screw driver or similar. If you have Cruise control there will be a second cable and nob to pry off. (Not %100 percent sure as I don't have Cruise Control).
Step 5
Unbolt the EGR (Only for VT-VY). As I am aware VS does not have a EGR.
Step 6
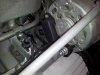
Remove your Engine belt. Unbolt your alternator. Theres two screws plus a ground screw underneath. Theres also a support bracket which needs to be unscrewed. At the rear is a another ground i think which is surrounded by rubber. Don't forget to unplug the clip at the rear of the alternator. If all bolts remove the alternator should slide up and out of the supporting metal brackets.
Step 7
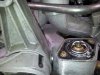
Ok now is the time to remove the coolant from the system. Undo the bottom radiator hose allowing coolant to come out. Have a tray underneath to catch the coolant to dispose of it. Remember Environment and dispose of coolant correctly. Remove the top radiator hose. Allow as much of the coolant to drain and then remove the thermostat housing by undoing the two bolts. Attached to the bottom of the housing will be the old paper gasket. Scrap this off using a razar or petrol/turps. Remove the thermostat, Discard if you have a new one. If reusing make sure thermostat still works. Test in boiling water. It should open up in Boiling water and close when cold.
Step 8
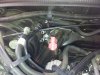
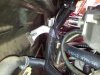
Unplug all the injectors and fuel rail lines that enter the body on the drivers side using the fuel disconnect tool. Undo all the vacuum lines from the rear of the plenum. Not all of them need to be removed as one or to goes to the fuel lines which you disconnect which can go with the hole plenum when pulled off.
Step 9
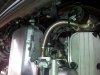
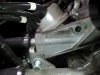
Time to remove the Tensior Pulley Assembly. undo bolts underneath. Undo the heater radiator pipes that connect to the metal pipe. Once all bolts undo slowly slide the metal cylinder out from the tensior pulley assembly and remove the whole assembly.
Step 10
Attempt to remove any coolant left in the lower manifold. After this make a quick check around the engine bay making sure no bolts or cables are in the way for when you remove the plenum/lower manifold.
Step 11
Remove the 12 bolts that attach the lower manifold to the engine. When reassembling the Torque range is between 12 - 16 NM which is quite weak. You may notice when undoing these bolts some will be extremely loose.
Step 12
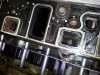
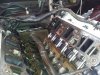
Ok if you have removed everything correctly the whole plenum/TPS/ICA and lower manifold should come free revealing the intake manifold gasket. This is were I could see I had a small leak near cylidner 1 - 3. Also a small leak at the rear of the block.
Step 13
You need to clean the matting surfaces from which the gasket was sitting on. Do so using a razor, turps and or fuel until clean. Do the same on the bottom of the lower manifold. Be careful not to disturb the injector nozzels which poke through. While doing this step cover the engine compartment to prevent foreign objects getting into it. If you suspect anything has fallen in you need to flush your oil and replace the oil ASAP.
Step 14
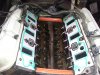
Once you are satisfied both matting surfaces are clean position the new gaskets. Place RTV Sealant or equivalent in the four corners to provide a seal and stop leaks. Apply librally as it won't hurt as long as you get it in the right place. RTV Sets in 10 minutes so be quick to replace the plenum/lower manifold back on the engine.
Step 15
Bolt up 12 bolts on manifold to 12 - 16 NM Torque and let set for 2 hrs or longer if you have to spare.
Step 16
Reverse of Steps 1 to 12 making sure you set thermostat correctly with new gasket. (I put in a cooler Thermostat the 81 Degrees one, The car runs cooler during highway driving and doesn't heat up as quickly during city stop and go, not really necessary as long as your cooling system is in A1 condition.)
Step 17
Put in fresh coolant with correct water/coolant ratio 33% - 50%. Double check all plugs/wires/bolts are re attached and correct. Replace fuse relay and battery.
Step 18
If you are satisfied everything is correct and back together start engine. Check for leaks in coolant system. and around manifold gaskets. After a week replace oil and coolant to remove any foreign objects. Then you are done.
Things you will need:
Engine Oil, Oil flush (approx $35 bucks)
Coolant, coolant flush, new radiator cap (approx $50 bucks as I use genuine Castrol Coolant)
Thermostat, Thermostat Gasket (Ecotec Motor Tridon TTG46) (approx $24 bucks)
New Inlet Manifold Gasket Set, Instant Gasket Sealant RTV or equivalent (approx $140 bucks as I used a lifetime gasket set aluminium one)
A good set of Screw Drivers and Ratchets, a rubber mallet, Fuel Disconnect Tool
Turps/Petrol, Razor Blade tool
MONEY SAVED
I would guess this job would cost 4 hours labour in a mechanics shop, the current going rate is about $100 bucks an hour. Plus your guaranteed a mechanic would be using cheap coolant, oils, the cheap plastic gasket set, not quality products like I have used. So assuming this the mechanics price would be around $500 - $600 bucks, could be wrong though maybe someone can assist with this. So easily I've saved $200 - $300 bucks doing it myself and now I've got more of an understanding of my engine from doing it.
Step 1
Turn engine on. Open bonnet and remove Fuel Relay Fuse from Fuse boxs in engine bay. Check your diagram to confirm which fuse it is. Wait until engine stalls. Attempt to crank at least 10 times to try and reduce fuel in fuel lines and injector fuel rails.
Step 2
Remove Battery. This is to prevent any unintended sparks from hitting a Positive lead in the Engine Bay which could potentially damage components or computer hardware.
Step 3
Time to get dirty. Start by removing the air box and piping to the plenum. Don't forget to remove the Air Box Sensor and the MAF sensor.
Step 4
Remove the Throttle Bracket which is attached by three bolts on the rear. Pry off the throttle cable from the nob with a screw driver or similar. If you have Cruise control there will be a second cable and nob to pry off. (Not %100 percent sure as I don't have Cruise Control).
Step 5
Unbolt the EGR (Only for VT-VY). As I am aware VS does not have a EGR.
Step 6
Remove your Engine belt. Unbolt your alternator. Theres two screws plus a ground screw underneath. Theres also a support bracket which needs to be unscrewed. At the rear is a another ground i think which is surrounded by rubber. Don't forget to unplug the clip at the rear of the alternator. If all bolts remove the alternator should slide up and out of the supporting metal brackets.
Step 7
Ok now is the time to remove the coolant from the system. Undo the bottom radiator hose allowing coolant to come out. Have a tray underneath to catch the coolant to dispose of it. Remember Environment and dispose of coolant correctly. Remove the top radiator hose. Allow as much of the coolant to drain and then remove the thermostat housing by undoing the two bolts. Attached to the bottom of the housing will be the old paper gasket. Scrap this off using a razar or petrol/turps. Remove the thermostat, Discard if you have a new one. If reusing make sure thermostat still works. Test in boiling water. It should open up in Boiling water and close when cold.
Step 8
Unplug all the injectors and fuel rail lines that enter the body on the drivers side using the fuel disconnect tool. Undo all the vacuum lines from the rear of the plenum. Not all of them need to be removed as one or to goes to the fuel lines which you disconnect which can go with the hole plenum when pulled off.
Step 9
Time to remove the Tensior Pulley Assembly. undo bolts underneath. Undo the heater radiator pipes that connect to the metal pipe. Once all bolts undo slowly slide the metal cylinder out from the tensior pulley assembly and remove the whole assembly.
Step 10
Attempt to remove any coolant left in the lower manifold. After this make a quick check around the engine bay making sure no bolts or cables are in the way for when you remove the plenum/lower manifold.
Step 11
Remove the 12 bolts that attach the lower manifold to the engine. When reassembling the Torque range is between 12 - 16 NM which is quite weak. You may notice when undoing these bolts some will be extremely loose.
Step 12
Ok if you have removed everything correctly the whole plenum/TPS/ICA and lower manifold should come free revealing the intake manifold gasket. This is were I could see I had a small leak near cylidner 1 - 3. Also a small leak at the rear of the block.
Step 13
You need to clean the matting surfaces from which the gasket was sitting on. Do so using a razor, turps and or fuel until clean. Do the same on the bottom of the lower manifold. Be careful not to disturb the injector nozzels which poke through. While doing this step cover the engine compartment to prevent foreign objects getting into it. If you suspect anything has fallen in you need to flush your oil and replace the oil ASAP.
Step 14
Once you are satisfied both matting surfaces are clean position the new gaskets. Place RTV Sealant or equivalent in the four corners to provide a seal and stop leaks. Apply librally as it won't hurt as long as you get it in the right place. RTV Sets in 10 minutes so be quick to replace the plenum/lower manifold back on the engine.
Step 15
Bolt up 12 bolts on manifold to 12 - 16 NM Torque and let set for 2 hrs or longer if you have to spare.
Step 16
Reverse of Steps 1 to 12 making sure you set thermostat correctly with new gasket. (I put in a cooler Thermostat the 81 Degrees one, The car runs cooler during highway driving and doesn't heat up as quickly during city stop and go, not really necessary as long as your cooling system is in A1 condition.)
Step 17
Put in fresh coolant with correct water/coolant ratio 33% - 50%. Double check all plugs/wires/bolts are re attached and correct. Replace fuse relay and battery.
Step 18
If you are satisfied everything is correct and back together start engine. Check for leaks in coolant system. and around manifold gaskets. After a week replace oil and coolant to remove any foreign objects. Then you are done.
Attachments
-
 1.jpg179.5 KB · Views: 16,630
 -
 2.jpg171.8 KB · Views: 27,689
 -
 3.jpg210.1 KB · Views: 13,717
 -
 4.jpg296.7 KB · Views: 13,805
 -
 5.jpg173.4 KB · Views: 33,959
 -
 6.jpg169.6 KB · Views: 15,083
 -
 7.jpg194.5 KB · Views: 13,832
 -
 8.jpg206.4 KB · Views: 46,385
 -
 9.jpg162.7 KB · Views: 14,917
 -
 10.jpg145.9 KB · Views: 17,865
 -
 11.jpg216.5 KB · Views: 16,104
 -
 12.jpg171.4 KB · Views: 14,189
 -
 13.jpg166.7 KB · Views: 27,902
 -
 14.jpg190.3 KB · Views: 15,585
 -
 15.jpg186 KB · Views: 17,649
 -
 16.jpg252.9 KB · Views: 20,716
 -
 17.jpg214.5 KB · Views: 23,610
 -
 18.jpg467.5 KB · Views: 36,609
Last edited: