aussieakito
Holden Dealer Master Tech
- Joined
- Apr 10, 2012
- Messages
- 1,133
- Reaction score
- 100
- Points
- 63
- Location
- Melbourne, Victoria
- Website
- forums.justcommodores.com.au
- Members Ride
- Manual VY SS2, 2005 Rolla Sportivo
Hello guys recently did my cluster trim and vents
Heres how to do it
Vents
1. take out the vents, this is actually very easy. Pry them out with a flat head screw driver then simply pull them out.
2. take apart the vent so that you dont spray everything else near the part you want to spray.
-undo the little clips around the front of the vent, a small flat head would come in really handy to push out the clips.
-when the clips are unclipped simply pull the front part away from the back part dividing the 2 parts. When you pull it apart there will be a little thing holding on to the flap that controlls whether or not you want air coming from the vent, you will see what i mean when you do it yourself.
- Now take out the little moving line things that direct the air, they simply just push out
- now to get the little (open close) control thing out just widen the area that its in with your 2 thumbs and push it out from the top.
- more detailed how to take apart here https://forums.justcommodores.com.au/threads/front-air-vents-paint-how-detailed.125846
NOW for the painting
i just picked up some enamel paint and primer from autobarn.. 6 bucks all up
grey primer
silver paint
3. make 100% sure that the vent is clean and has no oils or interior shine on it
4. put the part you want to paint into a shoe box to stop anything flying onto it like dirt and such. (if you're doing this outside like me)
5. very lightly start with the primer, do very light even coats each time. this doesnt take to long as the primer dries in about 3 minutes. i did about 5 coats of primer, if it comes out bubbly or doesnt end up smooth sand it very lightly and re spray.
6. with the silver paint again do very light even coats, i also did 5 coats of silver.
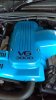
Here is on the third coat of silver

7. once completely dry put the vents back together making sure to put the little control arm back in the correct spot. Also might want to clean the vents while they are off.
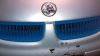
END PRODUCT


CLUSTER TRIM
First off you are going to want to remove the whole dash fascia.
this can be a little tricky but here is a detailed how to. StreetWagons.com • View topic - Removing/Painting Dash Surrounds VX
heres mine with everything out

Ok so now that you are at the cluster there is only 2 screws holding this in.
both screws are located on the top corners of the cluster.
undo these and pull the cluster as far out as it can come while attached to the cable.
undo the clip that holds the plug in at the back and pull out the whole cluster.
Now with the cluster undo the clips that hold the clear plastic in and take it off.
once the clear plastic is off undo the clips that hold the black plastic on and take that off.
When the black plastic is off the trim simply lifts off the cluster.
Take it and get ready to paint it xD
As you probably noticed that cluster trim already had a kind of matte paint on it so primer is not needed.
Simply start painting with the silver paint again lightly even coats.
i did 5 or 6 coats to make sure i got every little bit.
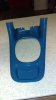
Here is when it was almost done

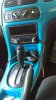
And here it is back in the cluster

Back together in the car

Heres how to do it
Vents
1. take out the vents, this is actually very easy. Pry them out with a flat head screw driver then simply pull them out.
2. take apart the vent so that you dont spray everything else near the part you want to spray.
-undo the little clips around the front of the vent, a small flat head would come in really handy to push out the clips.
-when the clips are unclipped simply pull the front part away from the back part dividing the 2 parts. When you pull it apart there will be a little thing holding on to the flap that controlls whether or not you want air coming from the vent, you will see what i mean when you do it yourself.
- Now take out the little moving line things that direct the air, they simply just push out
- now to get the little (open close) control thing out just widen the area that its in with your 2 thumbs and push it out from the top.
- more detailed how to take apart here https://forums.justcommodores.com.au/threads/front-air-vents-paint-how-detailed.125846
NOW for the painting
i just picked up some enamel paint and primer from autobarn.. 6 bucks all up
grey primer
silver paint
3. make 100% sure that the vent is clean and has no oils or interior shine on it
4. put the part you want to paint into a shoe box to stop anything flying onto it like dirt and such. (if you're doing this outside like me)
5. very lightly start with the primer, do very light even coats each time. this doesnt take to long as the primer dries in about 3 minutes. i did about 5 coats of primer, if it comes out bubbly or doesnt end up smooth sand it very lightly and re spray.
6. with the silver paint again do very light even coats, i also did 5 coats of silver.
Here is on the third coat of silver
7. once completely dry put the vents back together making sure to put the little control arm back in the correct spot. Also might want to clean the vents while they are off.
END PRODUCT
CLUSTER TRIM
First off you are going to want to remove the whole dash fascia.
this can be a little tricky but here is a detailed how to. StreetWagons.com • View topic - Removing/Painting Dash Surrounds VX
heres mine with everything out
Ok so now that you are at the cluster there is only 2 screws holding this in.
both screws are located on the top corners of the cluster.
undo these and pull the cluster as far out as it can come while attached to the cable.
undo the clip that holds the plug in at the back and pull out the whole cluster.
Now with the cluster undo the clips that hold the clear plastic in and take it off.
once the clear plastic is off undo the clips that hold the black plastic on and take that off.
When the black plastic is off the trim simply lifts off the cluster.
Take it and get ready to paint it xD
As you probably noticed that cluster trim already had a kind of matte paint on it so primer is not needed.
Simply start painting with the silver paint again lightly even coats.
i did 5 or 6 coats to make sure i got every little bit.
Here is when it was almost done
And here it is back in the cluster
Back together in the car