PhilMeUp
New Member
- Joined
- Jun 20, 2011
- Messages
- 4
- Reaction score
- 1
- Points
- 3
- Location
- Perth, Western Australia
- Members Ride
- ----------
Despite generally being a Holden fan, I deal with Falcons for a living. My girlfriend (Deb) and I own and drive a taxi each. The industry standard is the Falcon BA/BF/FG series, so that’s what we use (2008 BFIII wagons). Workshop support, mechanical knowledge, parts pricing, etc.
Mine:
Yes, those really are genuine Brembo callipers. Six piston front callipers, four piston rear callipers, DBA5000 two piece front discs, DBA4000 rear discs, Goodridge braided lines, Hawk Performance ceramic pads and Super Dot 4 brake fluid. The car stops when I tell it to.
Deb also owns a 2001 Commodore VU ute. She doesn’t use it much these days, and is limited on space at her house, so the ute stays at my place. This also means that I don’t have to tie up money in a personal car.
I’m going to recycle a bunch of old photos for this (ie from when I’ve done this job on Falcons). But the general idea is the same.
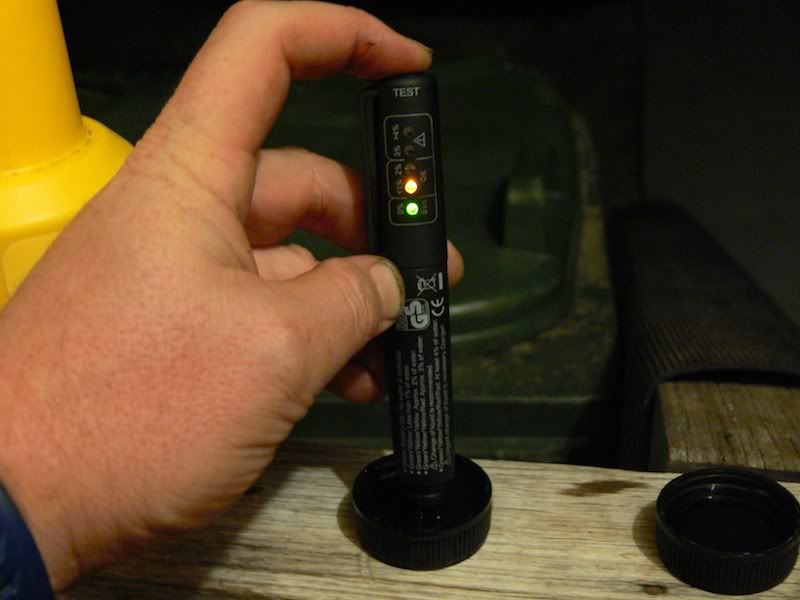
With our taxis, I flush the brake fluid on a regular basis. Brake fluid is hydroscopic, meaning that it absorbs water. This is useful for keeping water off metallic parts in the brake system (which corrode), but means that brake fluid has to be flushed once there is too much moisture in it. I use a Wurth brake fluid tester (that I paid way too much for) to check the brake fluid regularly.

I’ve known for ages that the Commodore was way overdue for a brake fluid flush but just haven’t gotten around to it. Any mechanical inclinations get absorbed by the taxis. I woke up early today and figured that I’ll get it done.
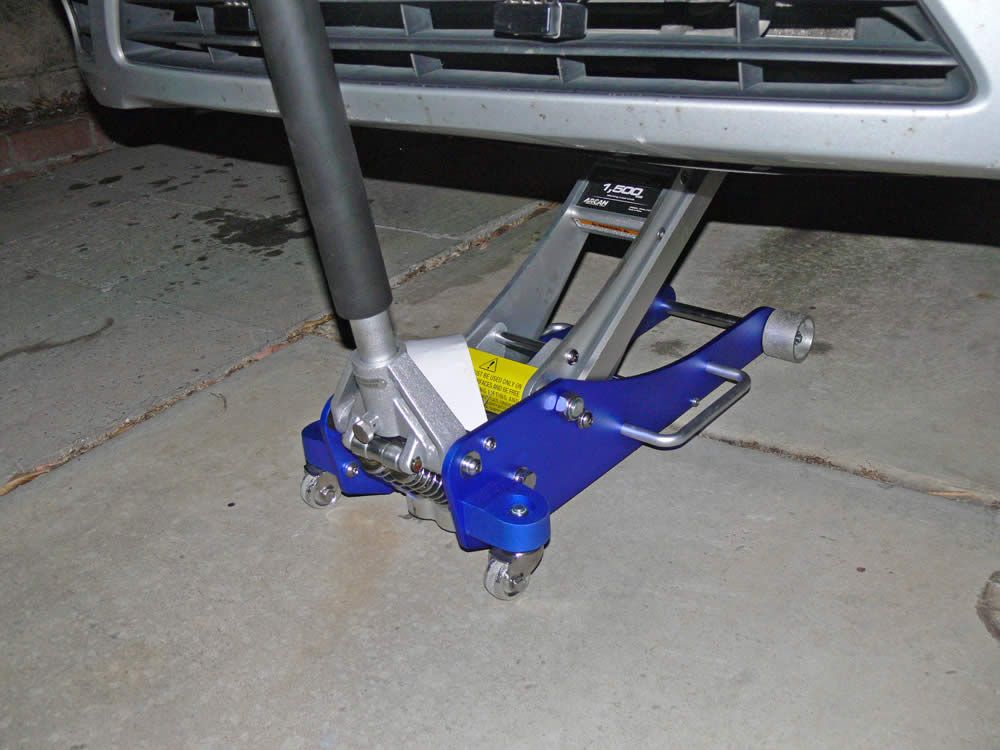
Jacked up the back end with the trolley jack and removed the wheel nuts on both sides. Love the Alcan aluminium racing jack that I bought recently - if you work on cars at home regularly then buy one of these. If you’re in Melbourne then you can buy them from Aldi for $164. Everyone else (me included) can look on eBay or Gumtree, where you’ll find plenty of people that buy them from Aldi and then resell them with a profit margin added on. I paid $250 for mine, including postage to Perth.
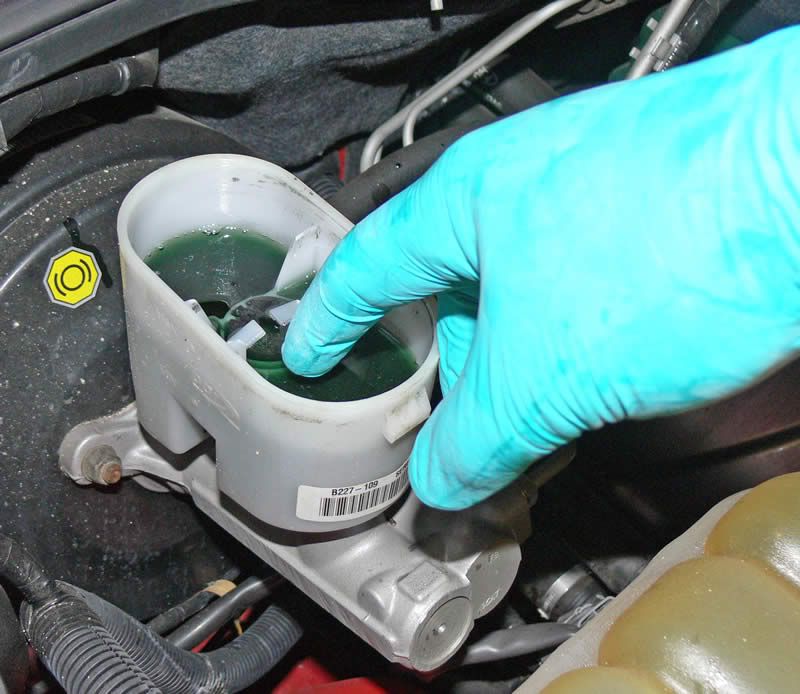
I started by cleaning out the brake fluid reservoir. I use a 60mL syringe to suck up the old brake fluid. You can get these syringes from places that sell stuff for horses.
To clean the reservoir, I poke my finger around the place to get the gunk off the reservoir walls to mix in with the brake fluid. Then I drain it with the syringe. I then pour in new fluid and repeat this process. I waste a bit of brake fluid by doing this two or three times, but I want to know that my brake fluid is as close to 100% clean as possible.
Another photo of the Wurth brake fluid tester:
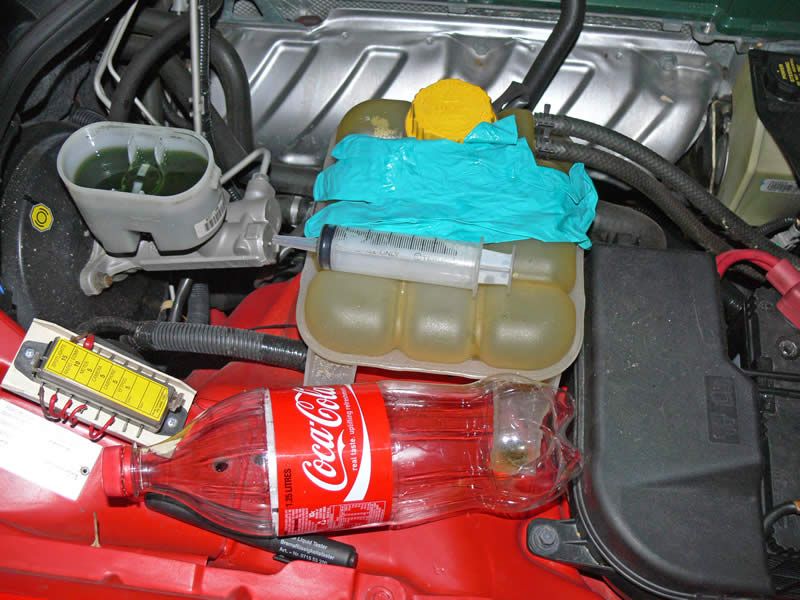
The stuff that I use to clean the reservoir - rubber glove, syringe and bottle to put the old fluid into:
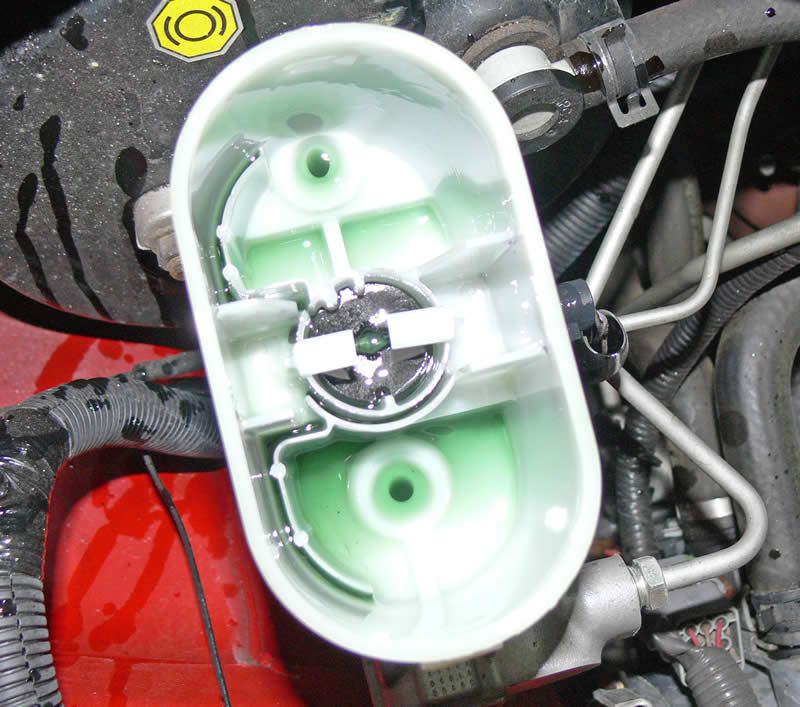
What a fluid reservoir looks like when it’s clean - I’m pretty fussy about this part. If there’s muck in there then it’s only going to feed through the brake lines (defeating the purpose of the whole job), so I make sure that the reservoir is as clean as possible:
Naturally, the reservoir cap needs to be cleaned as well. No point in putting this back on. I use aerosol brake cleaner to clean this.
First problem. The passenger side rear wheel wouldn’t come off. Corrosion has caused it to become stuck to the axle mount. Easy enough - just grab a decent size rubber mallet and belt the living daylights out of it. Whilst thinking about various drunk idiot passengers that pissed me off last weekend (a long weekend here in Perth, so people behaved even worse than normal).
Lots of belting with the rubber mallet achieved nothing (except fantasies of doing the same with drunk passengers). Lots of swear words were said. Gosh. Golly. Darn.
Time to go back inside and hit Google up for a solution. A quick search showed that the common solution was to put the wheel back on with the wheel nuts on hand tight and drive the car back and forth for a few metres. That would have meant putting both back wheels back on and a bit of other stuffing around. I kept looking.
Another suggestion was to pour boiling water over the centre of the wheel. And if that didn’t work, hit the wheel with the kettle. Both of those appealed to me.
Filled the kettle, got the water boiling and poured it over the centre of the wheel (whilst rotating to ensure equal heat everywhere). Shook the wheel with my hands and it came loose. That simple. The kettle lives for another day.
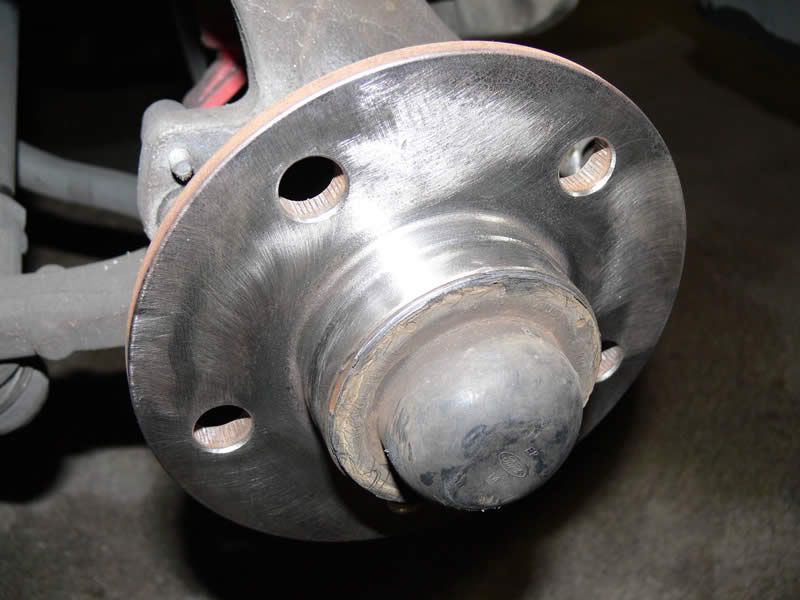
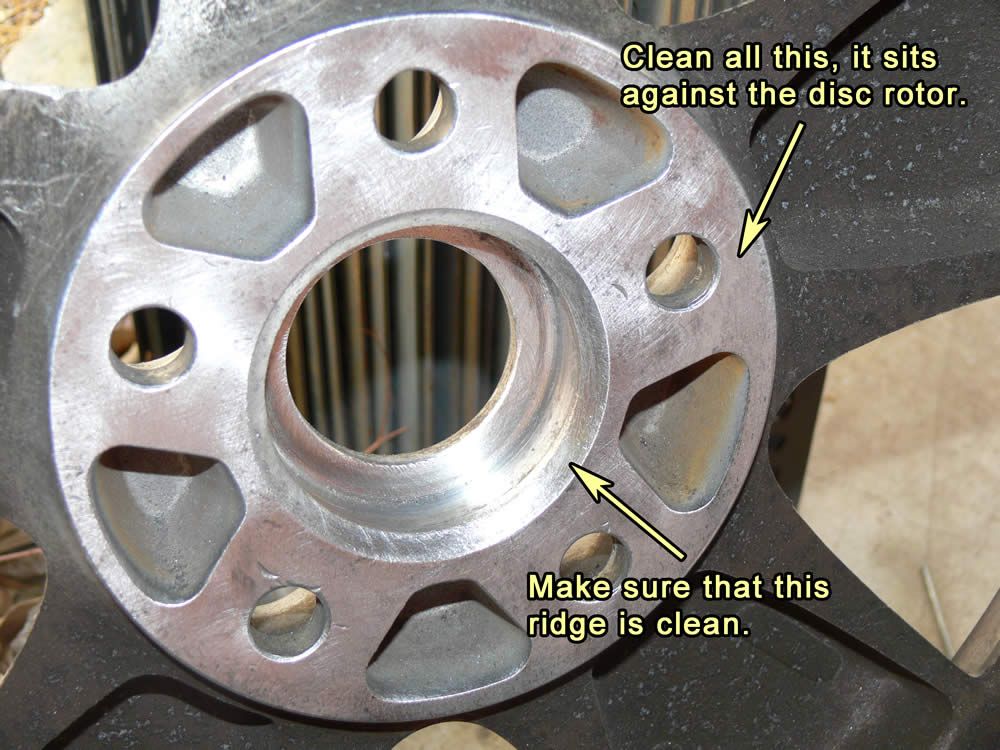
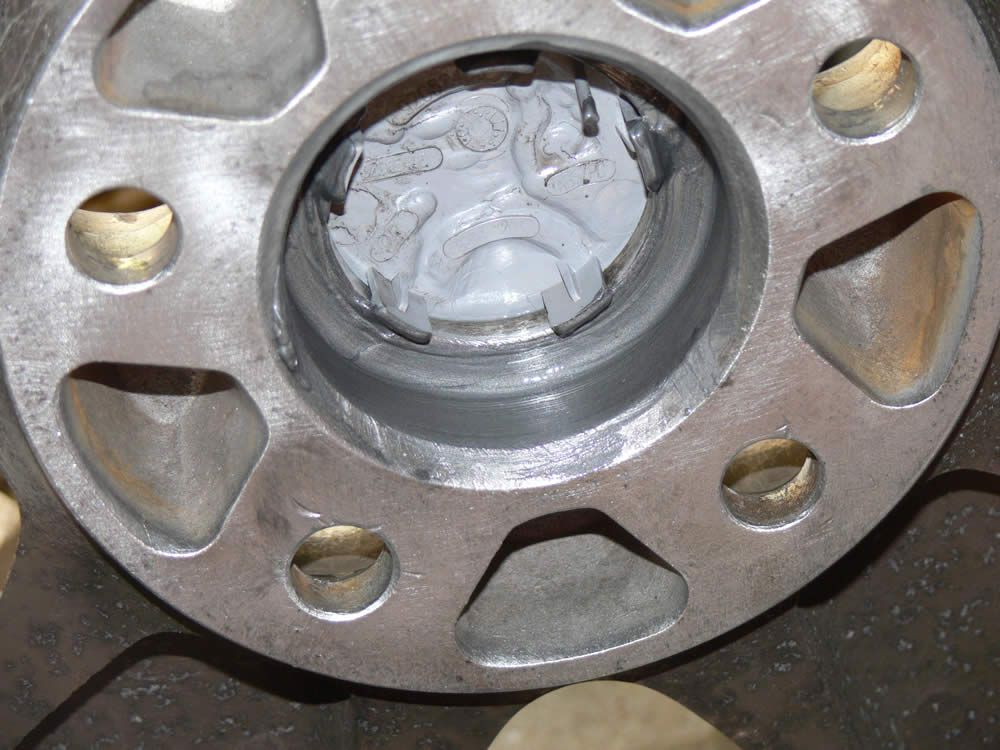
There was plenty of corrosion in the centre of the wheel and on the disc hub:
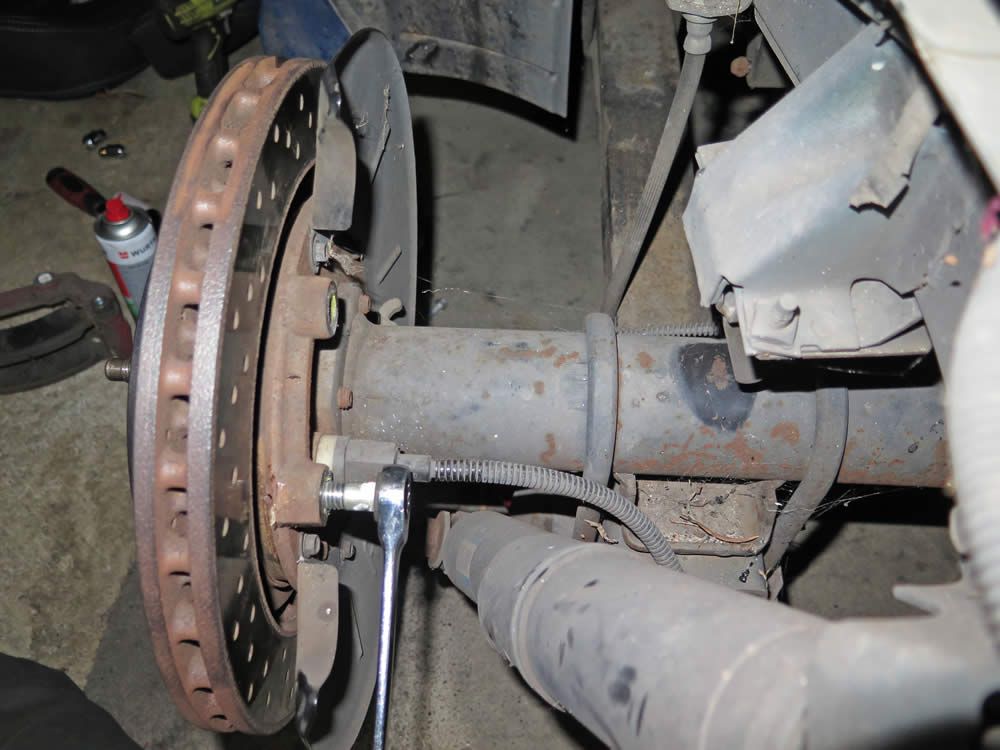
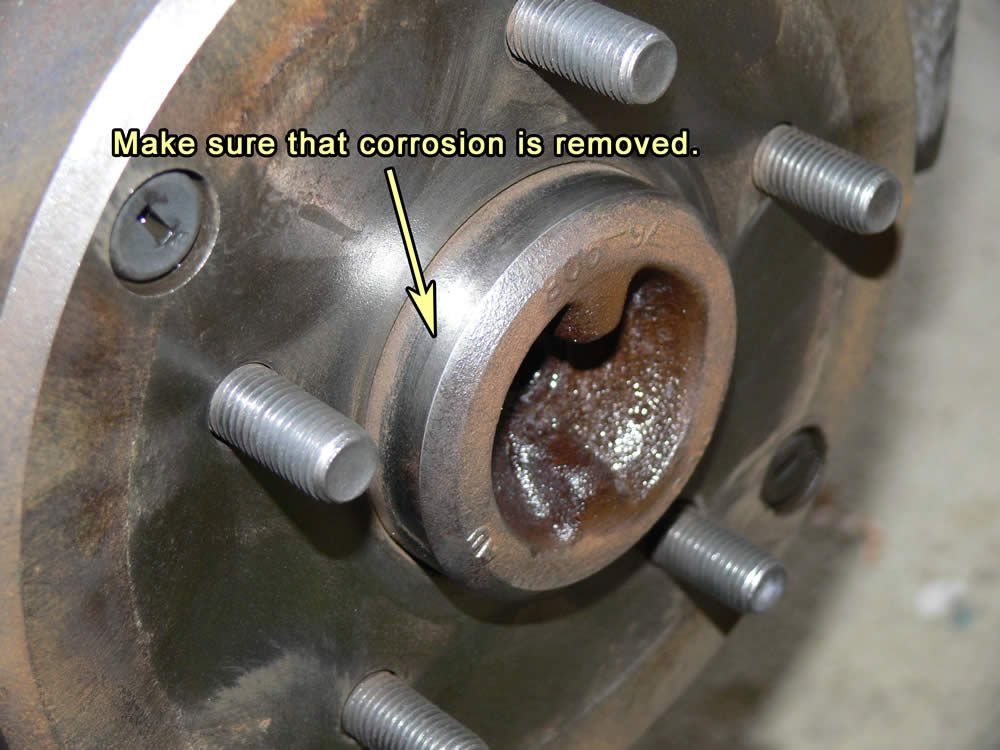
On a side note, this is what I do with the Falcon taxis - I even knock out the wheel studs so that I can get full access to the backing plate:
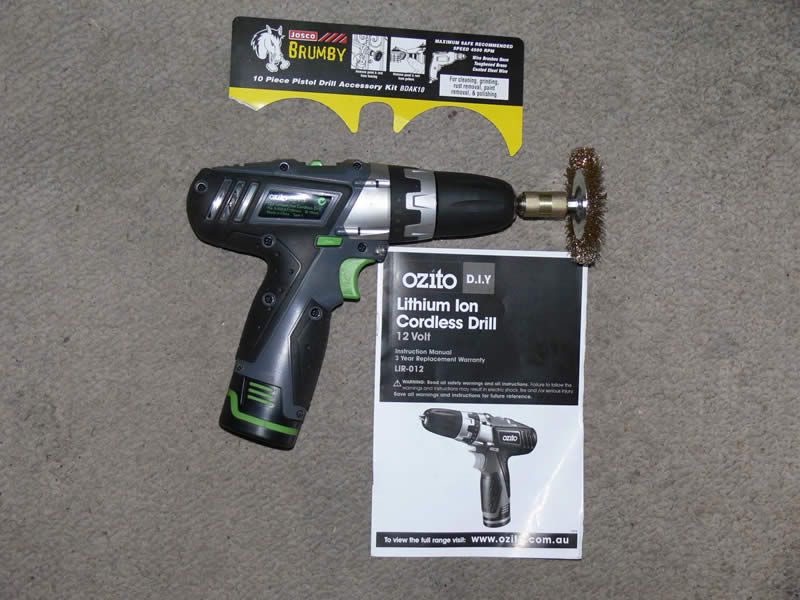
I cleaned this up with the usual cordless drill and wire brushes. I use a Ryobi drill these days, but the wire brush setup is something like this:
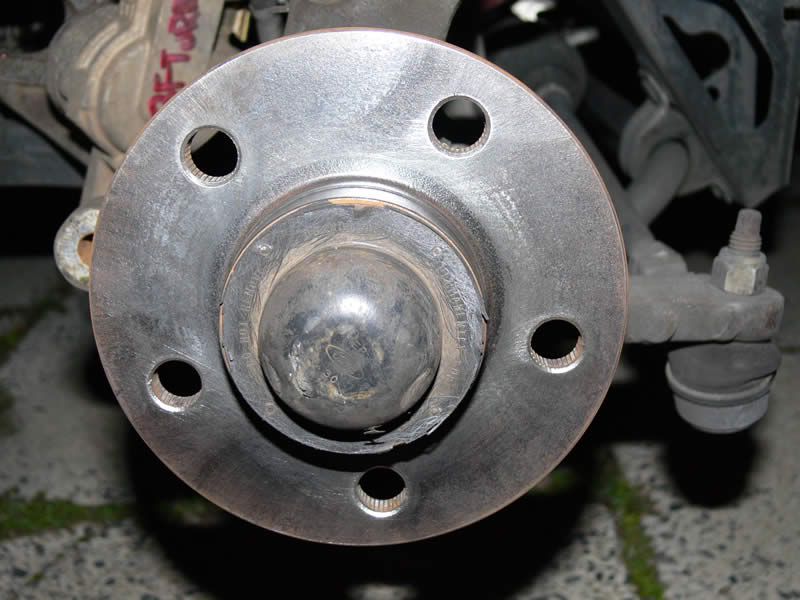
I was fairly thorough with cleaning corrosion off the disc rotor surfaces:
And I did the same with the inside of each each wheel:
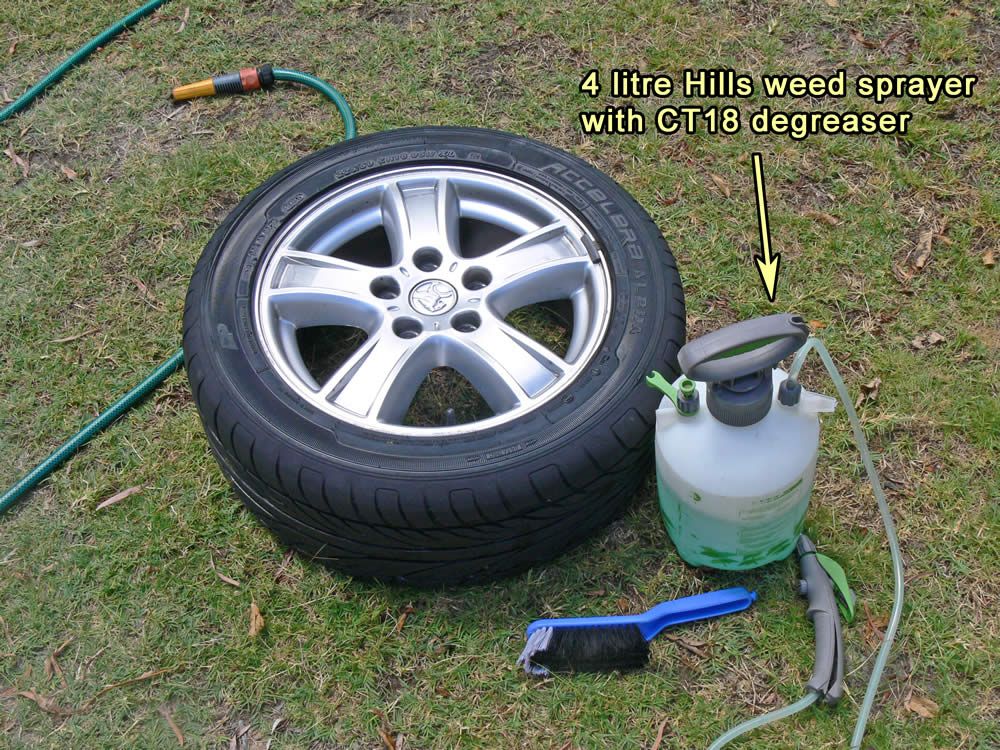
I like to keep the wheels clean on any car that I own (or drive). It’s a lot easier to clean wheels when they are off the car, so I dug out my usual wheel cleaning stuff. I use a Hills 4 litre weed sprayer bottle that I bought from Bunnings. In that I put CT18 cleaner/degreaser. I also bought the brush from Bunnings - that one is around $5.30 on its own (ie without a tray). I buy those brushes because the bristles don’t lose their shape so quickly.
Tip: wash the wheels after you’ve cleaned the insides with a wire brush. Corrosion dust goes everywhere, including on the outer spokes. You’ll only have to rinse them again if you use a drill and wire brush after you’ve washed the wheels.
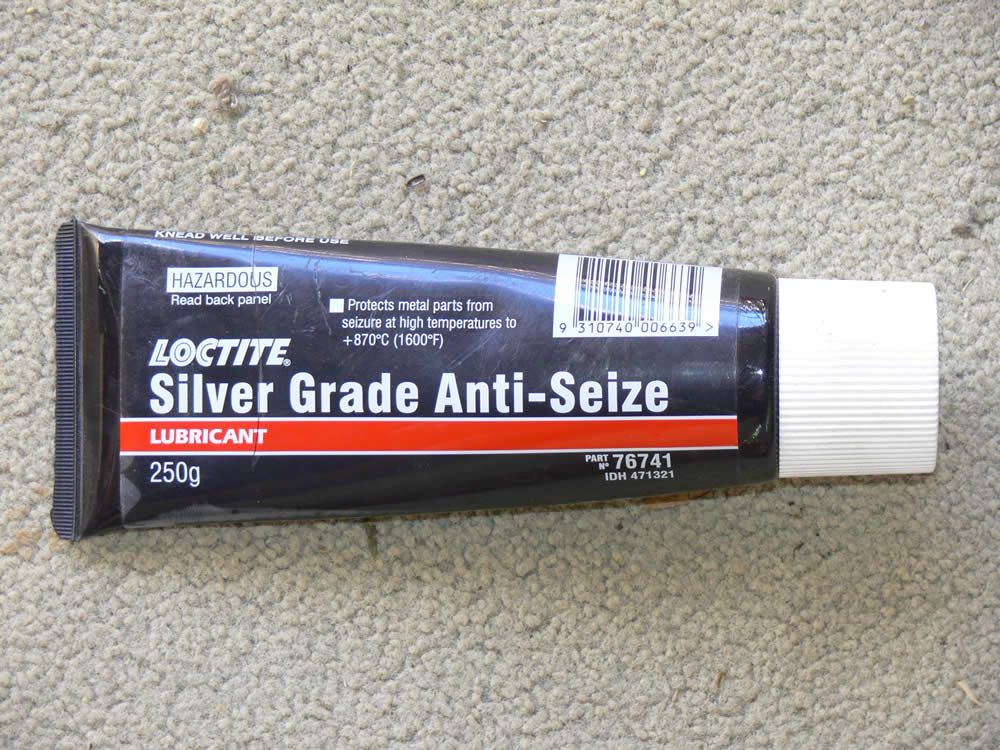
I don’t have copper grease here, so used anti-seize for now. Will pull the wheels off every six months or so in the future just to make sure that they do come off, and that I don’t get stuck with a flat tyre some day and unable to change it.
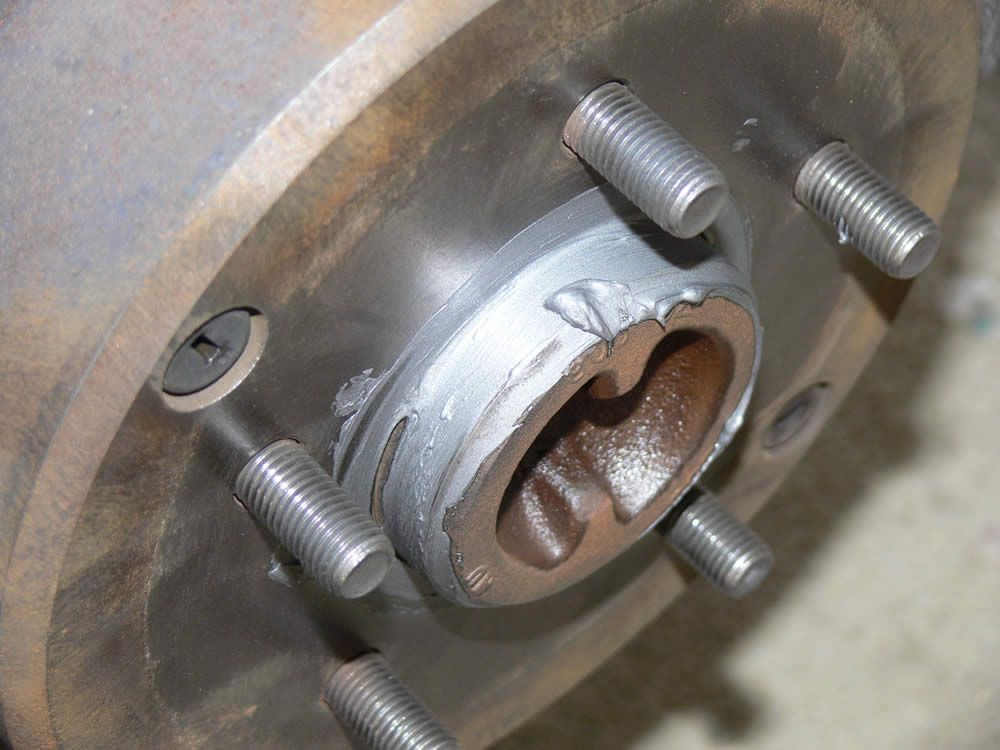
After blowing so much time getting the first wheel off, I made sure that I put plenty of anti-seize on the contact surfaces of the wheels and disc rotors.
Having gotten both of the back wheels off, cleaned up the corrosion and put some anti-seize on there, it was time to do what I actually intended to do. Flush the bloody brake fluid! By now it was about two hours since I started (figuring out the wheel took a while). Just a tad grumpy by now.
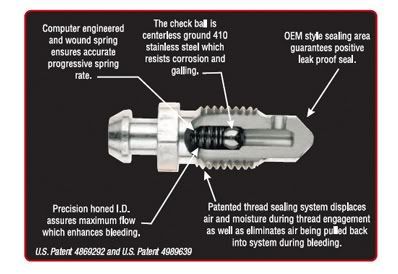
I’m a huge fan of speed bleeders. Love ‘em. What are they? A speed bleeder is a brake calliper bleed nipple that has a small valve inside that means that fluid can only go one way. Normally when you bleed brakes, you apply pressure with the brake pedal, loosen the bleed nipple and then quickly do it back up again before it sucks back in any bad fluid or air.
With a speed bleeder, the ball bearing and spring inside act as a valve, preventing anything from going back in. Instead of having two people do the job (ie one pumping the brake pedal and one loosening and tightening the bleed nipple), one person can do it on their own. Just loosen the nipple and go pump on the brake pedal as many times as you like. You just have to keep an eye on the fluid reservoir and make sure that it doesn’t run dry.
I removed the first brake nipple, put a speed bleeder in and tightened it up. Brake fluid was still dripping out of the bleeder. Must be some dirt or something stuck in there. Remove bleeder, make sure the threads are clean and put it back in. Still leaking. Pulled it back out and compared it to the standard Commodore bleeder. The Commodore one is longer. Oh dear.
Despite both Commodore and Falcon brakes being made here in Australia by the same company (PBR), they use different length brake nipples. Same diameter and thread, but different lengths.
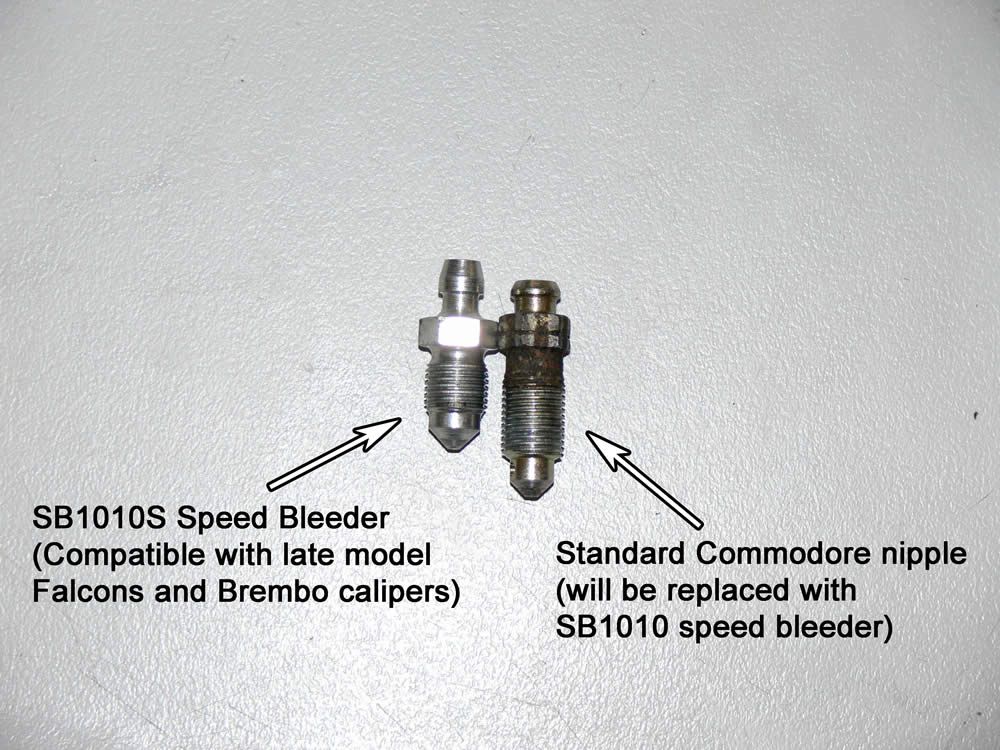
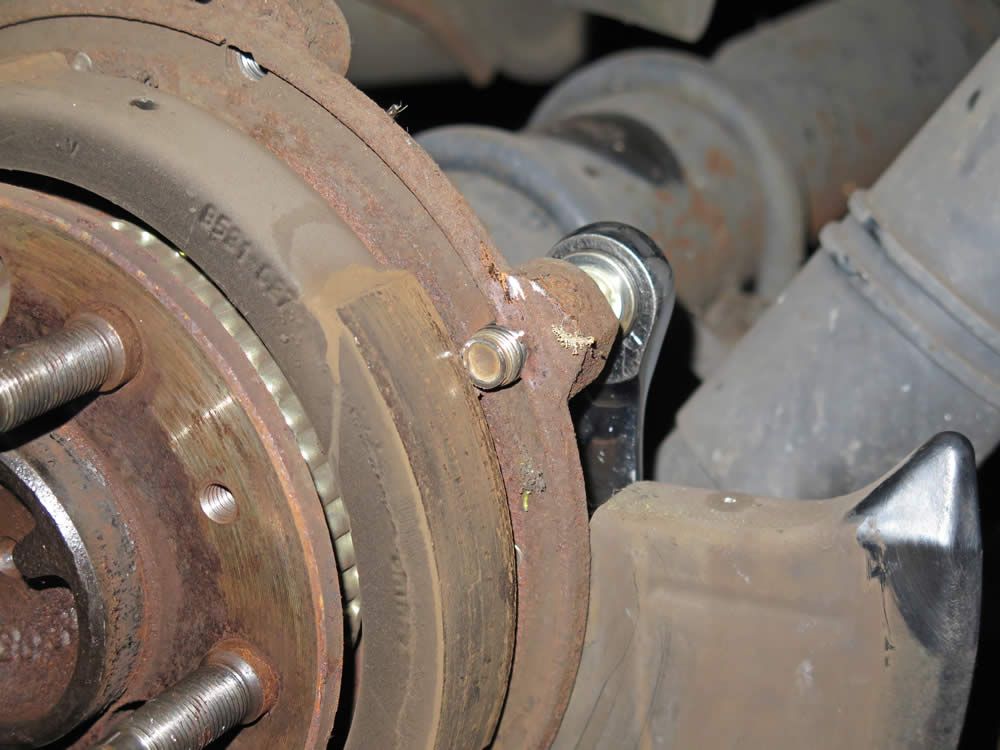
Here’s a photo showing the nipples from a Brembo calliper, a speed bleeder and a standard Falcon brake nipple:

A quick measure showed that the Falcon-compatible ones are roughly 29mm long and the Commodore ones are 33mm long. It’s amazing what a difference 4mm can make. This also meant that I couldn’t do the job on my own - I needed someone to pump the brake pedal when required.
Girlfriend was called and requested/informed that she was required here as soon as possible. Forget about everything else… I’m getting pissed off that a simple job was now taking up hours and still not getting done. Did the same job on my taxi on my own last week in 50 minutes.
Meanwhile, I jumped onto Speedbleeder.com to check on speed bleeder sizing. As expected, the SB1010 speed bleeders are the ones to get (Falcon and Brembo callipers both use the same SB1010S - the S standing for short). I’ve got a bunch of other stuff being ordered via Amazon.com at the moment, so added two pairs to my current order.
Because I normally use speed bleeders when I flush brake fluid, I don’t get to see the dirty stuff being replaced with the clean stuff. I just loosen the speed bleeder nipple, give the brake pedal 15 or so pumps and tighten the speed bleeder back up. With Deb pumping the brake pedal and me loosening the brake nipple manually I was able to see the dark green swampy stuff flow through the clear tube, to be replaced by fresh translucent light green stuff.
By now, I was a tad… miffed. I’m going to guess that the forum server will delete the words that I was actually saying for most of the day, so let’s just settle for “miffed”. Very, very, very, very miffed.
Hence the recycling of Falcon photos instead of taking the time to photograph the Commodore setup.
For bleeding each calliper, I use this hose that I bought from Bunnings:
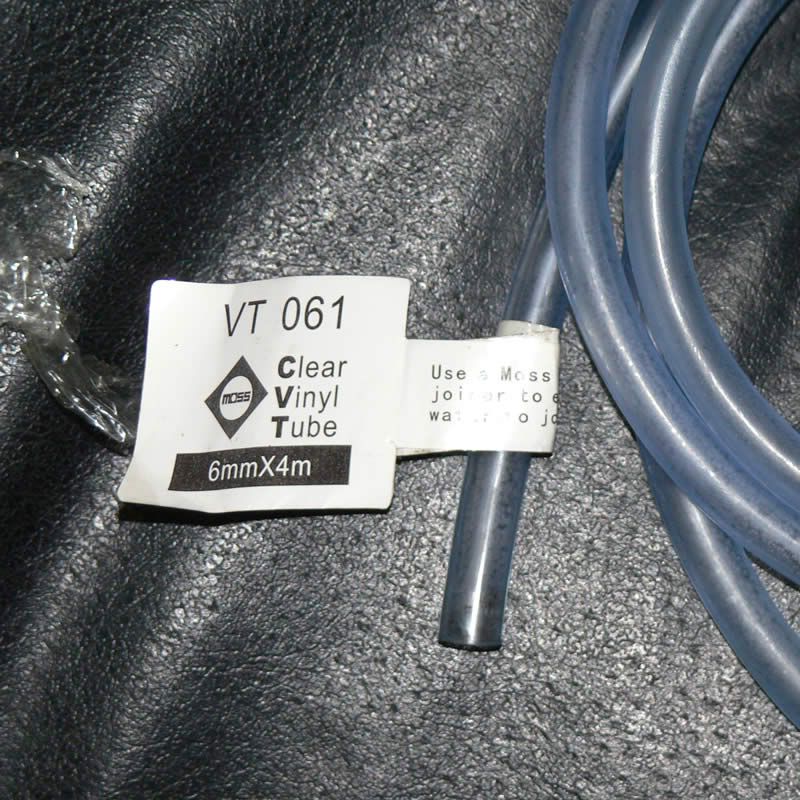
I used to use whatever empty drink bottle that I could around the place, but these days I use one with the lid still on, and a hole drilled in the lid so that the hose just fits. The hose forms a fairly good seal against the lid, so if/when the bottle falls over, brake fluid doesn’t spill everywhere. I can also feed the hose into the bottle to shorten the distance from bleed nipple to bottle when required.
Before I started using a bottle lid:

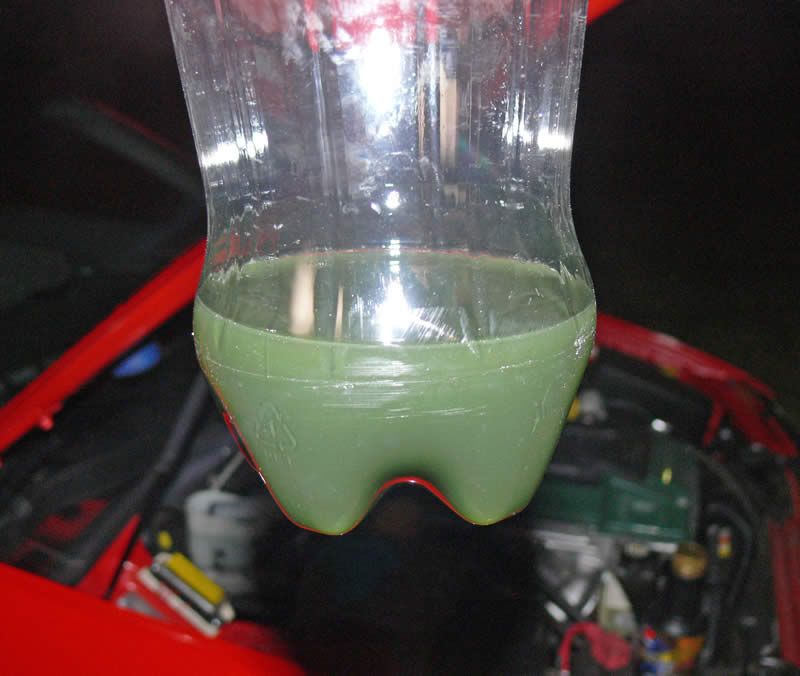
What old brake fluid looks like:
I finally got all four callipers bled. Ended up taking up almost the entire day.
In amongst all this I forgot that I’ve been getting a few squeaking sounds from the brake pads sometimes. I was going to pull the pads out and put some of this stuff on the back of each one to stop the noise. I’ll do it when I redo this in a few weeks. This is what I do with the brake pads that go in the Brembo callipers on my taxi:
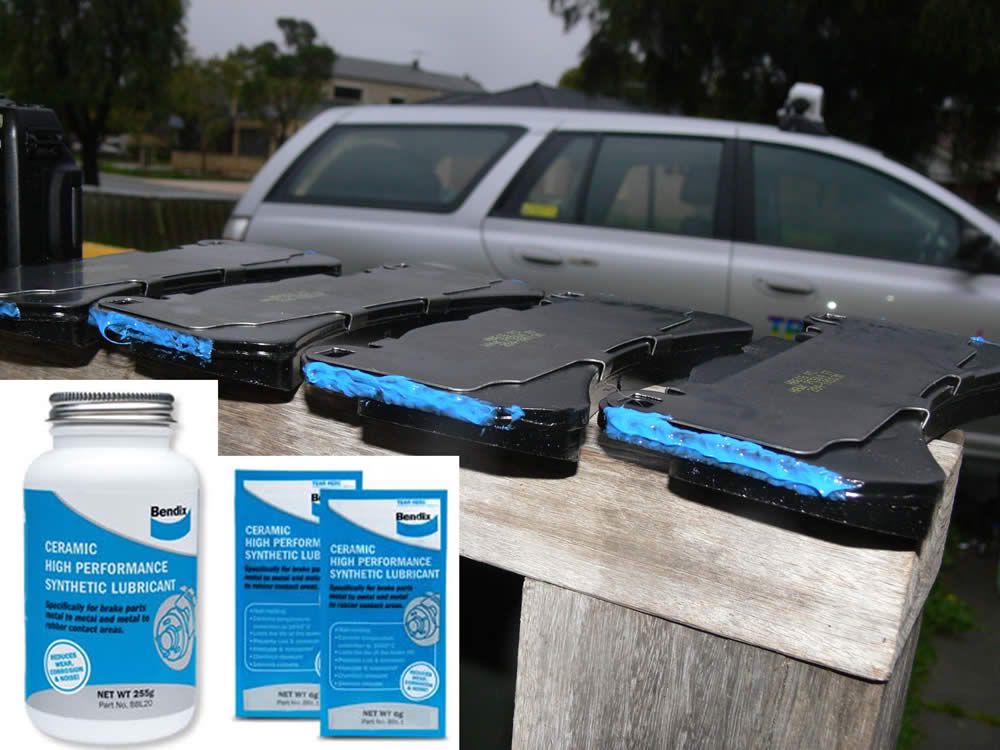
I used to use the CRC stuff, but use the Bendix goo these days. On the above photo, I’ve put the blue Bendix stuff on the outer edges of the pads because that’s how they sit in the Brembo callipers.
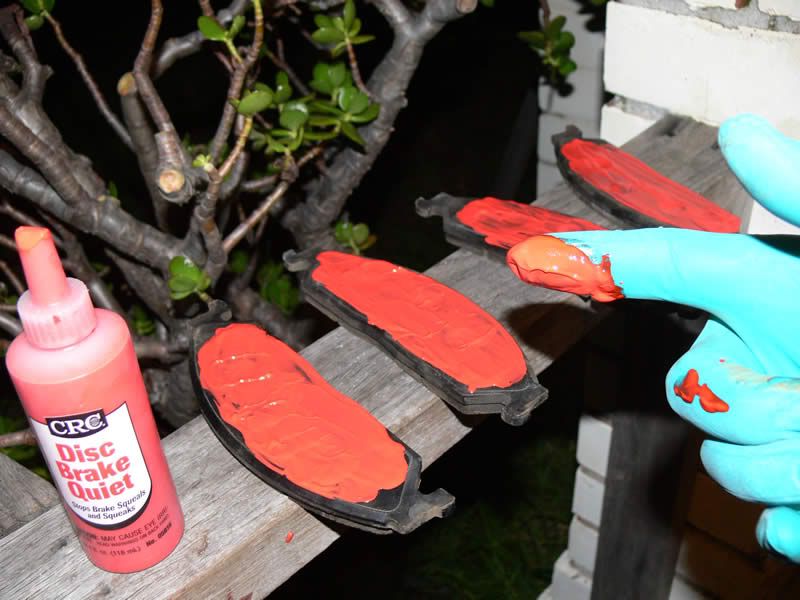
With standard conventional callipers, something like this is suitable (except without wasting so much of the stuff):
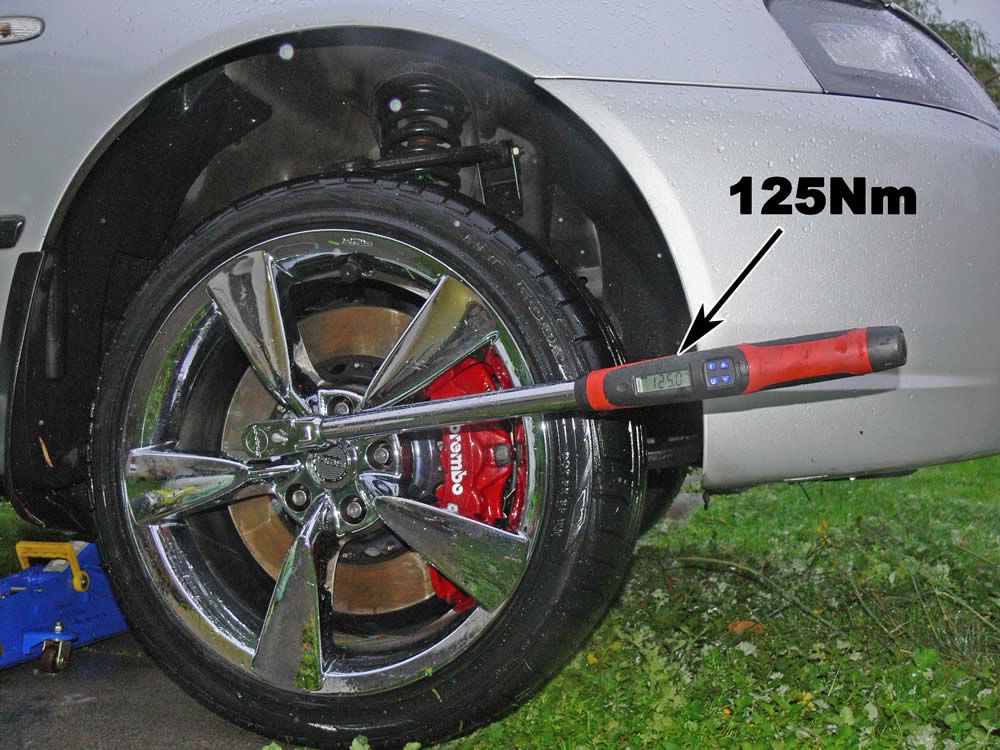
I’m not familiar with Commodore secrets, but I know that with the way that Falcons are designed it’s important to have the right tension on the wheel nuts. Not tight enough and there’s the risk of the wheel nuts coming loose, resulting in the wheel coming off. Too tight and there’s too much pressure on the disc rotor, which can lead to brake disc runout and brake shudder. To make sure that I get it right, I use a Snap-on torque wrench that I bought on eBay US especially for the job.
I didn’t know what torque to use on the Commodore so I tightened the wheel nuts up to the same torque as I do on the Falcons - 125Nm (I’ll look up the Commodore specification later). To ensure that it’s accurate, I let the trolley jack down a bit, so that the tyre is in contact with the ground - just enough to stop the wheel from rotating.
Finally got it all finished and took the ute for a test drive. I was initially disappointed, but then again, I am used to the Brembos on my taxi. A basic PBR setup isn’t going to compete with that. I drove around the suburb for a while, doing stops from various speeds. Although the initial bite wasn’t anywhere near what I get with the Brembo setup, the Commodore was stopping better than it was before. Especially the last 20-30 metres of each stop - that’s when the braking performance was very sub-standard before.
I’m guessing that not many people flush their brake fluid when they’re meant to. It’s actually not a particularly difficult task, especially if you have speed bleeders on the callipers. As mentioned before, I do a complete flush on either of the taxis in under an hour these days.
And doing this on your Commodore also gives you the chance to check that your wheels will actually come off, and clean the relevant surfaces to ensure that they will in the future.
Mine:
Yes, those really are genuine Brembo callipers. Six piston front callipers, four piston rear callipers, DBA5000 two piece front discs, DBA4000 rear discs, Goodridge braided lines, Hawk Performance ceramic pads and Super Dot 4 brake fluid. The car stops when I tell it to.
Deb also owns a 2001 Commodore VU ute. She doesn’t use it much these days, and is limited on space at her house, so the ute stays at my place. This also means that I don’t have to tie up money in a personal car.
I’m going to recycle a bunch of old photos for this (ie from when I’ve done this job on Falcons). But the general idea is the same.
With our taxis, I flush the brake fluid on a regular basis. Brake fluid is hydroscopic, meaning that it absorbs water. This is useful for keeping water off metallic parts in the brake system (which corrode), but means that brake fluid has to be flushed once there is too much moisture in it. I use a Wurth brake fluid tester (that I paid way too much for) to check the brake fluid regularly.
I’ve known for ages that the Commodore was way overdue for a brake fluid flush but just haven’t gotten around to it. Any mechanical inclinations get absorbed by the taxis. I woke up early today and figured that I’ll get it done.
Jacked up the back end with the trolley jack and removed the wheel nuts on both sides. Love the Alcan aluminium racing jack that I bought recently - if you work on cars at home regularly then buy one of these. If you’re in Melbourne then you can buy them from Aldi for $164. Everyone else (me included) can look on eBay or Gumtree, where you’ll find plenty of people that buy them from Aldi and then resell them with a profit margin added on. I paid $250 for mine, including postage to Perth.
I started by cleaning out the brake fluid reservoir. I use a 60mL syringe to suck up the old brake fluid. You can get these syringes from places that sell stuff for horses.
To clean the reservoir, I poke my finger around the place to get the gunk off the reservoir walls to mix in with the brake fluid. Then I drain it with the syringe. I then pour in new fluid and repeat this process. I waste a bit of brake fluid by doing this two or three times, but I want to know that my brake fluid is as close to 100% clean as possible.
Another photo of the Wurth brake fluid tester:
The stuff that I use to clean the reservoir - rubber glove, syringe and bottle to put the old fluid into:
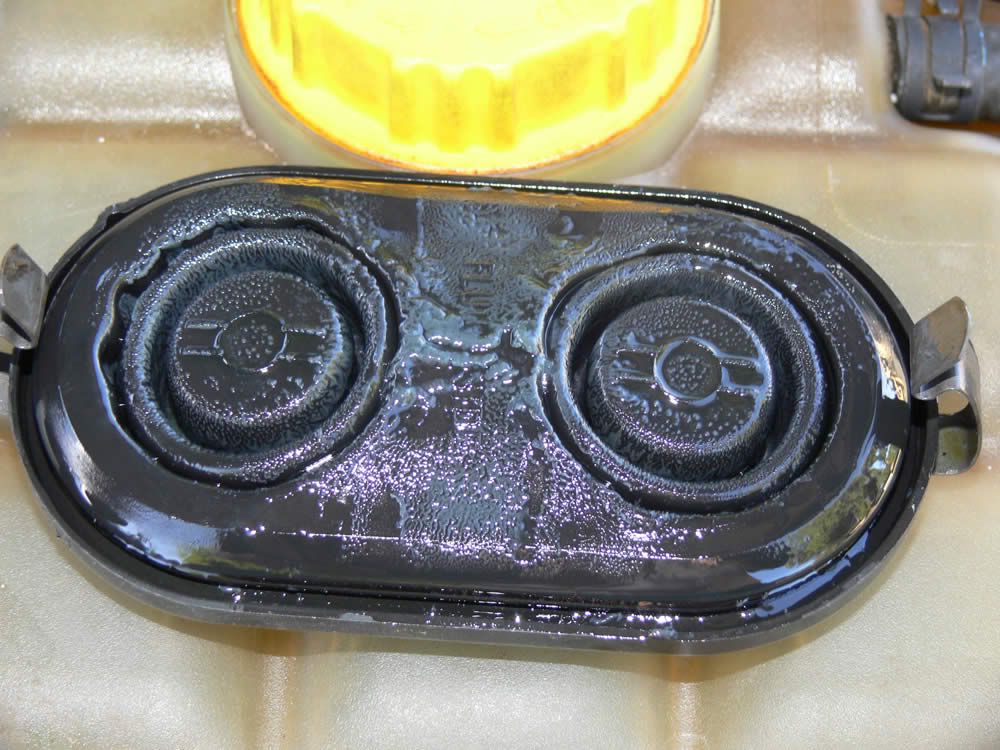
What a fluid reservoir looks like when it’s clean - I’m pretty fussy about this part. If there’s muck in there then it’s only going to feed through the brake lines (defeating the purpose of the whole job), so I make sure that the reservoir is as clean as possible:
Naturally, the reservoir cap needs to be cleaned as well. No point in putting this back on. I use aerosol brake cleaner to clean this.
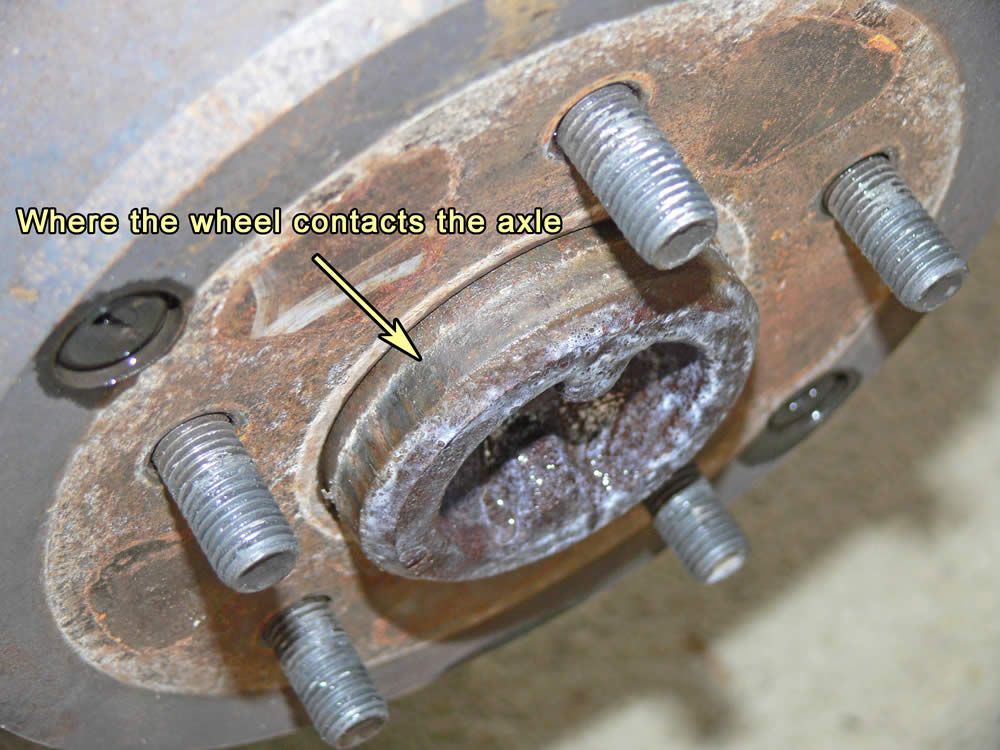
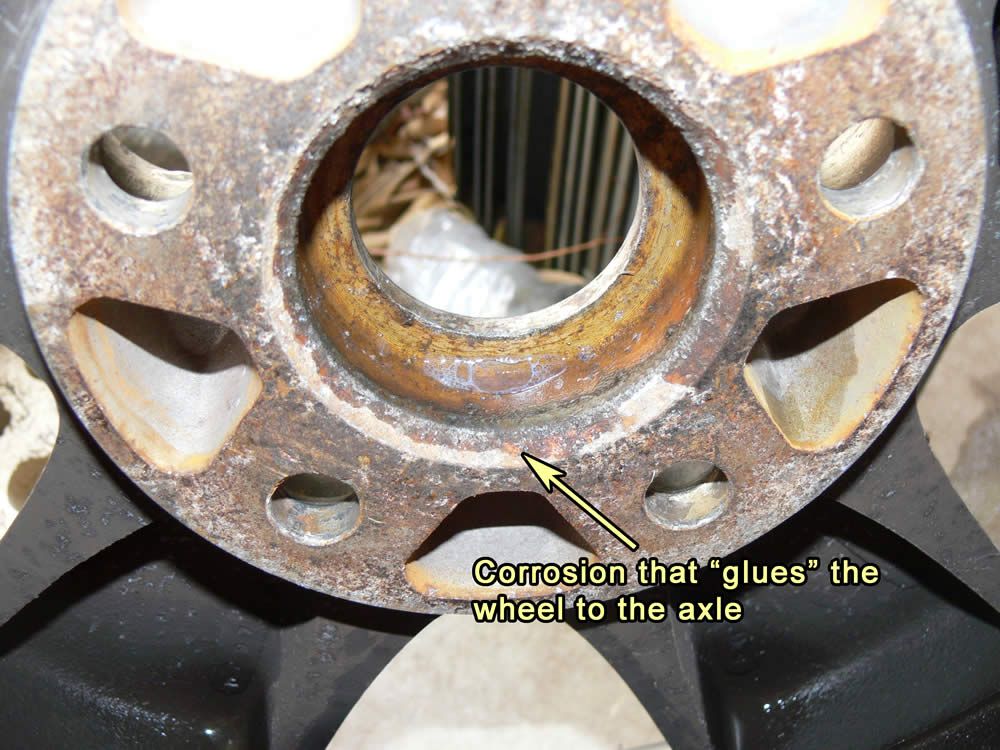
First problem. The passenger side rear wheel wouldn’t come off. Corrosion has caused it to become stuck to the axle mount. Easy enough - just grab a decent size rubber mallet and belt the living daylights out of it. Whilst thinking about various drunk idiot passengers that pissed me off last weekend (a long weekend here in Perth, so people behaved even worse than normal).
Lots of belting with the rubber mallet achieved nothing (except fantasies of doing the same with drunk passengers). Lots of swear words were said. Gosh. Golly. Darn.
Time to go back inside and hit Google up for a solution. A quick search showed that the common solution was to put the wheel back on with the wheel nuts on hand tight and drive the car back and forth for a few metres. That would have meant putting both back wheels back on and a bit of other stuffing around. I kept looking.
Another suggestion was to pour boiling water over the centre of the wheel. And if that didn’t work, hit the wheel with the kettle. Both of those appealed to me.
Filled the kettle, got the water boiling and poured it over the centre of the wheel (whilst rotating to ensure equal heat everywhere). Shook the wheel with my hands and it came loose. That simple. The kettle lives for another day.
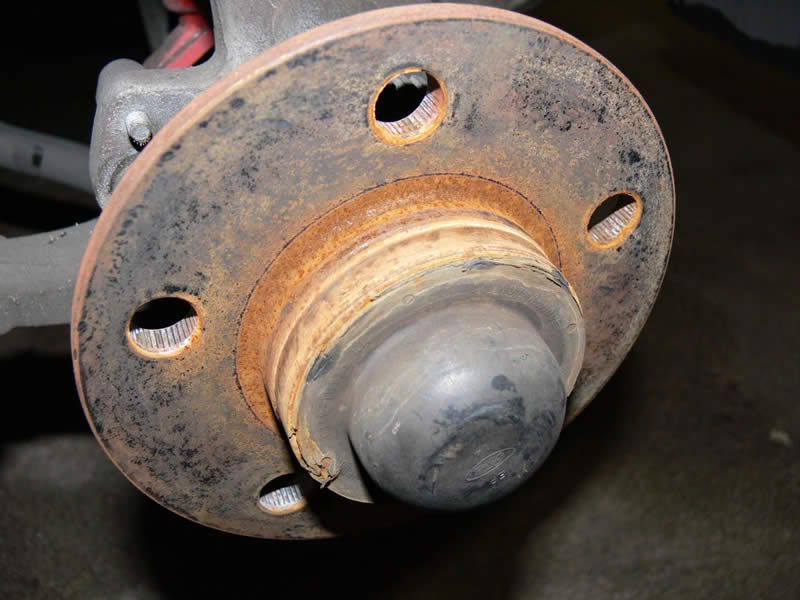
There was plenty of corrosion in the centre of the wheel and on the disc hub:
On a side note, this is what I do with the Falcon taxis - I even knock out the wheel studs so that I can get full access to the backing plate:
I cleaned this up with the usual cordless drill and wire brushes. I use a Ryobi drill these days, but the wire brush setup is something like this:
I was fairly thorough with cleaning corrosion off the disc rotor surfaces:
And I did the same with the inside of each each wheel:
I like to keep the wheels clean on any car that I own (or drive). It’s a lot easier to clean wheels when they are off the car, so I dug out my usual wheel cleaning stuff. I use a Hills 4 litre weed sprayer bottle that I bought from Bunnings. In that I put CT18 cleaner/degreaser. I also bought the brush from Bunnings - that one is around $5.30 on its own (ie without a tray). I buy those brushes because the bristles don’t lose their shape so quickly.
Tip: wash the wheels after you’ve cleaned the insides with a wire brush. Corrosion dust goes everywhere, including on the outer spokes. You’ll only have to rinse them again if you use a drill and wire brush after you’ve washed the wheels.
I don’t have copper grease here, so used anti-seize for now. Will pull the wheels off every six months or so in the future just to make sure that they do come off, and that I don’t get stuck with a flat tyre some day and unable to change it.
After blowing so much time getting the first wheel off, I made sure that I put plenty of anti-seize on the contact surfaces of the wheels and disc rotors.
Having gotten both of the back wheels off, cleaned up the corrosion and put some anti-seize on there, it was time to do what I actually intended to do. Flush the bloody brake fluid! By now it was about two hours since I started (figuring out the wheel took a while). Just a tad grumpy by now.
I’m a huge fan of speed bleeders. Love ‘em. What are they? A speed bleeder is a brake calliper bleed nipple that has a small valve inside that means that fluid can only go one way. Normally when you bleed brakes, you apply pressure with the brake pedal, loosen the bleed nipple and then quickly do it back up again before it sucks back in any bad fluid or air.
With a speed bleeder, the ball bearing and spring inside act as a valve, preventing anything from going back in. Instead of having two people do the job (ie one pumping the brake pedal and one loosening and tightening the bleed nipple), one person can do it on their own. Just loosen the nipple and go pump on the brake pedal as many times as you like. You just have to keep an eye on the fluid reservoir and make sure that it doesn’t run dry.
I removed the first brake nipple, put a speed bleeder in and tightened it up. Brake fluid was still dripping out of the bleeder. Must be some dirt or something stuck in there. Remove bleeder, make sure the threads are clean and put it back in. Still leaking. Pulled it back out and compared it to the standard Commodore bleeder. The Commodore one is longer. Oh dear.
Despite both Commodore and Falcon brakes being made here in Australia by the same company (PBR), they use different length brake nipples. Same diameter and thread, but different lengths.
Here’s a photo showing the nipples from a Brembo calliper, a speed bleeder and a standard Falcon brake nipple:
A quick measure showed that the Falcon-compatible ones are roughly 29mm long and the Commodore ones are 33mm long. It’s amazing what a difference 4mm can make. This also meant that I couldn’t do the job on my own - I needed someone to pump the brake pedal when required.
Girlfriend was called and requested/informed that she was required here as soon as possible. Forget about everything else… I’m getting pissed off that a simple job was now taking up hours and still not getting done. Did the same job on my taxi on my own last week in 50 minutes.
Meanwhile, I jumped onto Speedbleeder.com to check on speed bleeder sizing. As expected, the SB1010 speed bleeders are the ones to get (Falcon and Brembo callipers both use the same SB1010S - the S standing for short). I’ve got a bunch of other stuff being ordered via Amazon.com at the moment, so added two pairs to my current order.
Because I normally use speed bleeders when I flush brake fluid, I don’t get to see the dirty stuff being replaced with the clean stuff. I just loosen the speed bleeder nipple, give the brake pedal 15 or so pumps and tighten the speed bleeder back up. With Deb pumping the brake pedal and me loosening the brake nipple manually I was able to see the dark green swampy stuff flow through the clear tube, to be replaced by fresh translucent light green stuff.
By now, I was a tad… miffed. I’m going to guess that the forum server will delete the words that I was actually saying for most of the day, so let’s just settle for “miffed”. Very, very, very, very miffed.
Hence the recycling of Falcon photos instead of taking the time to photograph the Commodore setup.
For bleeding each calliper, I use this hose that I bought from Bunnings:
I used to use whatever empty drink bottle that I could around the place, but these days I use one with the lid still on, and a hole drilled in the lid so that the hose just fits. The hose forms a fairly good seal against the lid, so if/when the bottle falls over, brake fluid doesn’t spill everywhere. I can also feed the hose into the bottle to shorten the distance from bleed nipple to bottle when required.
Before I started using a bottle lid:
What old brake fluid looks like:
I finally got all four callipers bled. Ended up taking up almost the entire day.
In amongst all this I forgot that I’ve been getting a few squeaking sounds from the brake pads sometimes. I was going to pull the pads out and put some of this stuff on the back of each one to stop the noise. I’ll do it when I redo this in a few weeks. This is what I do with the brake pads that go in the Brembo callipers on my taxi:
I used to use the CRC stuff, but use the Bendix goo these days. On the above photo, I’ve put the blue Bendix stuff on the outer edges of the pads because that’s how they sit in the Brembo callipers.
With standard conventional callipers, something like this is suitable (except without wasting so much of the stuff):
I’m not familiar with Commodore secrets, but I know that with the way that Falcons are designed it’s important to have the right tension on the wheel nuts. Not tight enough and there’s the risk of the wheel nuts coming loose, resulting in the wheel coming off. Too tight and there’s too much pressure on the disc rotor, which can lead to brake disc runout and brake shudder. To make sure that I get it right, I use a Snap-on torque wrench that I bought on eBay US especially for the job.
I didn’t know what torque to use on the Commodore so I tightened the wheel nuts up to the same torque as I do on the Falcons - 125Nm (I’ll look up the Commodore specification later). To ensure that it’s accurate, I let the trolley jack down a bit, so that the tyre is in contact with the ground - just enough to stop the wheel from rotating.
Finally got it all finished and took the ute for a test drive. I was initially disappointed, but then again, I am used to the Brembos on my taxi. A basic PBR setup isn’t going to compete with that. I drove around the suburb for a while, doing stops from various speeds. Although the initial bite wasn’t anywhere near what I get with the Brembo setup, the Commodore was stopping better than it was before. Especially the last 20-30 metres of each stop - that’s when the braking performance was very sub-standard before.
I’m guessing that not many people flush their brake fluid when they’re meant to. It’s actually not a particularly difficult task, especially if you have speed bleeders on the callipers. As mentioned before, I do a complete flush on either of the taxis in under an hour these days.
And doing this on your Commodore also gives you the chance to check that your wheels will actually come off, and clean the relevant surfaces to ensure that they will in the future.
")