Jxfwsf
Well-Known Member
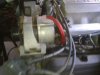
As V6 commodore owners it's almost guaranteed that you have either had or will have this problem.....
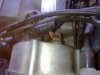
The main charge wire from the alternator burning out..... First problem is it's to small a gauge, it's only designed to carry 70-75 amps, standard alternators are capable of putting out 85 Amps.

You'll need some nice heavy gauge wire, start with 1.5 meters (I ended up with 110 Amp cable, rather overkill in this situation, only choices I had was same gauge 75A or 110A, nothing else on the shelf saturday morning)
2 Eyelets to suit
Some heatshrink that'll fit
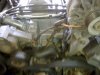
First disconnect the battery(I know it looks like I didn't do this, I have an isolating terminal on the -ve battery post, quick turn of the green bit and battery is dc'd), start ripping the old main charge wire out, It splices near the battery and goes to the main fuse, so you can't just chop it off at both ends.


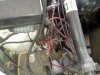
Cut the splice, bin the charge wire, clean up the corroded mess and join the main power wire to the batt terminal.


Dummy fit the new cable and cut to length.


Remove the cable, cut some heatshrink (4-6 pieces, so you have 2-3 layers on each end)
Attach the eyelets, Using a proper crimper is the best way, I went the dodgy way using a vice, center punch, hammer and solder to fill the gaps, I'm not going into detail on the process, If you have never joined this type of connection before then I'm not going to be blamed for any failures, It's main connection needs to be crimped, solder is less conductive than a crimped metal to metal join and is only used to fill the void, relying on solder only will fail when high amperage is involved.
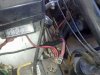
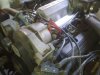
Put it all back together, make sure the thicker charge wire is not pinched/jammed between the alternator and engine and moves freely, you don't want it shorting out in the future from a dodgy install.
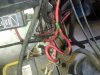
You should have something like this, I'm not fussed about looks, it's only a V6 daily driver in my case, if you want to make the wire slightly longer so you can tuck it away neatly then that's your option.


The main charge wire from the alternator burning out..... First problem is it's to small a gauge, it's only designed to carry 70-75 amps, standard alternators are capable of putting out 85 Amps.
You'll need some nice heavy gauge wire, start with 1.5 meters (I ended up with 110 Amp cable, rather overkill in this situation, only choices I had was same gauge 75A or 110A, nothing else on the shelf saturday morning)
2 Eyelets to suit
Some heatshrink that'll fit
First disconnect the battery(I know it looks like I didn't do this, I have an isolating terminal on the -ve battery post, quick turn of the green bit and battery is dc'd), start ripping the old main charge wire out, It splices near the battery and goes to the main fuse, so you can't just chop it off at both ends.
Cut the splice, bin the charge wire, clean up the corroded mess and join the main power wire to the batt terminal.
Dummy fit the new cable and cut to length.
Remove the cable, cut some heatshrink (4-6 pieces, so you have 2-3 layers on each end)
Attach the eyelets, Using a proper crimper is the best way, I went the dodgy way using a vice, center punch, hammer and solder to fill the gaps, I'm not going into detail on the process, If you have never joined this type of connection before then I'm not going to be blamed for any failures, It's main connection needs to be crimped, solder is less conductive than a crimped metal to metal join and is only used to fill the void, relying on solder only will fail when high amperage is involved.
Put it all back together, make sure the thicker charge wire is not pinched/jammed between the alternator and engine and moves freely, you don't want it shorting out in the future from a dodgy install.
You should have something like this, I'm not fussed about looks, it's only a V6 daily driver in my case, if you want to make the wire slightly longer so you can tuck it away neatly then that's your option.
Attachments


Last edited:
")