lordmuz
New Member
- Joined
- Jan 30, 2007
- Messages
- 34
- Reaction score
- 6
- Points
- 0
- Members Ride
- 2009 MY10 WM Caprice 3.6L V6 SIDI
My commodore, which has now done 260,000kms (which has a factory LPG installed) is starting to idle roughly. When the A/C (or climate control in my case) is activated, it idles fine due to the computer increasing the idle to compensate for the extra load of the A/C compressor. Also, she has a few flat spots on fuel. So, I decided to clean the plenum chamber and throttle body, and replace the fuel injectors.
I was lucky enough to find a complete lower and upper inlet manifold on ebay, brand new, to suit a VX V6 for only $200.00. This was a bargain, and included the lower inlet manifold, thermostat, thermostat housing, fuel rail with fuel pressure regulator, 6 injectors, upper inlet manifold (plenum chamber), throttle body with IAC, and plenum cover. All this for only $200, it was too good to be true. I purchased it and it arrived within the week.
Since I had a collection of new parts, I decided initially to replace the entire plenum chamber, fuel rail, injectors and throttle body assembly. However, it turned out this wasn’t possible. The VX lower inlet manifold casting is slightly different to the VT one, so I decided to keep my old VT plenum chamber (it just needed a very good clean), and to use the new fuel rail, new injectors and new throttle body on the original VT plenum. In case anyone else was interested in doing a similar job, I decided to take photos and share how the job came together.
First, and most important is to make sure there is no dirt around the lower inlet manifold where the fuel injectors are seated. Otherwise, when the plenum chamber and injectors are removed, dirt can fall into the holes where the injectors have been sitting. So, remove the dress cover from the top of the motor, and take a can of degreaser, and squirt heaps all around the plenum chamber, and the fuel injectors. Let it soak for a bit, then hose clean. Do it again if you need to, until it is all very clean. Next, let the engine dry properly before continuing. I left it overnight to be sure.
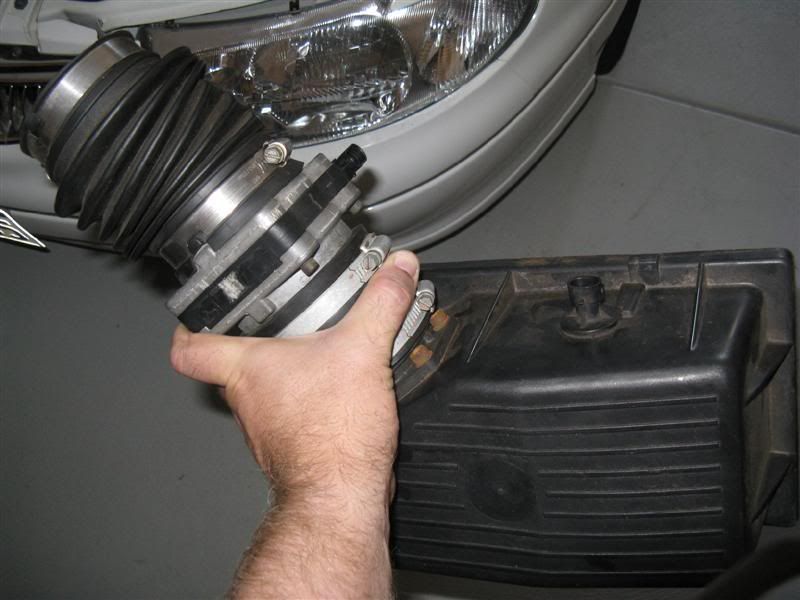
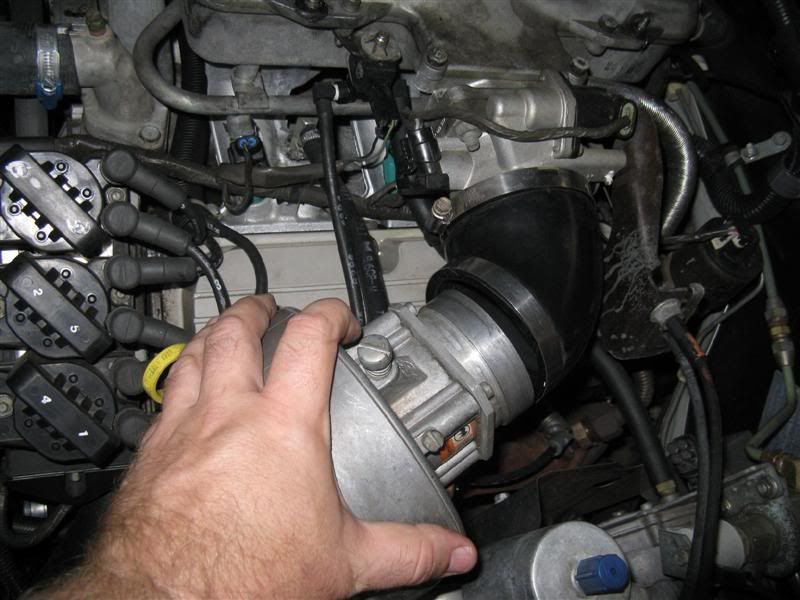
Second step, disconnect the wiring from the IAT (Intake Air Temperature sensor) and the MAF (Mass Air Flow sensor). These sensors are on the air box (IAT) and very close to the air box (MAF) in-line with some ducting heading to the throttle body. In my case, I have factory LPG system installed, so the duct connects to the LPG mixer. Unscrewing the clamp which connects the duct to the mixer allows you to remove this entire section (ie the air box lid and the MAF). This gives you some more room to move inside the engine bay.
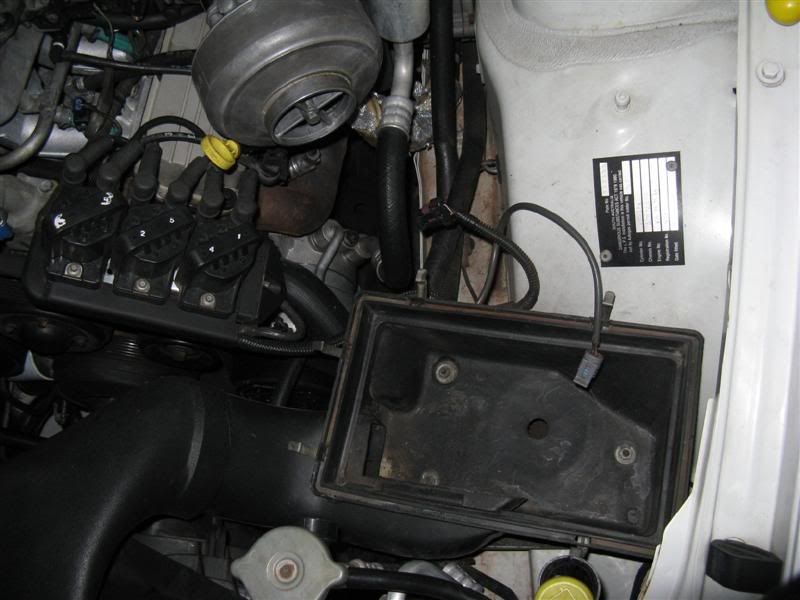
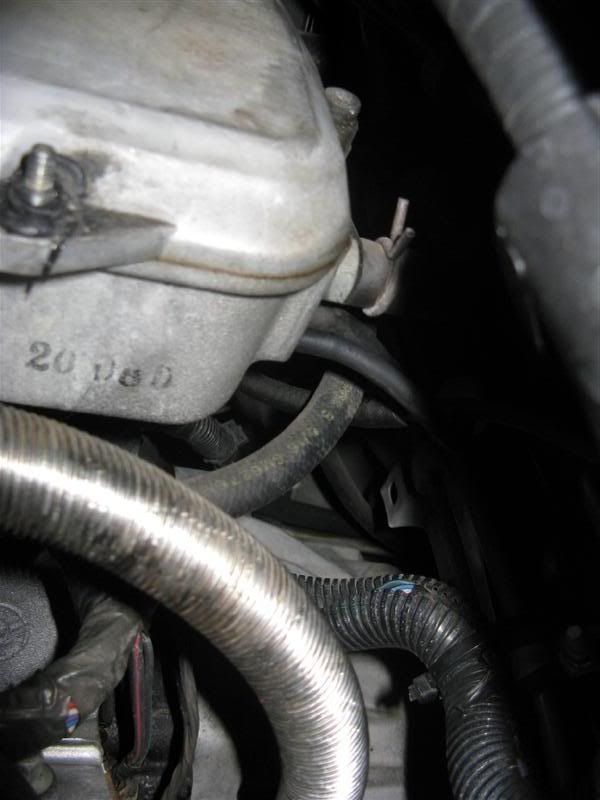
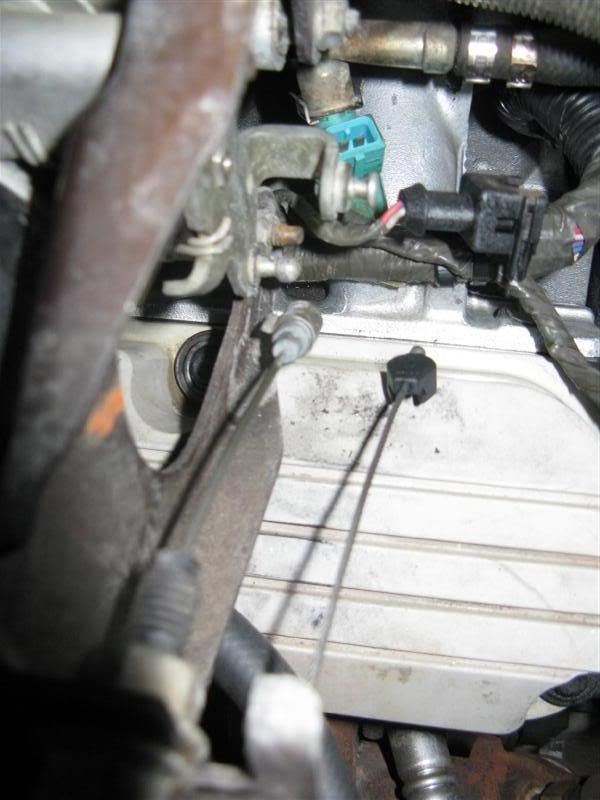
Below is a picture of where the air box lid and MAF were sitting before they were removed.
Next, disconnect the clamp securing the LPG mixer to the throttle body ducting, and disconnect the mixer from the duct. If you don’t have LPG installed, you won’t have to do this.
Next, disconnect the vacuum hoses from the bottom of the throttle body, and the three hoses at the back of the plenum chamber. Make sure you remember where they all go when you need to reassemble!
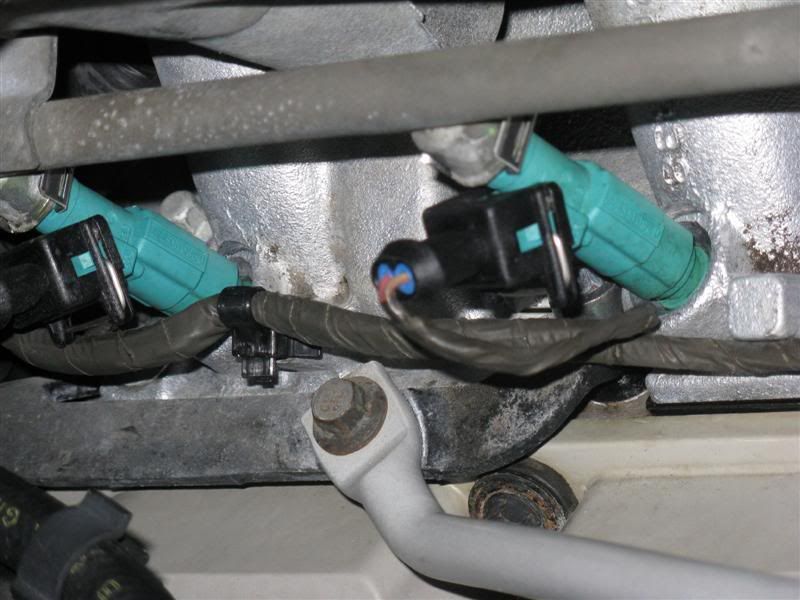
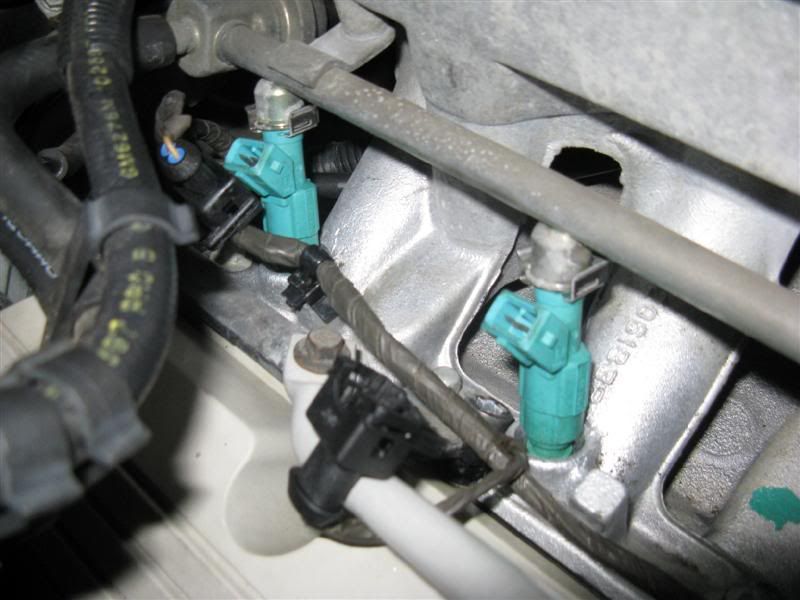
Next, disconnect the wiring connectors from each of the 6 injectors. The silver clips on the injector plugs must be removed first, then the plug comes off easily.
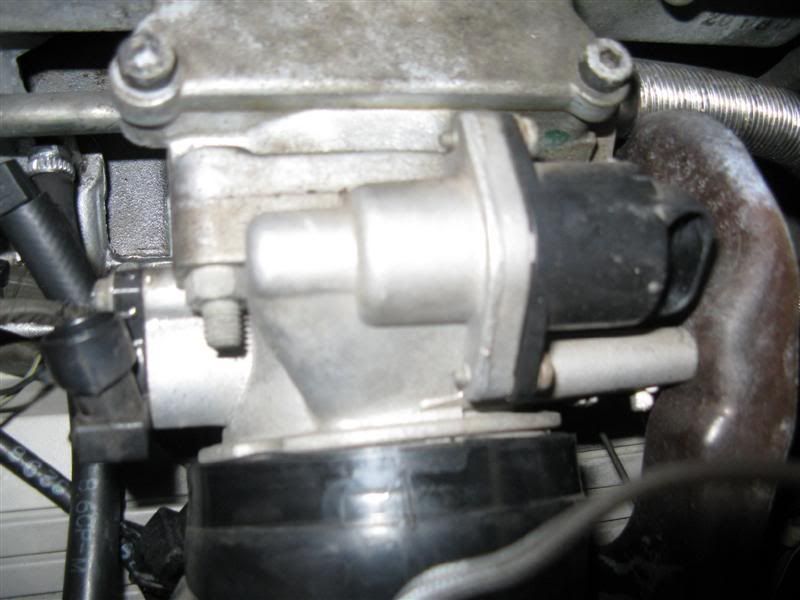
Next, disconnect the wiring from the IAC (Idle Air Control) and the TPS (Throttle Position Sensor). These connectors are located on the top of the throttle body itself.
Now, remove the throttle cable and the cruise control cable from the throttle body connectors. They unclip, you should be able to figure out how they come off when you look at the cables, it is pretty easy. Don’t touch either of the adjusting nuts on the mounting bracket, they must be left as they are.
Now, remove the 3 nuts that hold the throttle cable mounting bracket to the throttle body, and place the entire bracket assembly to one side. There is no need to touch the nuts that secure the throttle cable and cruise control cable to the mounting bracket – simply undo the bracket and remove it as an assembly. Move the bracket and cable assembly clear of the throttle body.
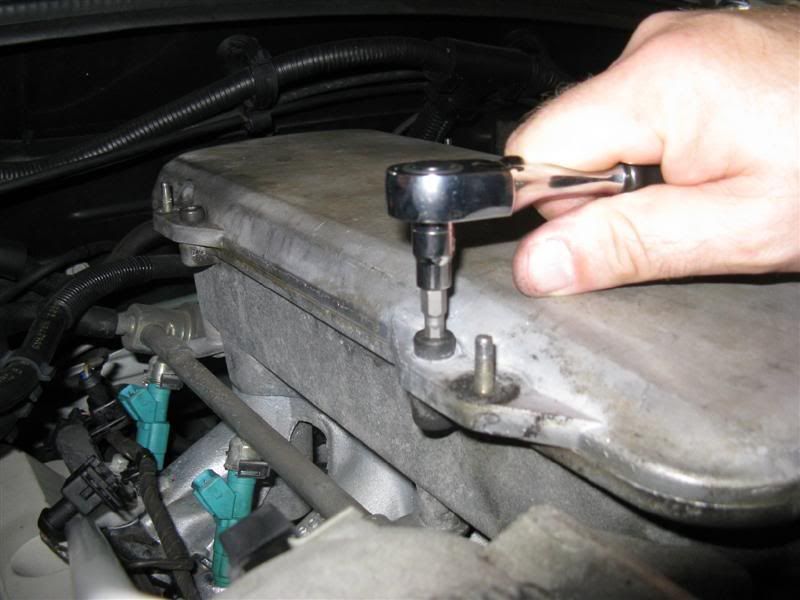
Next, remove the 8 hex bolts from the top of the plenum chamber. You will need a hex bit that can be used in a ratchet, because you will need to be able to re-torque the bolts later. Using an allan key to remove these bolts is a no-no!
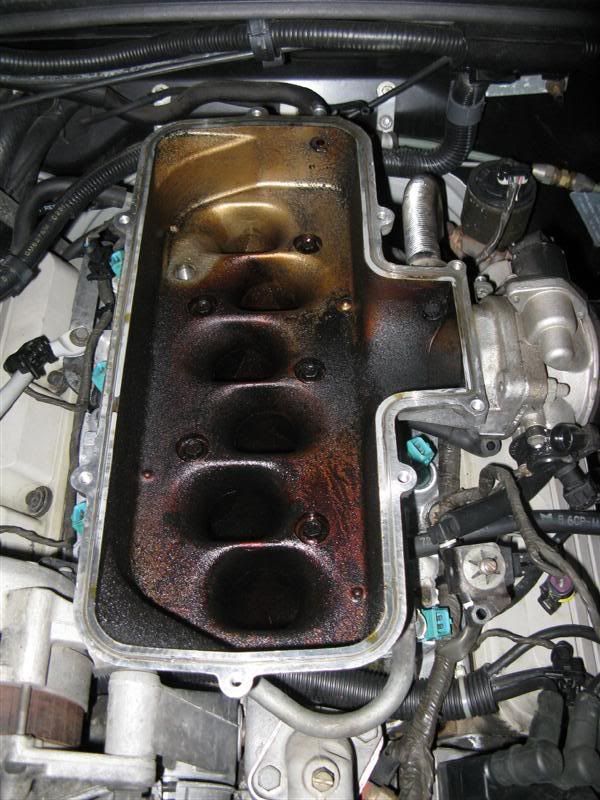
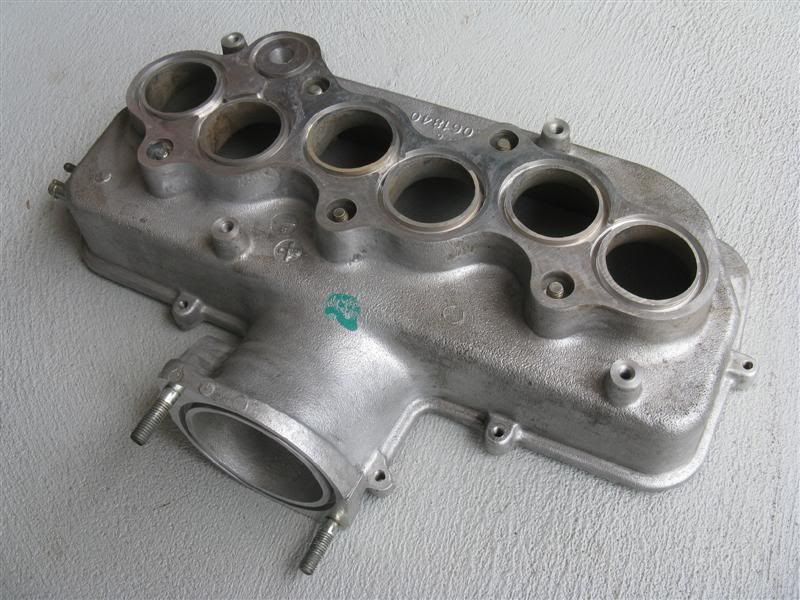
Once you have the plenum cover off, you will be able to see just how dirty the inside of the plenum chamber is! Mine was filthy! The car has 260,000kms on the clock and I doubt the plenum cover has ever been removed. Check the pics below of the cover, and the inside of the plenum chamber. Note the comparison between the new plenum cover and the one that was removed from the car ☺

The plenum chamber itself:
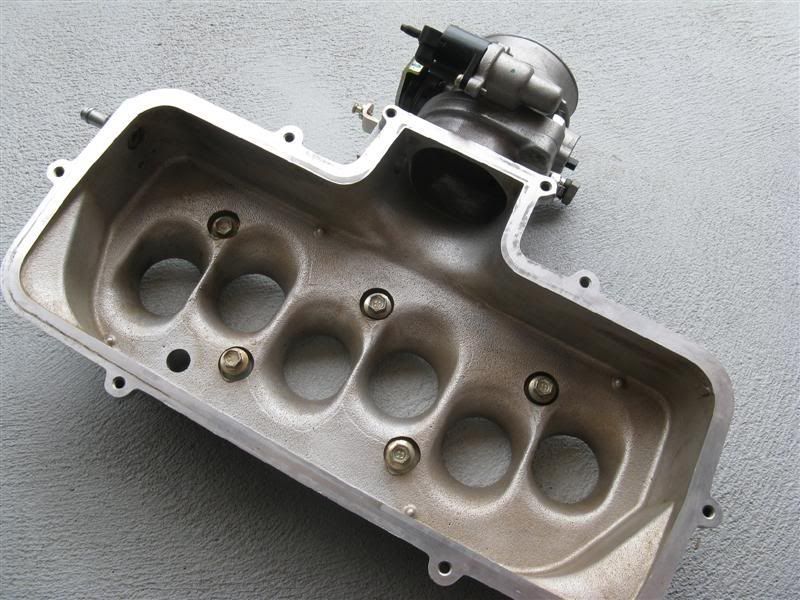
Another photo, this one looking in towards the throttle body:
Compare this to the new VX plenum chamber I managed to buy from ebay:
The next step is to disconnect the fuel rail hoses from the fuel lines at the firewall. There are many suggestions of how to disconnect these hoses, but by far the easiest way to do it is to go to your local supercheap or Repco store and buy the tool to disconnect fuel lines. I bought my tool at Supercheap Auto, and it cost $16.95.
Simply slide the correct size tool over the metal fuel line, and push it up into the quick connect connector. You will then be able to just pull the fuel line off easily. Make sure you mark which fuel line goes where, because it is very important that the fuel lines are reconnected the same way.
Next, losen the 5 bolts inside the plenum chamber. They are designed not to come out, so that they don’t fall inside the air intake at the top of the motor. When all 5 bolts have been undone, you will be able to lift the plenum chamber with the throttle body, fuel rail and injectors off as one assembly.
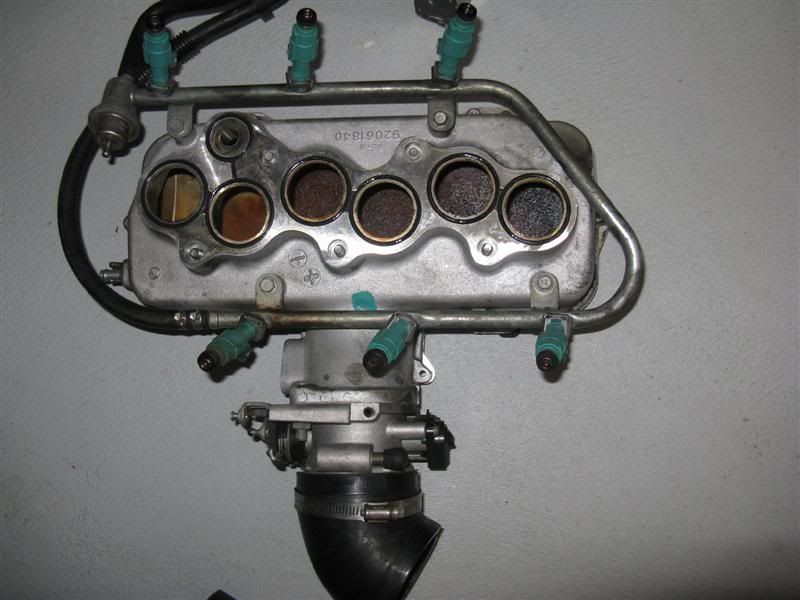
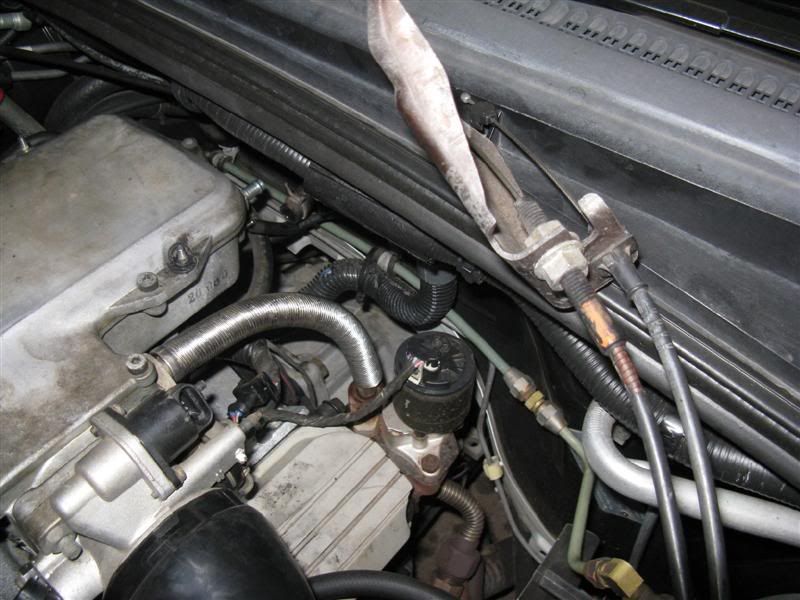
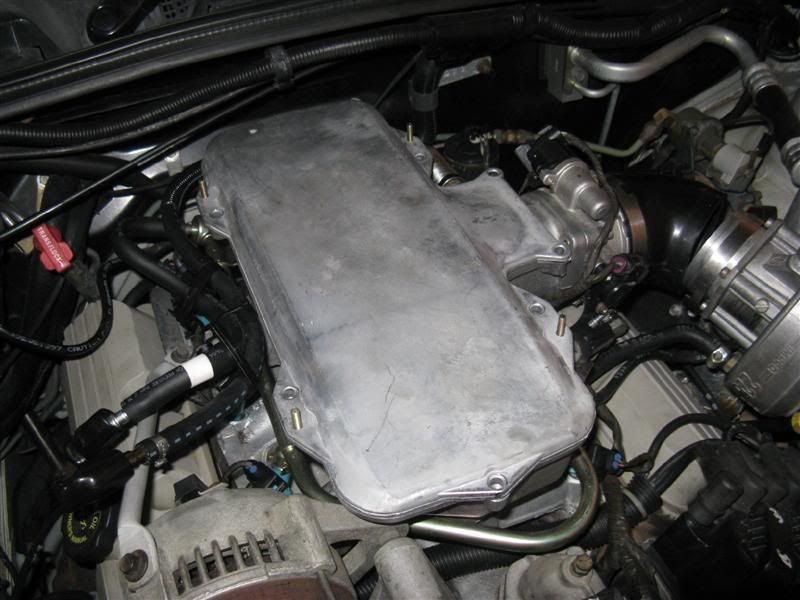
After removing this assembly, the engine bay will look similar to this:
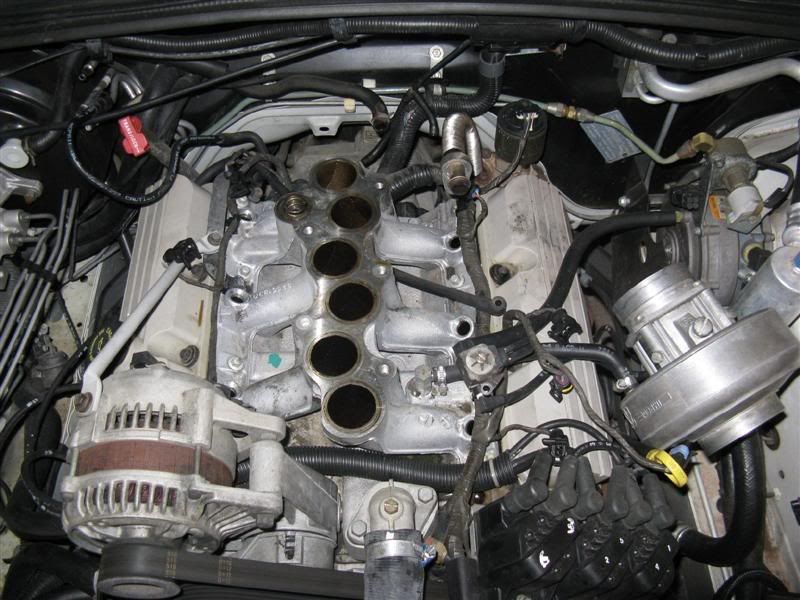
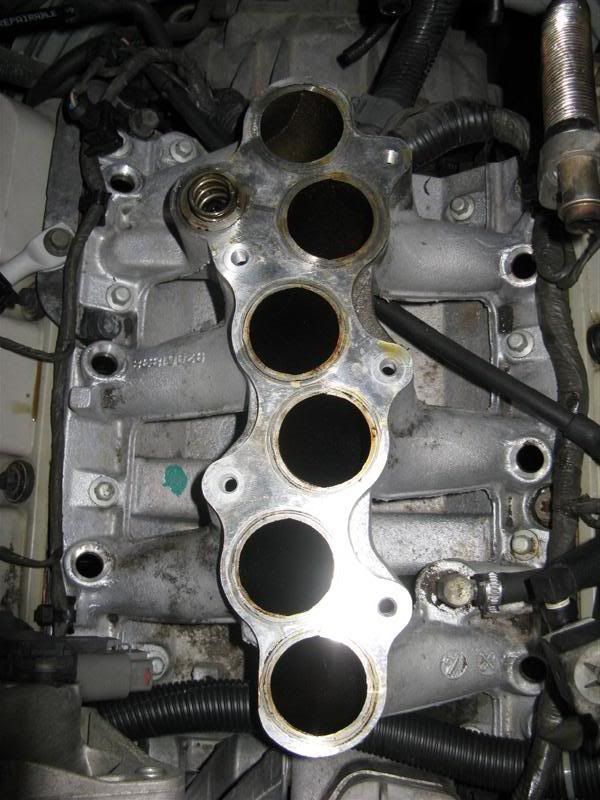
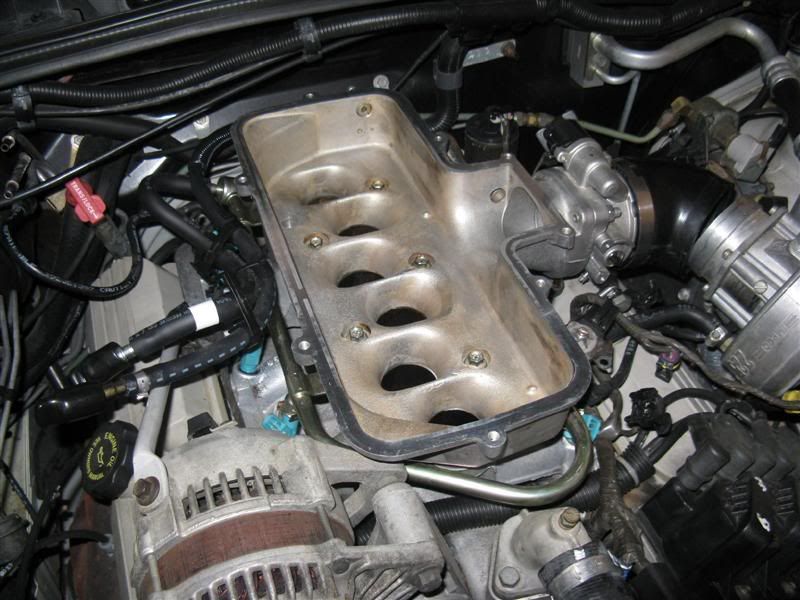
At this point, cut a rectangular piece of cardboard and place it over the top of the lower manifold inlet ports to prevent dirt entering the engine intake. Here is a closer look at the lower manifold:
The next step is to remove the bolts that attach the fuel rail to the plenum chamber, and the two nuts that hold the throttle body to the plenum. Then, use carby cleaner or throttle body cleaner, and THOROUGHLY clean the plenum chamber. When you are finished, your plenum will look something like this:
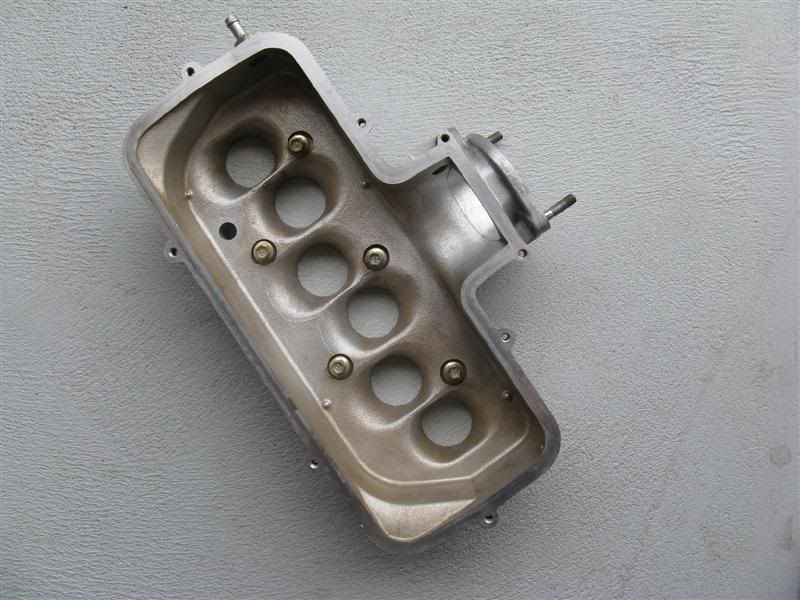
Another photo, from the underside:
Next, clean the throttle body completely with carby cleaner and re-attach the throttle body to the plenum with a new rubber o-ring type gasket seal. I smeared a small amount of PBR rubber grease on the seal to ensure a good fit.
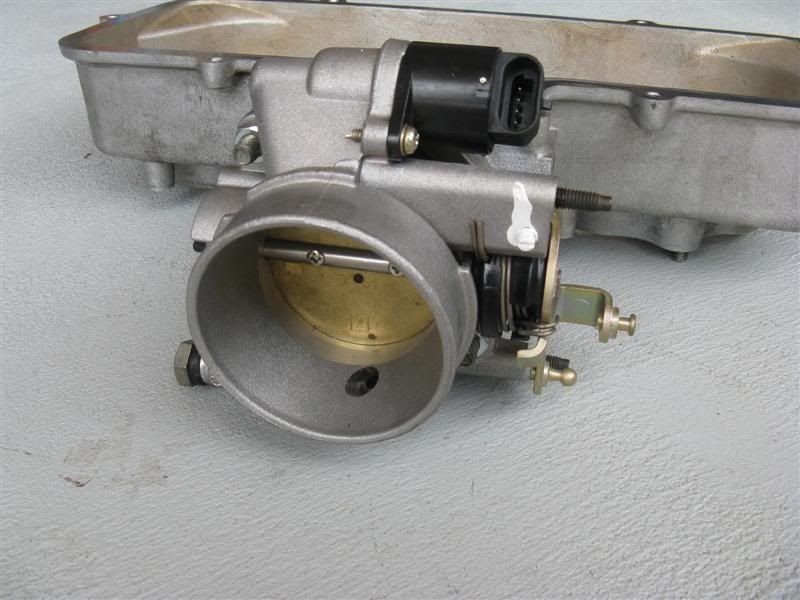
I replaced the throttle body with the one that I bought from ebay, but you will most likely need to clean your existing one unless you have a replacement. Here is another photo, looking inside the throttle body to the butterfly:
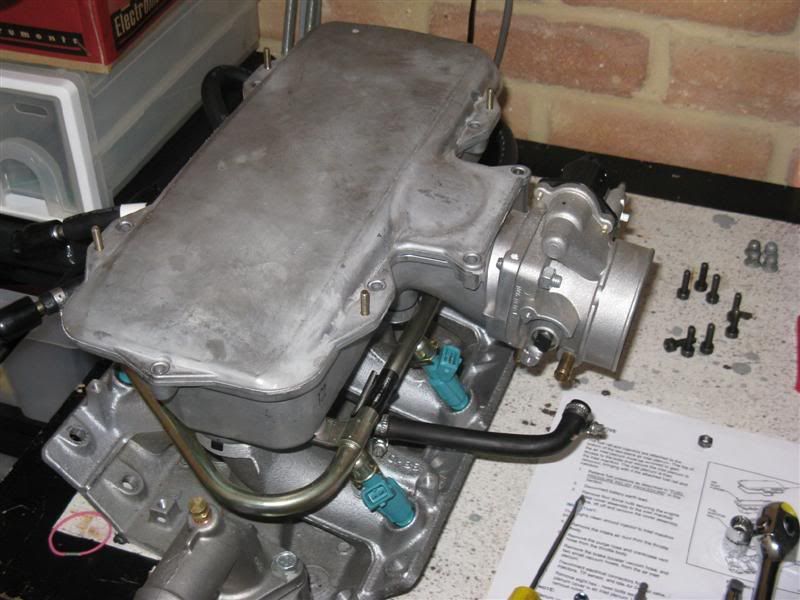
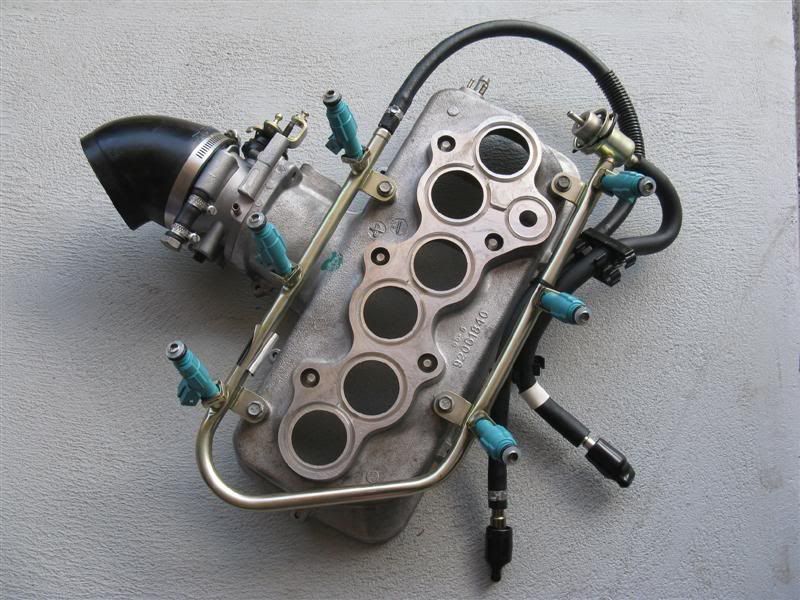
Next, re-attach the fuel rail and injector assembly. I used a new fuel rail and injectors, but you may have your existing injectors cleaned instead. This is best done professionally. Cleaning injectors isn’t something that can generally be done at home.
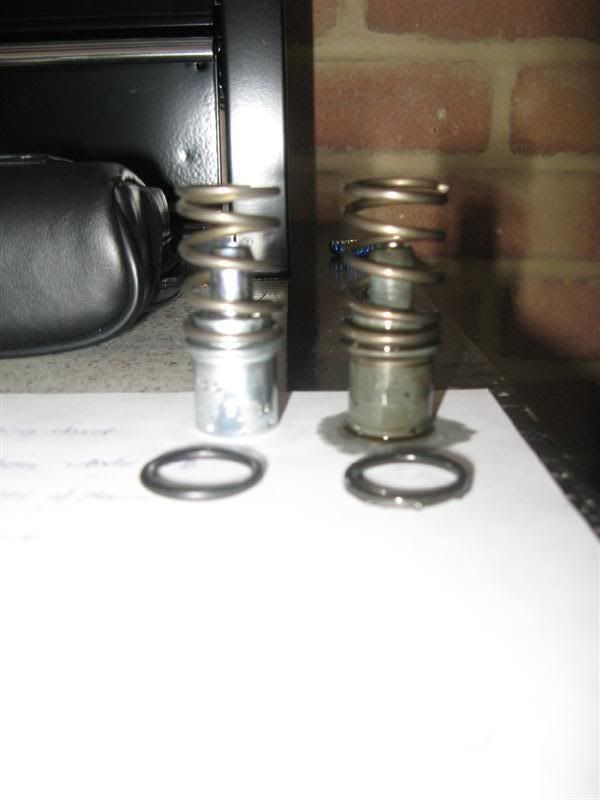
I also removed the PCV valve from the lower inlet manifold (it sits under the spring in the top left corner), and it’s rubber O-ring and replaced these parts with new parts.
Next, use new inlet manifold seals for the plenum chamber (with a thin smear of PBR rubber grease if you like), and new o-rings for the injectors (also smeared with rubber grease) and bolt the plenum chamber back onto the lower manifold. Make sure you torque the bolts to the correct torque setting.
Now, reattach the plenum cover with the 8 hex bolts, and torque the bolts to the correct setting.
Finally, it is simply a matter of reversing the above procedure and start to reconnect everything. The fuel lines, the IAC and TPS connectors, the injector wiring, the vacuum hoses to the back of the plenum chamber, the throttle cable mounting bracket and the throttle cable itself. Don’t forget to reconnect the MAF and IAT wiring when you replace the air duct that connects the air box lid to the LPG mixer (or to the throttle body as is the case).
I hope this helps any of you planning to change your injectors, or clean your throttle body or plenum chamber.
Have fun. :w00t:
I was lucky enough to find a complete lower and upper inlet manifold on ebay, brand new, to suit a VX V6 for only $200.00. This was a bargain, and included the lower inlet manifold, thermostat, thermostat housing, fuel rail with fuel pressure regulator, 6 injectors, upper inlet manifold (plenum chamber), throttle body with IAC, and plenum cover. All this for only $200, it was too good to be true. I purchased it and it arrived within the week.
Since I had a collection of new parts, I decided initially to replace the entire plenum chamber, fuel rail, injectors and throttle body assembly. However, it turned out this wasn’t possible. The VX lower inlet manifold casting is slightly different to the VT one, so I decided to keep my old VT plenum chamber (it just needed a very good clean), and to use the new fuel rail, new injectors and new throttle body on the original VT plenum. In case anyone else was interested in doing a similar job, I decided to take photos and share how the job came together.
First, and most important is to make sure there is no dirt around the lower inlet manifold where the fuel injectors are seated. Otherwise, when the plenum chamber and injectors are removed, dirt can fall into the holes where the injectors have been sitting. So, remove the dress cover from the top of the motor, and take a can of degreaser, and squirt heaps all around the plenum chamber, and the fuel injectors. Let it soak for a bit, then hose clean. Do it again if you need to, until it is all very clean. Next, let the engine dry properly before continuing. I left it overnight to be sure.
Second step, disconnect the wiring from the IAT (Intake Air Temperature sensor) and the MAF (Mass Air Flow sensor). These sensors are on the air box (IAT) and very close to the air box (MAF) in-line with some ducting heading to the throttle body. In my case, I have factory LPG system installed, so the duct connects to the LPG mixer. Unscrewing the clamp which connects the duct to the mixer allows you to remove this entire section (ie the air box lid and the MAF). This gives you some more room to move inside the engine bay.
Below is a picture of where the air box lid and MAF were sitting before they were removed.
Next, disconnect the clamp securing the LPG mixer to the throttle body ducting, and disconnect the mixer from the duct. If you don’t have LPG installed, you won’t have to do this.
Next, disconnect the vacuum hoses from the bottom of the throttle body, and the three hoses at the back of the plenum chamber. Make sure you remember where they all go when you need to reassemble!
Next, disconnect the wiring connectors from each of the 6 injectors. The silver clips on the injector plugs must be removed first, then the plug comes off easily.
Next, disconnect the wiring from the IAC (Idle Air Control) and the TPS (Throttle Position Sensor). These connectors are located on the top of the throttle body itself.
Now, remove the throttle cable and the cruise control cable from the throttle body connectors. They unclip, you should be able to figure out how they come off when you look at the cables, it is pretty easy. Don’t touch either of the adjusting nuts on the mounting bracket, they must be left as they are.
Now, remove the 3 nuts that hold the throttle cable mounting bracket to the throttle body, and place the entire bracket assembly to one side. There is no need to touch the nuts that secure the throttle cable and cruise control cable to the mounting bracket – simply undo the bracket and remove it as an assembly. Move the bracket and cable assembly clear of the throttle body.
Next, remove the 8 hex bolts from the top of the plenum chamber. You will need a hex bit that can be used in a ratchet, because you will need to be able to re-torque the bolts later. Using an allan key to remove these bolts is a no-no!
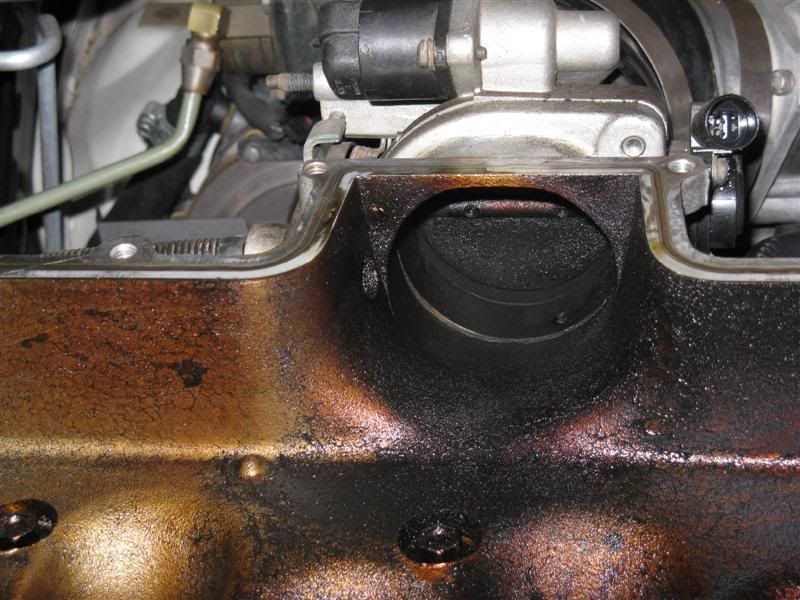
Once you have the plenum cover off, you will be able to see just how dirty the inside of the plenum chamber is! Mine was filthy! The car has 260,000kms on the clock and I doubt the plenum cover has ever been removed. Check the pics below of the cover, and the inside of the plenum chamber. Note the comparison between the new plenum cover and the one that was removed from the car ☺
The plenum chamber itself:
Another photo, this one looking in towards the throttle body:
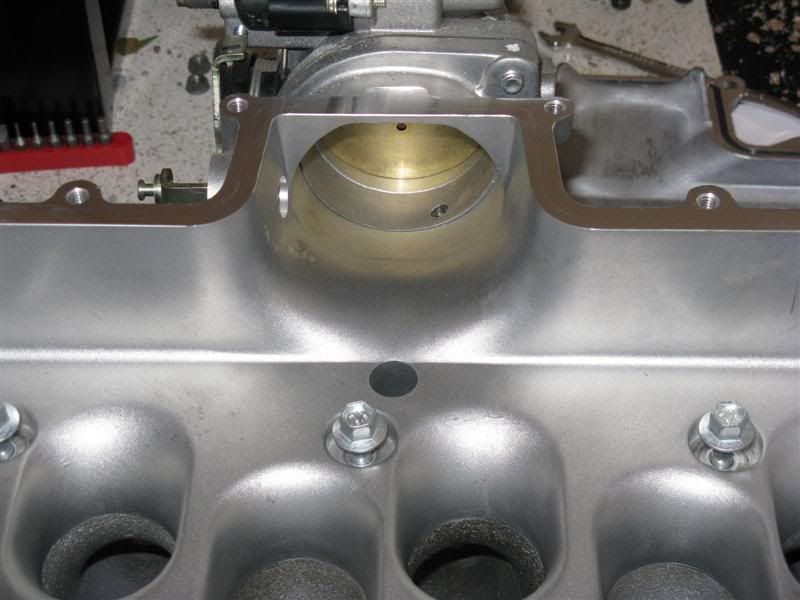
Compare this to the new VX plenum chamber I managed to buy from ebay:
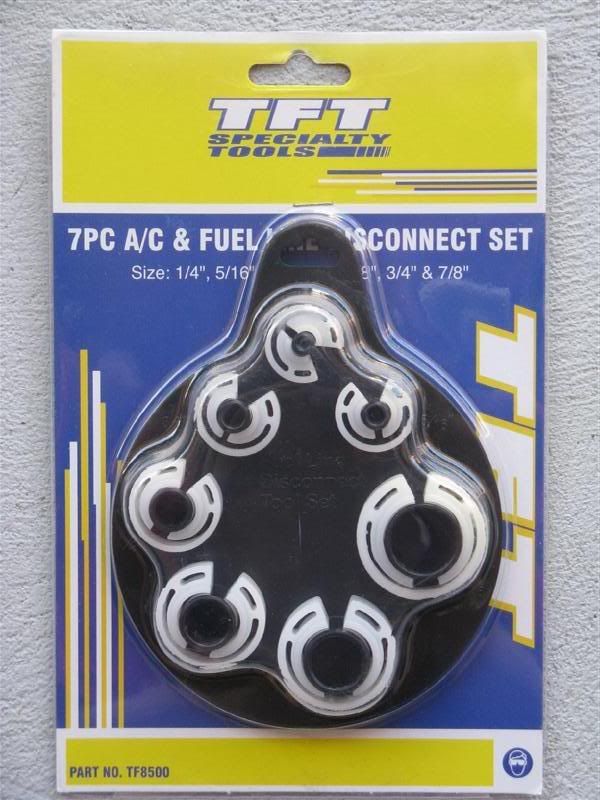
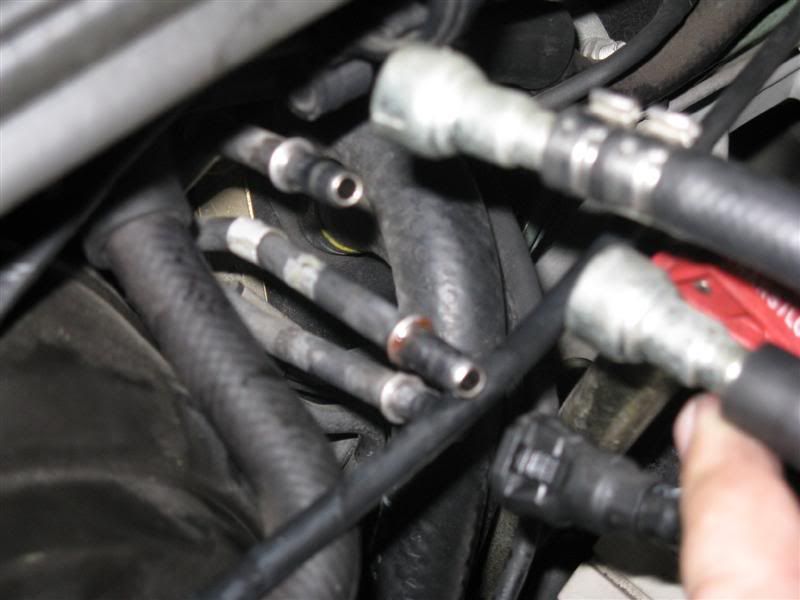
The next step is to disconnect the fuel rail hoses from the fuel lines at the firewall. There are many suggestions of how to disconnect these hoses, but by far the easiest way to do it is to go to your local supercheap or Repco store and buy the tool to disconnect fuel lines. I bought my tool at Supercheap Auto, and it cost $16.95.
Simply slide the correct size tool over the metal fuel line, and push it up into the quick connect connector. You will then be able to just pull the fuel line off easily. Make sure you mark which fuel line goes where, because it is very important that the fuel lines are reconnected the same way.
Next, losen the 5 bolts inside the plenum chamber. They are designed not to come out, so that they don’t fall inside the air intake at the top of the motor. When all 5 bolts have been undone, you will be able to lift the plenum chamber with the throttle body, fuel rail and injectors off as one assembly.
After removing this assembly, the engine bay will look similar to this:
At this point, cut a rectangular piece of cardboard and place it over the top of the lower manifold inlet ports to prevent dirt entering the engine intake. Here is a closer look at the lower manifold:
The next step is to remove the bolts that attach the fuel rail to the plenum chamber, and the two nuts that hold the throttle body to the plenum. Then, use carby cleaner or throttle body cleaner, and THOROUGHLY clean the plenum chamber. When you are finished, your plenum will look something like this:
Another photo, from the underside:
Next, clean the throttle body completely with carby cleaner and re-attach the throttle body to the plenum with a new rubber o-ring type gasket seal. I smeared a small amount of PBR rubber grease on the seal to ensure a good fit.
I replaced the throttle body with the one that I bought from ebay, but you will most likely need to clean your existing one unless you have a replacement. Here is another photo, looking inside the throttle body to the butterfly:
Next, re-attach the fuel rail and injector assembly. I used a new fuel rail and injectors, but you may have your existing injectors cleaned instead. This is best done professionally. Cleaning injectors isn’t something that can generally be done at home.
I also removed the PCV valve from the lower inlet manifold (it sits under the spring in the top left corner), and it’s rubber O-ring and replaced these parts with new parts.
Next, use new inlet manifold seals for the plenum chamber (with a thin smear of PBR rubber grease if you like), and new o-rings for the injectors (also smeared with rubber grease) and bolt the plenum chamber back onto the lower manifold. Make sure you torque the bolts to the correct torque setting.
Now, reattach the plenum cover with the 8 hex bolts, and torque the bolts to the correct setting.
Finally, it is simply a matter of reversing the above procedure and start to reconnect everything. The fuel lines, the IAC and TPS connectors, the injector wiring, the vacuum hoses to the back of the plenum chamber, the throttle cable mounting bracket and the throttle cable itself. Don’t forget to reconnect the MAF and IAT wiring when you replace the air duct that connects the air box lid to the LPG mixer (or to the throttle body as is the case).
I hope this helps any of you planning to change your injectors, or clean your throttle body or plenum chamber.
Have fun. :w00t:
Last edited:
")