Page 1 of 5 12345 LastLast
Results 1 to 25 of 115

Thread: step by step manifold making

  1. #1
    hinterland's Avatar
    hinterland is offline commyvt
    Ride
    vt sed turbo

    Join Date
    Feb 2005
    Posts
    598

    Default step by step manifold making

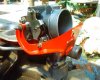
    thought i would throw this up as there might be someone out there wanting to make a front connection manifold like the gen3 has. i will put up pics as progress happens daily till its finished.im trying to do this without a welder so any one can with a bit of abillity and basic tools . i will be useing drill,4 inch grinder with 1mm cut of wheel, belt sander ,,6mm tap,my barby table as the work bench and a big g clamp.

    DAY 1
    bought cut of disk 1mm cost 2.50 hope it last the job out
    had upper vt ecotech manifold i got from wreckers cost 25.00
    FIRS STEP
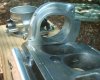
    clamped to bench upside down and where the edge starts to roll over attacked with grinder just so leaving about 2mm proad of inner face refer pic 1
    SECOND STEP
    fliped over and clamped again and ready to run over the surface with belt sander just so everything looked preaty flat.refer pic 2
    THIRD STEP
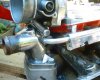
    at the front of the manifold bace we have created i cut of 15mm square to the front lip that is directly behind the thermastat housing reasons being oveious later .refer pic 3
    FOURTH STEP
    i drilled a pilot whole through the centre of the 4 threaded lugs that the fuel rail bolts to and turned over so i could run a straight edge through the holes and mark it because i need to drill more holes 50 mm apart around the hole edge useing the first holes as a starting point to eventualy hold the side part of the new manifold.also taped them out with metric 1.0x6 tap.refer pic 4

    well 3 hours gone ill try and do bit more after work.
    Last edited by hinterland; 09-12-2006 at 12:59 PM.

  2. #2
    hinterland's Avatar
    hinterland is offline commyvt
    Ride
    vt sed turbo

    Join Date
    Feb 2005
    Posts
    598

    Default

    STEP 5
    well this is most difficult bit but time taken easy to do.the origanal nose bit that the throutle body bolted 2 needs to cut of so that when trimed up can be bolted to the front of the base plate.if you look at the top of it where the old top plate bolted on there are 2 6mm holes in a nice machined bit you have to cut 2mm in front of that and sraight down on 90deg angle .the only reason 2mm is gives tou bit to play with because once cut of you run it over the belt sander to get nice flat surface .the pics will tell the story better.
    bye this stage you will neet to ring up steel place and order a piece of 3mm alloy sheet lenght needs to be 1 metre width including 2x 15 mm folds 120mm.get them to fold a 15mm 90 degree on the both lengh sides as this will end up being the sides of new manifold .
    STEP 6
    mounting the bit we just finnished is easy as drilling 2 holes .place it on the edge where you cut the 15 mm bit of in step 3 mark the wholes so that the mount is level at front and level with the longer edge as shown in pic 2

    tommorow another day wateing for alloy for sides so thats it today.total time spent including scrating the head 4 hours cost so far $2.50
    Attached Images Attached Images
    Last edited by hinterland; 09-12-2006 at 12:59 PM.

  3. #3
    HDT_aero is offline resident bush mechanic
    Ride
    manual VN aero

    Join Date
    May 2005
    Location
    SA
    Posts
    1,285

  4. #4
    Ride
    VYII SV8 One tonner

    Join Date
    Apr 2004
    Location
    Central Coast, NSW
    Posts
    1,252

    Default

    will you have the problem of the front ports recieving air and the rear not
    Check out My SV8 One Tonner

    You can get a lot farther with a kind word and a gun than a kind word alone

  5. #5
    hinterland's Avatar
    hinterland is offline commyvt
    Ride
    vt sed turbo

    Join Date
    Feb 2005
    Posts
    598

    Default

    no problem because a motor draws the air it wants you only have problems when you carnt give it enough . as soon as this little projects finnished im going to put up the mods needed for my new blower thats why the manifold conversion the blower a eaton45 will sit between it and the turbo.

  6. #6
    vinnywelsh's Avatar
    vinnywelsh is offline Bored Technician
    Ride
    VN V6 3.8L Berlina

    Join Date
    Aug 2004
    Location
    Brisbane
    Posts
    558

    Default

    Great work there hinterland

    keep the project rolling along and keep us updated

  7. #7
    hinterland's Avatar
    hinterland is offline commyvt
    Ride
    vt sed turbo

    Join Date
    Feb 2005
    Posts
    598

    Default Day 2

    well waighting on the sheet alloy hopefully by lunch they tell me so the smorning i cleaned throutle body and base of manifold had to cut the exelarator cable bracket as pic shows and also put slight bend in the alloy fuel line that joins the 2 fuel rails also shown in pic .got carried away and lashed out and bought a tin of red engine enamel $6.50 "more expence"so the bracket and underside of manifold are now gleaming out in the sun drying.i have put it together to see what clearences i have when on lower part of manifild and we have success clears thermastat housing and fuel line preavesly mentioned that we bent clears as well so all is good.cleares the bonnet by bout 15 to 20 mm without a linner so that should be all good to.
    well untill i get me alloy im stumped so maybey back the sarvo with more progress. total time so far 6.5 hours cost $9.00
    Attached Images Attached Images

  8. #8
    AirStrike's Avatar
    AirStrike is offline Site Administrator
    Ride
    2009 G6ET

    Join Date
    Jun 2003
    Location
    Melbourne
    Posts
    6,630

    Default

    Dude the M45 is designed for engine between 1-1.5lts!! It will just be a restriction on a ecotech.....I mean shit the super charged minis even use a bigger blower (M62)..
    AirStrike
    Selling FG G6E Turbo and buying a N/A Supra

  9. #9
    hinterland's Avatar
    hinterland is offline commyvt
    Ride
    vt sed turbo

    Join Date
    Feb 2005
    Posts
    598

    Default

    hi im going to port out the 45 as im only using it for instant power till my turbo spools up which is about 2000 rpm the blower will be between the turbo and inlet with a read type valve ive desighned should work fine. the reason for the 45 is that it uses way less hp to run than a 90 (stock 1) and i will be able to have it share he turbos intercooler and being phisaclly smaller will fit between new manifold and turbo.
    ive found not to much info on blower and turbo combo,s only what i have done myself i had an old 300zx nissan with same type combo was good for 300rwhp so thought why not try the old ecotech see what she gets with costs being under the 2000.00 dollar mark. im going to post the whole exersize here from making the bits turbo manifold the lot so time will tell.
    thanks for the critasism

  10. #10
    Ride
    VYII SV8 One tonner

    Join Date
    Apr 2004
    Location
    Central Coast, NSW
    Posts
    1,252

    Default

    whats the go with the fuel rail, looks different to mine.

    Is it a different series rail.
    Mine is just a round tube
    Check out My SV8 One Tonner

    You can get a lot farther with a kind word and a gun than a kind word alone

  11. #11
    hinterland's Avatar
    hinterland is offline commyvt
    Ride
    vt sed turbo

    Join Date
    Feb 2005
    Posts
    598

    Default

    the manafold i bought was of a vs ecotech from wreckers i havent even looked at mine.ill sus it out and let you no .this one polished up nice so ill use it if its different.

  12. #12
    vinnywelsh's Avatar
    vinnywelsh is offline Bored Technician
    Ride
    VN V6 3.8L Berlina

    Join Date
    Aug 2004
    Location
    Brisbane
    Posts
    558

    Default

    That manifold is going to look so damn tough when you drop it back on your ecotech.

  13. #13
    hinterland's Avatar
    hinterland is offline commyvt
    Ride
    vt sed turbo

    Join Date
    Feb 2005
    Posts
    598

    Default Day 3

    well picked up alloy 3 pm yesterday so started to make sides and lids the smorning. alloy 3 mmx1000mmx120 and folded 15 mm at both of the length sides top was 150mmx350x2mm .cost was $15.00 which i thought was resnable.was preaty straight forward stuff measured the centre of the side alloy and layed up against the throutle body side mareked the corners where i was going to fold round and cut with the cutting disk (which is still alive)the apropriate angles mainly 90 degries out of the 15 mm edged top and bottom so all you do is just gently bend and keep doing that till you end up at rear.because of the uneven angle at the rear i bent the 90 degree end and cut of about centre close to 75mm long the other bit is bit tricky because it has to be cut to leave about 20mm ocer hang and trim the 15mm bits back so when it comes together you can drill and bolt together ,just look at pics they will tell the story.MAKE SHURE THAT HOLE IS CUT SO AIR CAN GET INTO THROUGHTLE BODY .(easy done by opening butterfly and scribing)lid was easy just just scribe around newly made sidesamd leace bout 5 mill bigger all the way round line up and neetly with good spacing and drill a couple holes to screw down .i used 4.5mm drill and 6mm tap ended up with 18 holes all up which if had any brains would have spaced out to 16 holes then i wouldnt have to get 2 more orig alankey bolts .once you have it bolted down take a wooden mallat mine was a bit of pine lying round and carfully belt the 5mm bit over the sides you will be suprised how easy and neet it will be and thats it ready for the sealing.
    SEELING
    buy this stage youl think to yourself dam only if i could weld alloy you would and make very nice job of it but this exersise was to make without welder so of to hardware and spent another 8.50 on a tube of fullaprene 303 sealer grey in colour and works a treet.might need bit of gp thinners and rags as i usualy end up with it everywere which i did.all the holes on the base run the sealer through the centre all way round put side on and bolt down nice and firm wipe with wet thinners rag on the outside to tidy up the messy gaps where you cut the corners lay it in and neeten of a bit and also the join where you overlaped at rear seal there as well, as long as your confident it will not leak and looks neet all will be fine.
    LAST BUT NOT LEAST
    the orig throughtle body mount we cut down earlyer needs to be seeled 'just apply sealer to the sanded face and put it position putting the 2 bolts on the bottom in clean up and run extra bead when dryed a bit.just have good look at picks you will get the idea.
    FINNAL NOTES
    the total cost is
    seeler 8.50
    alloy 15.00
    paint 6.50
    c/disc 2.50
    s/h man 25.00 57.50

    time spent 10.5 hours so if you dont charge yourself labour defenetly worth the exersize and it was nearly fun.im going to put on tommorow so ill give some more pic OMG camera not playing with pc ill post pics tommory sorry. lost pics i did today ill do more tommorow when fitting to car also pic for next project included of blower fitment . this is the eaton 45 i bought of ebay.
    Attached Images Attached Images
    Last edited by hinterland; 10-11-2005 at 08:28 PM.

  14. #14
    Ride
    VYII SV8 One tonner

    Join Date
    Apr 2004
    Location
    Central Coast, NSW
    Posts
    1,252

    Default

    are the measurments accurate.

    Ive got a tig welder over the road so its a breeze to weld, also i asked to be taught to tig weld at school last year so i might be able to get out of it a little cheaper
    Check out My SV8 One Tonner

    You can get a lot farther with a kind word and a gun than a kind word alone

  15. #15
    hinterland's Avatar
    hinterland is offline commyvt
    Ride
    vt sed turbo

    Join Date
    Feb 2005
    Posts
    598

  16. #16
    VPSI Guest

    Default

    hey hinterland, very nice effort indeed considering there was no welding involved also how are you planing to do your turbo/supercharger setup?

  17. #17
    hinterland's Avatar
    hinterland is offline commyvt
    Ride
    vt sed turbo

    Join Date
    Feb 2005
    Posts
    598

    Default Finnished and fitted

    hi again spent half the day putting the project manifold on. everything went well so the next project is moving ciol pack and make brackets for blower.ill keep all the work posted for anyone whos interested.
    Attached Images Attached Images

  18. #18
    hinterland's Avatar
    hinterland is offline commyvt
    Ride
    vt sed turbo

    Join Date
    Feb 2005
    Posts
    598

    Default

    Quote Originally Posted by VPSI
    hey hinterland, very nice effort indeed considering there was no welding involved also how are you planing to do your turbo/supercharger setup?
    hi and thanks works a treet as well even gave me about another 5lb of vacuum so must have ither sorted out some leaks or reduced the volume bye removing some of the plumbing.
    to answer your question you will see what i am going to do it is vertually placing the blower between the turbo and manifold with a gadget i desighned to help the blower draw enough air through the turbo to be eficient untill the turbo spools up then the turbo which will be set at about 9 pound boost and blower will be 5 pound by gearing its a bit of a exersize but it will be very impresive talk and h/p for a ecotech.we hope

  19. #19
    vinnywelsh's Avatar
    vinnywelsh is offline Bored Technician
    Ride
    VN V6 3.8L Berlina

    Join Date
    Aug 2004
    Location
    Brisbane
    Posts
    558

    Default

    Hell yeah!!! great work man. that looks awesome, not to mention that its going to make an improvement when you get the forced induction going

  20. #20
    Ride
    VS SIII Ute

    Join Date
    Jun 2005
    Location
    Melbourne
    Posts
    86

    Default

    That looks very impressive. Well done. Do you think it will hold together ok with the boost you are putting into it? 14 psi was it. Awesome job anyway. Would you post up a before and after of throttle response, and how you think power feels as Im sure most here would like to know. cheers.

  21. #21
    hinterland's Avatar
    hinterland is offline commyvt
    Ride
    vt sed turbo

    Join Date
    Feb 2005
    Posts
    598

    Default

    Quote Originally Posted by Bakes
    That looks very impressive. Well done. Do you think it will hold together ok with the boost you are putting into it? 14 psi was it. Awesome job anyway. Would you post up a before and after of throttle response, and how you think power feels as Im sure most here would like to know. cheers.
    thanks
    year it will hold up preasure tested it before putting on it blue my blow of valve which is set at 14lb if i thought it wouldnt i would have welded it.im taking for run tommorow to pick up new leads for coil pack reposition so ill let you no how it goes im hopping as good if not better.

  22. #22
    Ride
    VP Executive R-spec

    Join Date
    Jan 2005
    Posts
    7,910

    Default

    Quote Originally Posted by hinterland
    hi im going to port out the 45 as im only using it for instant power till my turbo spools up which is about 2000 rpm the blower will be between the turbo and inlet with a read type valve ive desighned should work fine. the reason for the 45 is that it uses way less hp to run than a 90 (stock 1) and i will be able to have it share he turbos intercooler and being phisaclly smaller will fit between new manifold and turbo.
    ive found not to much info on blower and turbo combo,s only what i have done myself i had an old 300zx nissan with same type combo was good for 300rwhp so thought why not try the old ecotech see what she gets with costs being under the 2000.00 dollar mark. im going to post the whole exersize here from making the bits turbo manifold the lot so time will tell.
    thanks for the critasism
    You are a champion : ), I'll be watching this

  23. #23
    hinterland's Avatar
    hinterland is offline commyvt
    Ride
    vt sed turbo

    Join Date
    Feb 2005
    Posts
    598

    Default coil pack

    coil pack moved for blower fitment ...well couldnt find real reason why the coil pack had to be sitting on motor so put it up front to get cool air from nose of bonnet only had to replace to leads to fit but stuff the expence changed them all.the bracket that holds it on wheighs about 2 klo so its in the bin.
    when taking for cruise to get leads it acually went better and has changed the tone of motor so manifold is success and it looks so much neeter.
    ok till next mod suppercharger brackets and pullies gess thats it for today.
    thanks for the feedback as well
    Attached Images Attached Images

  24. #24
    hinterland's Avatar
    hinterland is offline commyvt
    Ride
    vt sed turbo

    Join Date
    Feb 2005
    Posts
    598

    Default

    while waiting on blower still i decided to make water injection more metho than water usually 70 percent metho 30 water-- anyway bought second hand fuel pump from wreckers (intank) and hooked up to 1 injector i had out of vt .placed it 6 inches before throtle body and used a presure switch and senser switch to fire it up.i used the preasure switch to stop injection if throtle was opened flat when not running as i powered it staight to batery through relay.the senser switch was placed near the throtle arm so ingaded at wot.i submerged the pump into a 300 x 150 polly pipe with some end caps on it for the tank but anything could be used.took for blast and worked a treet smelt good to droped inlet manifild down from 44 cells to 35 within less than 40 seconds without any missing whatsoever.

  25. #25
    Ride
    VYII SV8 One tonner

    Join Date
    Apr 2004
    Location
    Central Coast, NSW
    Posts
    1,252

    Default

    would it be possible to eloborate on the pressure switches and realays on the water injection.

    I have a few VN injectors lying around and would like to run water injection but have no idea how to power injectors timeing of pulses
    Check out My SV8 One Tonner

    You can get a lot farther with a kind word and a gun than a kind word alone

Page 1 of 5 12345 LastLast

Similar Threads

  1. RB30 Engine Troubleshooting/Maintenance Step by step
    By VL Berlina 5speed in forum VL Holden Commodore (1986 - 1988)
    Replies: 26
    Last Post: 06-07-2010, 05:23 PM
  2. injector cleaning step by step???
    By hold-on in forum VR - VS Holden Commodore (1993 - 1997)
    Replies: 4
    Last Post: 10-09-2006, 05:40 PM
  3. the next step...
    By PaRaDoX in forum VN - VP Holden Commodore (1988 - 1993)
    Replies: 3
    Last Post: 16-07-2006, 11:54 PM
  4. Fixin da front of my vl step by step *pics*
    By ucwepn in forum VL Holden Commodore (1986 - 1988)
    Replies: 31
    Last Post: 17-03-2006, 05:43 PM
  5. the next step
    By mat vsII in forum V6 Development And Modification
    Replies: 4
    Last Post: 03-10-2005, 03:39 PM

Posting Permissions

  • You may not post new threads
  • You may not post replies
  • You may not post attachments
  • You may not edit your posts
  •  

1 2 3 4 5 6 7 8 9 10 11 12 13 14 15 16 17 18 19 20 21 22 23 24 25 26 27 28 29 30 31 32 33 34 35 36 37 38 39 40 41 42 43 44 45 46 47 48 49 50 51 52 53 54 55 56 57 58 59 60 61 62 63 64 65 66 67 68 69 70 71