Welcome to Just Commodores, a site specifically designed for all people who share the same passion as yourself.

New Posts Contact us

Just Commodores Forum Community

It takes just a moment to join our fantastic community

Register

Drilling centre console area - anything to watch for?

Brycestro

New Member
Joined
Nov 26, 2005
Messages
383
Reaction score
4
Points
0
Age
36
Members Ride
VS Acclaim S2
Hello Hello,

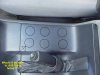
I'm installing some neons into my VS Commodore soon and am planning on locating a switch on the centre console plastic to the right of the handbrake. I'm placing it here so that later on i can hopefully have a number of switches all located on this one panel.

Probably a stupid question, but is there anything i should look out for before i go ahead and start drilling holes into this area? Is it possible to crack the plastic while drilling it or is there any wires underneath i should be watching out for? Is it a smart idea to drill it while i'm inside the car rather than taking the piece out being as it seems to be in fairly stable? (If it's not a smart idea could someone give me a hint on how to get that piece out? I can get the piece out surrounding the gear changer with the ash tray in it, but the handbrake piece doesn't appear to have the "pop-out" style to it).

P.S. - anyone know a good way to drill a 12.2mm hole with a cheap cordless drill that only goes up to 10mm :). I was thinking just drill the 10mm hole then get some sandpaper or a file and file down the remaining 2.2mm... sound good?

Thanks Everyone!
 

Brycestro

New Member
Joined
Nov 26, 2005
Messages
383
Reaction score
4
Points
0
Age
36
Members Ride
VS Acclaim S2
Sorry, thought i should include a picture of what i mean just to clarify...
 

Attachments

  • centre_console_safe_drill.jpg
    centre_console_safe_drill.jpg
    18 KB · Views: 430

HDT_aero

Banned
Joined
May 3, 2005
Messages
1,285
Reaction score
11
Points
0
Age
38
Location
SA
Members Ride
manual VN aero
only the floor pan to worry about unless you have a light in the console then there may be wiring to keep an eye out for but just go for it youll be right
 

vt1538

455rwhp LS3
Joined
Sep 28, 2005
Messages
897
Reaction score
23
Points
0
Age
55
Location
The Dead Centre
Members Ride
VY SS S2 11.284@125mph
You can buy reduced shank drillbits to fit a 10mm chuck.
 

Charg'd

New Member
Joined
May 10, 2005
Messages
2,310
Reaction score
41
Points
0
Location
in a ford
Members Ride
ford
mate that part of the console lifts out, maybe take it out and drill it if you arnt sure wats under there
 

nick88

New Member
Joined
Jul 4, 2005
Messages
368
Reaction score
0
Points
0
Age
35
Location
Vic
Members Ride
VE2 SS Voodoo
that part where he wants doesnt just 'lift out', you need to undo the whole centre console to get under that.
anyway, i had mine out recently and i think i remember the tubing for the Air Con that takes it to the back go along the side of the centre console, so it might be worth taking it out anyway just to make sure.
http://forums.justcommodores.com.au/showthread.php?t=18260
that tell you how to remove half of the centre console, if youve got a gregorys manual, read through that.....but its pretty simple, its really just LOSEN not undo two screws at the top of the centre console, and theres a few wires and i think a couple more screws to undo and it slids out

hope that helps
Nick
 

Brycestro

New Member
Joined
Nov 26, 2005
Messages
383
Reaction score
4
Points
0
Age
36
Members Ride
VS Acclaim S2
thanks everybody.

hey nick88, i had a look at that link there, the one you need to change the gear selector LED. do you have to do ALL of the steps in that before you can get the other half of the centre console off or is it just a select few of them???

nick88 or anyone else are you able to elaborate/explain exactly where these screws are located etc and any other steps to remove the second main piece because i'm still a newbie to it all :p. I'm thinking i will take it off to double check, maybe spray paint it while i'm doing it as well. If anyone happens to have some pics of the process lying around that would be great, but any help is much appreciated...

Thanks Again.
 

nick88

New Member
Joined
Jul 4, 2005
Messages
368
Reaction score
0
Points
0
Age
35
Location
Vic
Members Ride
VE2 SS Voodoo
i cant remember where i got my info from for getting it up, ill have a look for ya tho, and yes you do need to pretty much do what the 'change gear slector' thread says
its easiest to paint when its out of the car too, thats what i did anyway
 

Attachments

  • IMG_0003_new.JPG
    IMG_0003_new.JPG
    78.7 KB · Views: 429

nick88

New Member
Joined
Jul 4, 2005
Messages
368
Reaction score
0
Points
0
Age
35
Location
Vic
Members Ride
VE2 SS Voodoo
found it, it has all steps involved for getting it out
you can thank Infus10n for this as this is what he gave to me to take the bottom half out.
"Pull hand brake lever fully up.
Undo zipper below hand brake lever.
Put gear lever into neutral.
Open ashtray and pull up and remove.
Being very carefull lift the gear lever surround up from the rear, near the hand brake. This may take some force and may require a bit of help by using a small pry bar. Do not over force else it may break.
Once lifted from the rear, pull gear lever surround towards the rear of the vehicle.
Disconnect 1x 1 pin plug from cigarette lighter light. This requires the lifting up of tab.
Disconnect 1x 2 pin plug from cigarette lighter.
Lift surround up and turn 90'.
Lift surround up and tilt over gear lever from rear to front.
Mark gear position indicator plate cover for position in relation to white gear lever surround.
Remove gear position indicator plate cover.
Remove plate cover from above PWR/ECON switch.
Being very carefull lift gear lever sliding trim up slightly, twist the rear section down, push slightly forward and pull towards the drivers side of vehicle. Remove trim. Be very carefull not to snap trim in half at gear lever.
Pry small white trim from the front section of the white gear lever surround and remove.
Remove 4x black screws from the white gear lever surround.
Lift white gear lever surround up slightly and twist gear lever indicator bulb holder and pull away from white gear lever surround.
Disconnect 3 pin plug from the PWR/ECON switch wiring.
Remove white gear lever surround.
Loosen 2x large screws from front of centre console. Do not remove just loosen.
Lift centre console lid up and carpet up in the bottom of the console well.
Remove 2x 10mm nuts from under the carpet in the console well. (may be 2x screws)
Close console lid and place gear lever into first gear position.
Lift the rear of the centre console up about 50mm wilst pulling to the rear about 50mm. Lift the rear of the centre console up and over the gear lever and hand brake lever then slide centre console rearwards. Be carefull of electric window wiring (undo plugs at front of centre console underneith stereo surround) if fitted. Remove centre console. "

It is long but it only takes like 10mins to take it out, and have no pics either...sorry
If you need anymore help PM me or just post it here and ill try help ya(and im sure others will to :drink:

Nick
 
Top