That pic was one from when I changed my thermostat over, instead of the standard one I opted for the 71 degree from FIT.
Any idea when your going to do it? ie Saturday or Sunday, I've been meaning to put together a how-to but haven't got around to it yet but I'm more than happy to see what I can knock up to get the ball rolling.
In short, your going to lose a fair bit of coolant so you may as well dump the coolant in there and do a change whilst your at it. I'm doing all this from memory, it's been a number of months since I did mine so portions of it might be slightly incorrect but should be a good enough guide for you to work with.
You'll need a whole variety of tools including
Screwdrivers (Phillips / Flathead)
1/4" Socket Set
1/2" Socket Set
Flat file
Emery paper + Scraper
Soft blow hammer
Stubby Spanners -
See here for more details
There isn't too much which can go wrong but drawing diagrams and / or labels as things are about to come off can easily helpful when placing things like vacuum lines back on as it's very easy to forget where they belong.
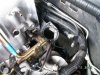
Once you have the top airbox, MAF sensor along with the wiring out of the way it's then time to get stuck into the throttle body, from memory there was 3 nuts on the cruise / throttle cable which were around the 10mm, simply swing this out of the way and then remove the 3 remaining nuts (12mm) from the throttle body, this may need a very slight tap with a soft blow hammer eitherside to dislodge but remember there is a gasket in place which can be destroyed easily.
After all of the above it's time to attack the U-Bend, this for me was the most frustration part getting something to fit back near the firewall. This is where I found the stubby spanners absolutely brilliant! (From memory 13mm), I tied a piece of rope around the open ended end which will prevent it from getting lost under the car (I know from personal experience), you'll thank me later for that tip

If you head in the direction of the stubby spanners grab some rag and wrap around it as they are fairly tight remembering you don't have a great deal of leverage at your disposal with those little things but they do the job nicely.
Once your all done at this point undo the final 2 remaining bolts from the thermostat housing, another slight tap with a soft blow hammer might be useful here as they often get stuck.
At this point your left with a mere thermostat infront of you with what appears to be a seal, it's fairly rigid so becareful as I split mine and ended up using some blue substance which eludes me by name but that has done the trick since. Using a small flat head screwdriver prise the seal up and remove the thermostat, this took a fair bit of patience.
Not much more left to do other than to clean all the mating faces, stuff rag inside where the thermostat sat and clean the face using a scraper for the bigger stuff and finally a file with some emery paper around it, repeat this process with the thermostat housing so it's nice and smooth.
Now all that's left to do is replace everything back as it is.
If you have any queries by all means fire them up.