LeaThaL
New Member
- Joined
- Jan 27, 2010
- Messages
- 19
- Reaction score
- 0
- Points
- 1
- Members Ride
- VR Series 1 sedan
Hey all,
im big into doing detailed how to threads on my 1jz/z20 soarer so now im doing it on the VR i might as well do one on here!")
this is a how to for replacing the bypass hose from the top of the water pump to the inlet manifold and the bung that is plugged into the inlet manifold

Step 1. remove the positive from the battery as were going to be playing with the alternator at one point.

Step 2. You want to remove the belt, so get a 18mm socket and remove the belt off the alternator pulley but dont totally remove it , just sit the belt on the pully when down so it stays where it is.

Step 3. now you will see the 2 bolts on the alternator, one is a 10mm and the bigger is a 13mm, remove the 10mm one (left side of alternator) and only loosen the 13mm one by about 2 turns.
Step 4. once the bolts are loosened get either some plyers or a flat head screwdriver and remove the clip holding the plug on top of the alternator on

Step 5. once done, the alternator should just rotate off to the right and sit there, if the loom catches just move it untill it moves freely

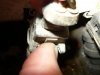
Step 6. this here is the little pipe were replacing, as far as ive had commodores this has been a randome problem as its in a fair amount of heat and can get hard and crack under pressure, you will want to remove these with a socket wrench, i think their 9/32 but not 100% sure once the hose has been removed expect water to flow out of the water pump, but to save some coolant just dont remove your radaitor cap as it will leave a vaccum in the lines and stop flow after some time

Step 7. now it looks really dirty here as it had been leaking oil at some time and coolant had been running thru here so with the hose off i hit it with some degreeser and a old toothbrush to get things nicer

Step 8. while the hose is off its good to replace this bung, its just a connector for the hose to enter the inlet manifold, as it can also get old and crack and cause water leaks,
now you can get a standard replacement plastic one, however as i found out they now make a brass one to repalce it


Step 9. for the above piece, to remove it either insert a set of long nose pylyers into the front and wiggle it from top to bottom or side to side or put a flat blade screwdriver under one side and pry it off side to side. but make sure it doesnt break as its a pain to try and remove random bits of plastic from inside the mainfold like when mine broke on the VR wagon, and once youve got it off give it a nice clean to make sure you would get a good clean seal

Step 10. with the new fitting in hand get the larger end with the rubber seal and put in the now open hole, and tap side to side to get said end in to sit flush with the manifold, and make sure to line up the hole on the loom with where the 10 mm bolt sits in.
Step 11. now using either new clamps or just reusing the old ones (i suggest if you do use old ones degrease them and check for damage) use you new hose and just pop onto the water pump pipe and put over your new bung, make sure both clamps are under the lip on the bung and the waterpump to save them getting pressurised and then pop off, once happy with how its sitting now tighten up the clamps but dont go too overboard as you dont wanna pinch the new hose and cause a new leak, just go till you feel its getting tight and go maybe a half turn after that and just check with your fingers if it moves.
Step 12. now just reverse steps 1 to 5 to get things back together, fill what water had come out in the radaitor, start the car and bleed the system as usual, while looking and seeing if there is any leaks and if there isnt, then success! enjoy having pressure in your cooling system again like i did

im big into doing detailed how to threads on my 1jz/z20 soarer so now im doing it on the VR i might as well do one on here!
this is a how to for replacing the bypass hose from the top of the water pump to the inlet manifold and the bung that is plugged into the inlet manifold
Step 1. remove the positive from the battery as were going to be playing with the alternator at one point.
Step 2. You want to remove the belt, so get a 18mm socket and remove the belt off the alternator pulley but dont totally remove it , just sit the belt on the pully when down so it stays where it is.
Step 3. now you will see the 2 bolts on the alternator, one is a 10mm and the bigger is a 13mm, remove the 10mm one (left side of alternator) and only loosen the 13mm one by about 2 turns.
Step 4. once the bolts are loosened get either some plyers or a flat head screwdriver and remove the clip holding the plug on top of the alternator on
Step 5. once done, the alternator should just rotate off to the right and sit there, if the loom catches just move it untill it moves freely
Step 6. this here is the little pipe were replacing, as far as ive had commodores this has been a randome problem as its in a fair amount of heat and can get hard and crack under pressure, you will want to remove these with a socket wrench, i think their 9/32 but not 100% sure
once the hose has been removed expect water to flow out of the water pump, but to save some coolant just dont remove your radaitor cap as it will leave a vaccum in the lines and stop flow after some time
Step 7. now it looks really dirty here as it had been leaking oil at some time and coolant had been running thru here so with the hose off i hit it with some degreeser and a old toothbrush to get things nicer
Step 8. while the hose is off its good to replace this bung, its just a connector for the hose to enter the inlet manifold, as it can also get old and crack and cause water leaks,
now you can get a standard replacement plastic one, however as i found out they now make a brass one to repalce it
Step 9. for the above piece, to remove it either insert a set of long nose pylyers into the front and wiggle it from top to bottom or side to side or put a flat blade screwdriver under one side and pry it off side to side. but make sure it doesnt break as its a pain to try and remove random bits of plastic from inside the mainfold like when mine broke on the VR wagon, and once youve got it off give it a nice clean to make sure you would get a good clean seal
Step 10. with the new fitting in hand get the larger end with the rubber seal and put in the now open hole, and tap side to side to get said end in to sit flush with the manifold, and make sure to line up the hole on the loom with where the 10 mm bolt sits in.
Step 11. now using either new clamps or just reusing the old ones (i suggest if you do use old ones degrease them and check for damage) use you new hose and just pop onto the water pump pipe and put over your new bung, make sure both clamps are under the lip on the bung and the waterpump to save them getting pressurised and then pop off, once happy with how its sitting now tighten up the clamps but dont go too overboard as you dont wanna pinch the new hose and cause a new leak, just go till you feel its getting tight and go maybe a half turn after that and just check with your fingers if it moves.
Step 12. now just reverse steps 1 to 5 to get things back together, fill what water had come out in the radaitor, start the car and bleed the system as usual, while looking and seeing if there is any leaks and if there isnt, then success! enjoy having pressure in your cooling system again like i did