JA2Z
Member
- Joined
- May 1, 2009
- Messages
- 84
- Reaction score
- 0
- Points
- 6
- Location
- East Gippsland, Vic
- Website
- www.studiomarban.com
- Members Ride
- VT 5L, WH LS1 Stato (Daily), TDCi Focus, Probe V6
Finally Managed to get some pics uploaded!!!
ok:
Heater one first:
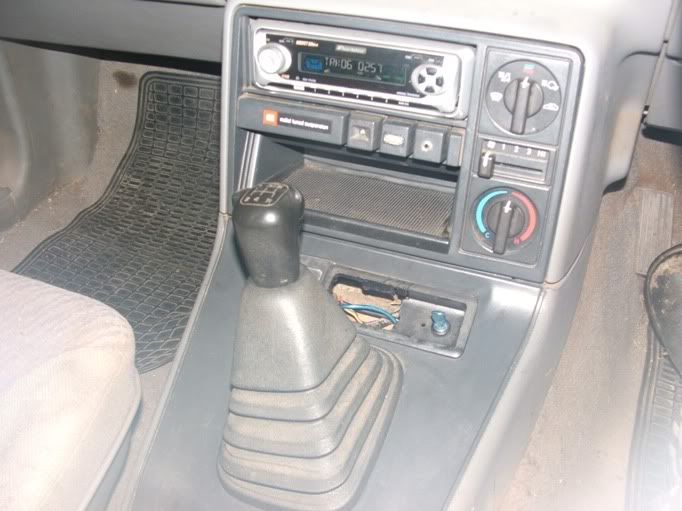
pic 1) lift up rear of console - just clip pressed
pic 2) pull console backwards
pic 3) diconnect cigarette lighter and light connections
pic 4) remove screws (3)
pic 5) lift out bottom when screws are removed
pic 6) lift out top
pic 7) disconnect security flasher LED
pic 8) remove screw
pic 9) twisting the temp to "hot" will push out the unit
pic 10) pull off knobs
pic 11, 12) pull off plastic front
pic 13) old plate
pic 14) new plate on plastic front
pic 15) plastic front back onto unit
pic 16) press housing back in
pic 17) install screws
pic 18) re-connect light and cig lighter
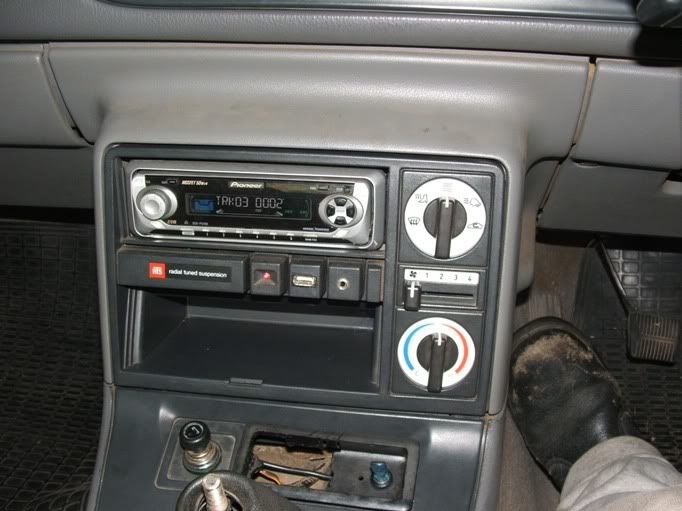
pic 19) put front of console in to place
pic 20) press down and clip in rear and side of console
Done!!
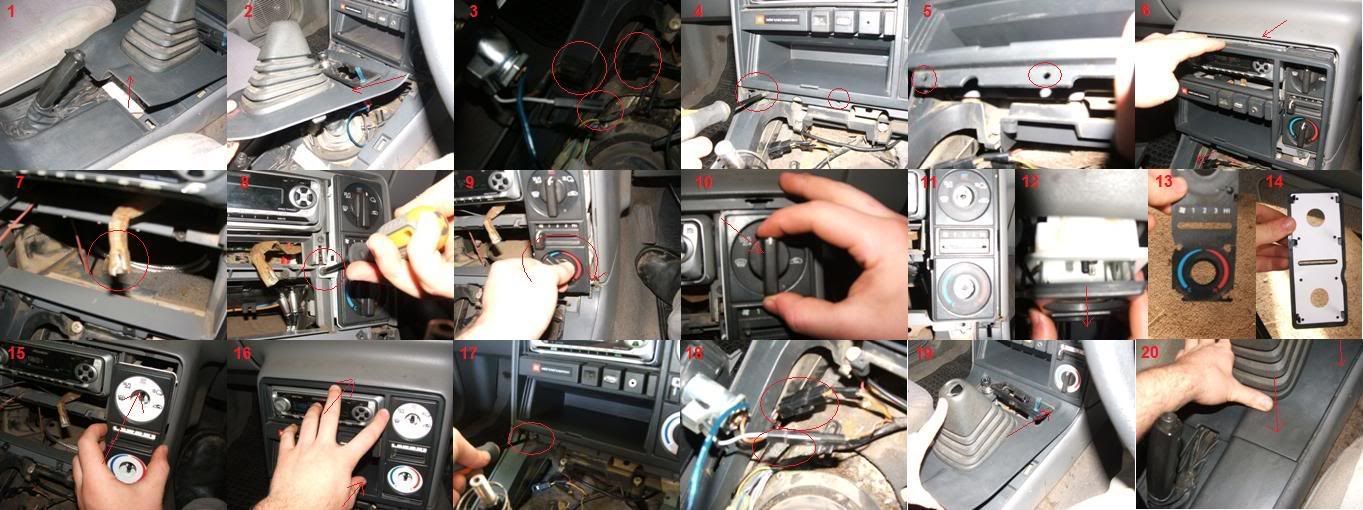
ok: Dash:

pic 1) lower steering column
pic 2,3) take out kick board pins
pic 4) remove screws
pic 5) pull out top of dash
pic 6) undo column screws
pic 7) pull apart column pieces
pic 8) remove key globe
pic 9) pull off top piece
pic 10) pull out dash
pic 11) it willl be firm, but as you can see they're only clips
pic 12) disconnect light switch plug
pic 13) disconnect speed limit
pic 14) remove the two screws holding the vent in place and unplug the demister, A/C & h azard switches
pic 15) remove the screws on each side of the cluster
pic 16) the cluster pulls out easily, no disconnection of plugs is required
pic 17) with the cluster removed unclip the front section from the insutruments
pic 18) remove the screws holding the bottom of the front to the insutruments
pic 19) the cluster separated
pic 20) pry off the needles off very carefully with a screw driver or similar, taking great care to note the EXACT position of the rotation of the needles (so when they're installed they will be on the same rotation and give the correct reading)
pic 21) the fuel and temp gauges have a "D" shaped spline, so they only go back on one way
pic 22) remove the screws holding the background onto the instruments
pic 23) remove the (old) background from the instruments, and install the new background. Reassemble the cluster.
pic 24) press the cluster back into the dash and install the mounting screws
pic 25) tools required: number 2 Stubby Phillips
number 1 Hex drive
number 2 hex drive
number 2 Phillips
And the finished product:
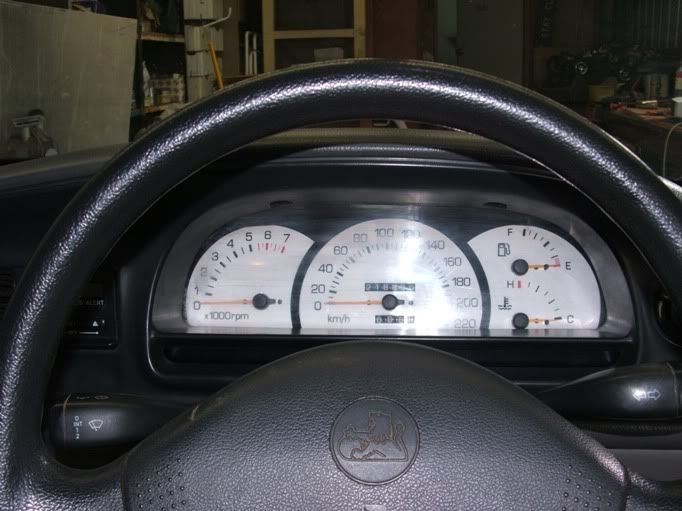
Hope that helps")
ok:
Heater one first:
pic 1) lift up rear of console - just clip pressed
pic 2) pull console backwards
pic 3) diconnect cigarette lighter and light connections
pic 4) remove screws (3)
pic 5) lift out bottom when screws are removed
pic 6) lift out top
pic 7) disconnect security flasher LED
pic 8) remove screw
pic 9) twisting the temp to "hot" will push out the unit
pic 10) pull off knobs
pic 11, 12) pull off plastic front
pic 13) old plate
pic 14) new plate on plastic front
pic 15) plastic front back onto unit
pic 16) press housing back in
pic 17) install screws
pic 18) re-connect light and cig lighter
pic 19) put front of console in to place
pic 20) press down and clip in rear and side of console
Done!!
ok: Dash:
pic 1) lower steering column
pic 2,3) take out kick board pins
pic 4) remove screws
pic 5) pull out top of dash
pic 6) undo column screws
pic 7) pull apart column pieces
pic 8) remove key globe
pic 9) pull off top piece
pic 10) pull out dash
pic 11) it willl be firm, but as you can see they're only clips
pic 12) disconnect light switch plug
pic 13) disconnect speed limit
pic 14) remove the two screws holding the vent in place and unplug the demister, A/C & h azard switches
pic 15) remove the screws on each side of the cluster
pic 16) the cluster pulls out easily, no disconnection of plugs is required
pic 17) with the cluster removed unclip the front section from the insutruments
pic 18) remove the screws holding the bottom of the front to the insutruments
pic 19) the cluster separated
pic 20) pry off the needles off very carefully with a screw driver or similar, taking great care to note the EXACT position of the rotation of the needles (so when they're installed they will be on the same rotation and give the correct reading)
pic 21) the fuel and temp gauges have a "D" shaped spline, so they only go back on one way
pic 22) remove the screws holding the background onto the instruments
pic 23) remove the (old) background from the instruments, and install the new background. Reassemble the cluster.
pic 24) press the cluster back into the dash and install the mounting screws
pic 25) tools required: number 2 Stubby Phillips
number 1 Hex drive
number 2 hex drive
number 2 Phillips
And the finished product:
Hope that helps
Last edited: