JST-23Z
New Member
Cold air intake is a basic way to gain a little bit more power and efficiency.
The idea is simple, the colder the air into the engine the better because the colder the air the more dense it is. (Unlike the hot air in the engine bay)
All the things you will need you can get from Bunnings or most hardware store
I bought:
1. A 90mm stormwater pipe that was 90mm diameter - $5.30
2. 2 90mm stormwater "Female and Female" 45deg bends - $1.51 each
3. silicon (Bond & Seal) - $5.74
4. 3/16 washers (50 pack) - $3.13
5. 3/16 nut and bolts (20 pack) $3.30
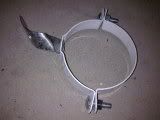
6. 90mm hanging bracket (get 2 in a pack but i used only 1) - $8.46
7. 90-105mm steel hose clamp - $4.46
Total $33.41
You will also need some assorted hand tools.
Read through to find out.
Step 1.
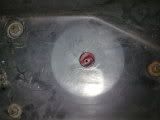
I took the top half of the air box off and left the bottom, then marked where I was going to drill through the hole already in the bottom of the box which is right above the drain hole in the guard... So I could drill through it without it pushing through I screwed some self drilling screws through the tabs.

Step 2.
Then I drilled through the tab on the mark that I put there before (this will act as a guide for the whole saw)
Then I refitted the air box.

Step 3.
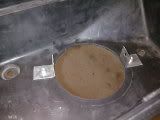
With an 89mm Hole saw cut through the bottom of the air box. The 90mm pipe will be a tight fit so you will probly have to file some off around the edges for a nice tight fit
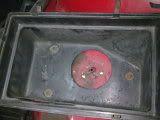
After filed it’s an air-tight fit
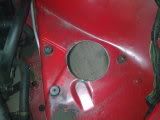
Step 4.
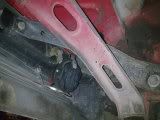
Now using a 103mm Hole saw cut through the guard using the pilot hole you drilled before (Make sure you use a good quality hole saw or you will have a lot of trouble and chew the teeth off the saw)
With a 103mm hole it allows for movement without hitting or vibrating on the body of the car.
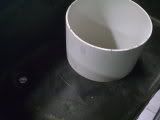
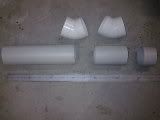
Step 5.
Dummy up the pipes to how you want. I had three lengths,
They were aprox:300mm
150mm
70mm
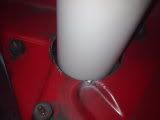
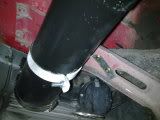
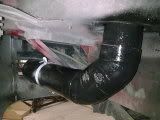
The 300mm pipe goes from the guard to the first 45deg bend then the 70mm one goes between that and the second 45deg bend and finally the 150mm pipe goes up into the air box
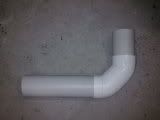
Step 6. When your happy with the way your pipes are angled and setup. Glue them together and work out a suitable place to mount the bracket, and twist or bend to suit.
Step 7.
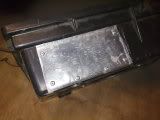
Now with the box, make to right angle brackets tho support the pipe inside the box… rivet one side to the bottom of the box. At the same time you car cut a piece of metal to fill in the original air duct hole. Rivet that over the hole and put silicon around the edges (if you do it on the inside of the box you can paint the outside, cause the paint will come off the silicon.
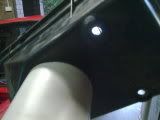
Step 8.
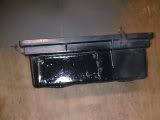
To keep it less obvious paint it black. (I also think it looks better)

Step 9.
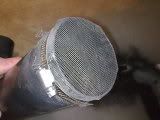
After its all dry, I put a bit of flyscreen over the end to prevent big things like bugs and rocks getting in. then you can bolt it all up and make sure its all secure.
Step 10.
Put the rest of the air duct back on, then drive and enjoy… for best results use a high flow air filter (stock VLs use A360 filters)
If you need any help or better pics pm me
heres a link to cai on wikipedia to tell you about the advantages
NOTE:
I’m not held responsible for any of this that gets put into your car… it is your choice to make this system and your problem if you get defected/booked
Also for any injury you sustain or damage done to your car while fitting/fitted this to your car!
The idea is simple, the colder the air into the engine the better because the colder the air the more dense it is. (Unlike the hot air in the engine bay)
All the things you will need you can get from Bunnings or most hardware store
I bought:
1. A 90mm stormwater pipe that was 90mm diameter - $5.30
2. 2 90mm stormwater "Female and Female" 45deg bends - $1.51 each
3. silicon (Bond & Seal) - $5.74
4. 3/16 washers (50 pack) - $3.13
5. 3/16 nut and bolts (20 pack) $3.30
6. 90mm hanging bracket (get 2 in a pack but i used only 1) - $8.46
7. 90-105mm steel hose clamp - $4.46
Total $33.41
You will also need some assorted hand tools.
Read through to find out.
Step 1.
I took the top half of the air box off and left the bottom, then marked where I was going to drill through the hole already in the bottom of the box which is right above the drain hole in the guard... So I could drill through it without it pushing through I screwed some self drilling screws through the tabs.
Step 2.
Then I drilled through the tab on the mark that I put there before (this will act as a guide for the whole saw)
Then I refitted the air box.
Step 3.
With an 89mm Hole saw cut through the bottom of the air box. The 90mm pipe will be a tight fit so you will probly have to file some off around the edges for a nice tight fit
After filed it’s an air-tight fit
Step 4.
Now using a 103mm Hole saw cut through the guard using the pilot hole you drilled before (Make sure you use a good quality hole saw or you will have a lot of trouble and chew the teeth off the saw)
With a 103mm hole it allows for movement without hitting or vibrating on the body of the car.
Step 5.
Dummy up the pipes to how you want. I had three lengths,
They were aprox:300mm
150mm
70mm
The 300mm pipe goes from the guard to the first 45deg bend then the 70mm one goes between that and the second 45deg bend and finally the 150mm pipe goes up into the air box
Step 6. When your happy with the way your pipes are angled and setup. Glue them together and work out a suitable place to mount the bracket, and twist or bend to suit.
Step 7.
Now with the box, make to right angle brackets tho support the pipe inside the box… rivet one side to the bottom of the box. At the same time you car cut a piece of metal to fill in the original air duct hole. Rivet that over the hole and put silicon around the edges (if you do it on the inside of the box you can paint the outside, cause the paint will come off the silicon.
Step 8.
To keep it less obvious paint it black. (I also think it looks better)
Step 9.
After its all dry, I put a bit of flyscreen over the end to prevent big things like bugs and rocks getting in. then you can bolt it all up and make sure its all secure.
Step 10.
Put the rest of the air duct back on, then drive and enjoy… for best results use a high flow air filter (stock VLs use A360 filters)
If you need any help or better pics pm me
heres a link to cai on wikipedia to tell you about the advantages
NOTE:
I’m not held responsible for any of this that gets put into your car… it is your choice to make this system and your problem if you get defected/booked
Also for any injury you sustain or damage done to your car while fitting/fitted this to your car!
