Chad_L
New Member
- Joined
- Jul 7, 2014
- Messages
- 8
- Reaction score
- 2
- Points
- 0
- Location
- Newcastle, NSW
- Members Ride
- Holden Commodore 2001 VX Acclaim 3.8L
Hello All,
I wanted to share my experience with changing the engine mounts on my VX. An inspection had revealed that they had sagged quite badly (after 345,000 km!) to the point where they would not be passed for rego.
First up I'll admit that I had the luxury of an inspection pit, however the principles are the same so while a pit is convenient, the method I used doesn't require one.
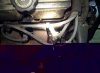
Each engine mount has four studs; two on the bottom and two on the top. The top set are arranged diagonally, so one is closer to the oil sump than the other. I'll call the stud (and nut) closest to the sump the "sump side", and the other stud (and nut) the "wheel side". The nuts that go on these studs are 15mm.
Here's a picture of the diagonal stud pattern on the top of the (old) mount.

How to actually remove the nuts on these studs is a big topic in a lot of threads, because they appear hard to access. So I did two things to get them off:
1) For the sump side nuts, I bought a cheap 15mm ring spanner from Supercheap ($1.60!!) and, using a blowtorch, heated it and bent it to between 30 and 45 degrees.
2) For the wheel side nuts, I was surprised to find that these are actually quite accessible through the engine bay with a normal ring spanner straight from my toolbox.
About the bent spanner.....
First up, I don't claim to be the inventor of this procedure. Anyway, a normal spanner will not fit to allow you to loosen the sump side nuts. The oil sump is right in the way. So, with your supercheap ring spanner, get it as close to the nut as you can and put a chalk mark where you need to bend it to clear the sump. Stick the ring end in the vice, then hold the blowtorch flame on the spanner where the mark is until it is orange hot. Quickly get a pair of large pliers or even a shifter and pull the open end of the spanner until it is at 45 degrees. Seriously, this is worth doing; if you or a mate has a blow torch it takes all of 2 minutes.
Here's the result. Mine ended up at about 30 degrees but this is only just enough. Bend yours a bit further as mine only just fitted.

The spanner can now slip over the sump side nuts without hitting the sump. Here a problem arises - because the spanner is bent it tends to not only rotate when you pull on it, but the ring also tends to ride up over the nut and slip off, damaging it. Get two pieces of wood or similar and use them as levers to push against the straight bit of the spanner near the ring, so that it only rotates and doesn't slip off the nut. In this way you can at least loosen it enough to be able to use the spanner by hand to remove the nut.
Here's the spanner in use on the driver's side

and on the passenger's side

Perhaps you could use a stubby spanner, or instead of heating a cheap one just cut it off to the desired length. But the stubby spanners aren't very cheap, and I also found that bending one left me plenty of grip which made it easy to use the spanner to run the nuts down their threads when they were too tight for finger tightening, but still easy to turn with a spanner. Up to you.
For all the different techniques discussed on forums for loosening the wheel side nuts, I was pretty amazed to discover that they are quite accessible from the engine bay. Don't get me wrong, I did feel like I had to extrude myself between the tangle of fittings and cables to get the spanner in place, and then there was a bit of teeth-gritting as I tried to get enough torque on the spanner to get the nuts to crack, but just persevere and you'll make it.
Look hard and you'll see the ring spanner (not the bent one) on the passenger's side nut

and on the driver's side nut

The nuts on the underside of the mounts are straight forward as they can be accessed from underneath the car. Just make sure you use a LONG 15mm socket - a "normal" length one will not go far enough over the nut before the square drive on the ratchet strikes the head of the stud, and you won't really get sufficient grip. For the record I did try it, and I spent most of the time scurrying after the socket after it flew off the nut.
I removed all the nuts, which left the engine resting on the mounts ready to be lifted. Before lifting, make sure there are no cables or hoses pulled tight over the engine.
I lifted the engine with a trolley jack by pushing on the oil sump. I used a block of wood between the jack and sump, as widely recommended, but I was worried about the raised ring you can see in the picture:

Even with a block of wood under the sump, much of the jack's force would be pushing against the raised parts of this ring and I thought this could over stress it. So I used some very soft fibre-board packing either side of the ring so that I could be sure the jacking force would be evenly distributed. Even cardboard, sufficiently thick, would do the job.
Here's the jack in place. You can see the packing as well.

I had a mate check the engine from the engine bay (to make sure cables weren't being pulled etc) while I jacked it up very gently from below. Initially the car's entire front end will lift as the jack takes the engine's weight off the suspension. Keep going and suddenly the engine will lift off the mounts.
I lifted the engine as far as I dared, then had my mate rock the engine slightly to one side so I could pull out the passenger's side mount (but you could do the driver's side first if you wanted). It took some fiddling but I got it eventually.
Here's an old mount, next to a new one. Note the damage and the difference in length! (Ignore the callipers in the background - they aren't actually measuring anything).

Now, the old mount was of course compressed a bit, so the new mount was taller than the old one. I struggled to get the new one in, and eventually decided to cut off the rounded ends off the bottom studs, plus two or three turns of thread, to shorten them (and dressed the ends with a file). I figured this was ok because the studs are plenty long as it is. I was then able to finally slip the mount into place, again with my mate rocking the engine a little to give me some extra room. I found that the bottom studs had to be fitted into their holes first, then the engine could be lowered down into the top studs once the engine mount was in place. Here's a rough sketch of what I mean:

The passenger's side mount was installed first, then the driver's side (but the order doesn't matter). Once in, I loosely fitted the nuts to the bottom studs, making sure I could still wiggle the mounts. The engine was then lowered very very slowly down onto the mounts by backing off the release screw on the jack slightly, letting the engine lower a little, then tightening the screw. Each time I checked the position of the mounts to make sure that the studs on the top of the mounts were going into the holes in the engine brackets.
With the engine lowered completely and the mounts taking its weight, it's a simple job to put the nuts on and tighten them all back up. Again use the lever arrangement on the bent spanner to get the sump side nuts as tight as you reasonably can.
All up, about 4-5 hours, but the time spent is small compared to the experience gained and the unique satisfaction you feel at having done something worthwhile for yourself. Hope this has been helpful!
Chad
I wanted to share my experience with changing the engine mounts on my VX. An inspection had revealed that they had sagged quite badly (after 345,000 km!) to the point where they would not be passed for rego.
First up I'll admit that I had the luxury of an inspection pit, however the principles are the same so while a pit is convenient, the method I used doesn't require one.
Each engine mount has four studs; two on the bottom and two on the top. The top set are arranged diagonally, so one is closer to the oil sump than the other. I'll call the stud (and nut) closest to the sump the "sump side", and the other stud (and nut) the "wheel side". The nuts that go on these studs are 15mm.
Here's a picture of the diagonal stud pattern on the top of the (old) mount.
How to actually remove the nuts on these studs is a big topic in a lot of threads, because they appear hard to access. So I did two things to get them off:
1) For the sump side nuts, I bought a cheap 15mm ring spanner from Supercheap ($1.60!!) and, using a blowtorch, heated it and bent it to between 30 and 45 degrees.
2) For the wheel side nuts, I was surprised to find that these are actually quite accessible through the engine bay with a normal ring spanner straight from my toolbox.
About the bent spanner.....
First up, I don't claim to be the inventor of this procedure. Anyway, a normal spanner will not fit to allow you to loosen the sump side nuts. The oil sump is right in the way. So, with your supercheap ring spanner, get it as close to the nut as you can and put a chalk mark where you need to bend it to clear the sump. Stick the ring end in the vice, then hold the blowtorch flame on the spanner where the mark is until it is orange hot. Quickly get a pair of large pliers or even a shifter and pull the open end of the spanner until it is at 45 degrees. Seriously, this is worth doing; if you or a mate has a blow torch it takes all of 2 minutes.
Here's the result. Mine ended up at about 30 degrees but this is only just enough. Bend yours a bit further as mine only just fitted.
The spanner can now slip over the sump side nuts without hitting the sump. Here a problem arises - because the spanner is bent it tends to not only rotate when you pull on it, but the ring also tends to ride up over the nut and slip off, damaging it. Get two pieces of wood or similar and use them as levers to push against the straight bit of the spanner near the ring, so that it only rotates and doesn't slip off the nut. In this way you can at least loosen it enough to be able to use the spanner by hand to remove the nut.
Here's the spanner in use on the driver's side
and on the passenger's side
Perhaps you could use a stubby spanner, or instead of heating a cheap one just cut it off to the desired length. But the stubby spanners aren't very cheap, and I also found that bending one left me plenty of grip which made it easy to use the spanner to run the nuts down their threads when they were too tight for finger tightening, but still easy to turn with a spanner. Up to you.
For all the different techniques discussed on forums for loosening the wheel side nuts, I was pretty amazed to discover that they are quite accessible from the engine bay. Don't get me wrong, I did feel like I had to extrude myself between the tangle of fittings and cables to get the spanner in place, and then there was a bit of teeth-gritting as I tried to get enough torque on the spanner to get the nuts to crack, but just persevere and you'll make it.
Look hard and you'll see the ring spanner (not the bent one) on the passenger's side nut
and on the driver's side nut
The nuts on the underside of the mounts are straight forward as they can be accessed from underneath the car. Just make sure you use a LONG 15mm socket - a "normal" length one will not go far enough over the nut before the square drive on the ratchet strikes the head of the stud, and you won't really get sufficient grip. For the record I did try it, and I spent most of the time scurrying after the socket after it flew off the nut.
I removed all the nuts, which left the engine resting on the mounts ready to be lifted. Before lifting, make sure there are no cables or hoses pulled tight over the engine.
I lifted the engine with a trolley jack by pushing on the oil sump. I used a block of wood between the jack and sump, as widely recommended, but I was worried about the raised ring you can see in the picture:
Even with a block of wood under the sump, much of the jack's force would be pushing against the raised parts of this ring and I thought this could over stress it. So I used some very soft fibre-board packing either side of the ring so that I could be sure the jacking force would be evenly distributed. Even cardboard, sufficiently thick, would do the job.
Here's the jack in place. You can see the packing as well.
I had a mate check the engine from the engine bay (to make sure cables weren't being pulled etc) while I jacked it up very gently from below. Initially the car's entire front end will lift as the jack takes the engine's weight off the suspension. Keep going and suddenly the engine will lift off the mounts.
I lifted the engine as far as I dared, then had my mate rock the engine slightly to one side so I could pull out the passenger's side mount (but you could do the driver's side first if you wanted). It took some fiddling but I got it eventually.
Here's an old mount, next to a new one. Note the damage and the difference in length! (Ignore the callipers in the background - they aren't actually measuring anything).
Now, the old mount was of course compressed a bit, so the new mount was taller than the old one. I struggled to get the new one in, and eventually decided to cut off the rounded ends off the bottom studs, plus two or three turns of thread, to shorten them (and dressed the ends with a file). I figured this was ok because the studs are plenty long as it is. I was then able to finally slip the mount into place, again with my mate rocking the engine a little to give me some extra room. I found that the bottom studs had to be fitted into their holes first, then the engine could be lowered down into the top studs once the engine mount was in place. Here's a rough sketch of what I mean:
The passenger's side mount was installed first, then the driver's side (but the order doesn't matter). Once in, I loosely fitted the nuts to the bottom studs, making sure I could still wiggle the mounts. The engine was then lowered very very slowly down onto the mounts by backing off the release screw on the jack slightly, letting the engine lower a little, then tightening the screw. Each time I checked the position of the mounts to make sure that the studs on the top of the mounts were going into the holes in the engine brackets.
With the engine lowered completely and the mounts taking its weight, it's a simple job to put the nuts on and tighten them all back up. Again use the lever arrangement on the bent spanner to get the sump side nuts as tight as you reasonably can.
All up, about 4-5 hours, but the time spent is small compared to the experience gained and the unique satisfaction you feel at having done something worthwhile for yourself. Hope this has been helpful!
Chad