More tips for removal of centre console unit


Great post - I did a lot of searching before finding this "how to" and it helped me heaps !!!!!
I needed to remove and replace the traction control switch, though to be honest the how to was not quite descriptive enough.
Looking at the photos, I can't help but wonder what it was that the previous owner spilt, but it went everywhere.....Coffee? Or maybe Molassess? Who knows?
I followed the instructions but could not get the console to come up high enough to remove the traction control switch. The 2 upper tabs mentioned in step #4 broke off while I was trying to remove the console. As well the area near the lower tabs (where the spring clip is shown in that photo) also fractured; in truth it almost broke completely. That'll give you an idea of the amount of leverage I was using to try to remove the console after all the other screws in steps #5 through to #7 were removed. I will also mention that the 2 screws referred to in step #7 are hidden. After the console lid hinge is removed, the screws shown (at the top of the housing) are not evident until you unclip and remove the "Upside down U" shaped piece of trim that hides the screws.
Now I don't know if my wagon had something not genuine fitted, but I finally realised (why didn't I realise this an hour before?) there was 1 more screw on either side of the console and they were what was causing the console to remain in its' general location, I now know those screws are what caused the plastic tabs to break.
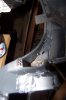
To get access to these screws you have to prise out the lower front section on either side of the console, this will reveal the hidden screws that need to be removed to allow the console to be lifted up. Because those screws were still in situ, whilst I was trying to raise the rear of the console to manouever the console out, the screw that holds the rear facing air vents to the console itself, caused the palstic tab through which the screw passes before threading into the air vent, to break. I have shown this tab in another photo, and the repair job, too.
So although most of the retaining screw had broken off, I managed to repair them all using an electric soldering iron to heat & melt the plastic to effect repairs. I'll admit it doesn't look pretty, but the result is that repairs were made and the console, once replaced is secured properly and there is no visual evidence of the repairs.
Hopefully this addendum may help others looking to remove the console in their ride.
May I apologise for the fact that the uploaded pictures are not really placed ideally within this post; one day i might learn how to do that properly.
 now i can see all the crap in there at night