ari666
250,000 hits
- Joined
- Mar 10, 2009
- Messages
- 11,835
- Reaction score
- 128
- Points
- 63
- Location
- melbourne
- Members Ride
- 1966 impala, R32 GTR
sigh, ok, well it seems you cant post threads here to see what they look like, so am doing this again
lol, i need to preface this by saying that i am no expert, this is just a culmination of what i have read, and playing with 2 other quaddys before. if there is any misleading info i will be happy to make correction based of FACT and not people opinions or theorys.
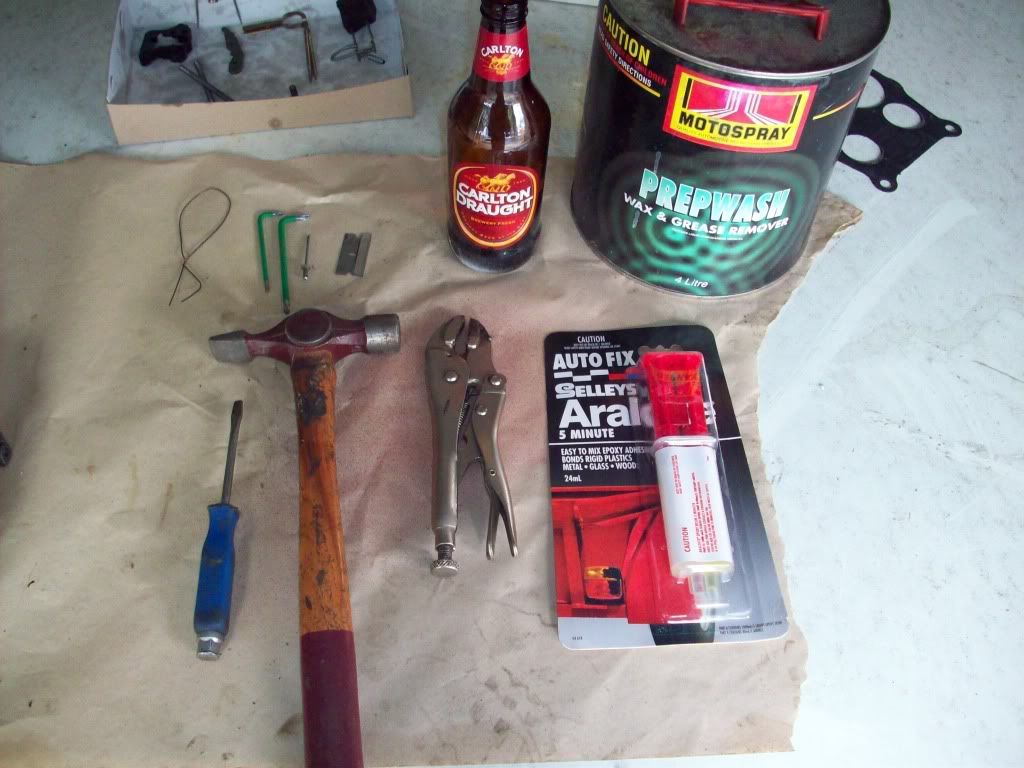
ok to start you will need:
prepsol
araldite
small hammer
1/8th pop rivet
razor blade
torx keys. cant remember what sizes, some also may have been changed to either phillips screws or allen keys so they would depend on your carb.
blade screwdriver
30cm of welding wire or something similar
and a beer (optional)
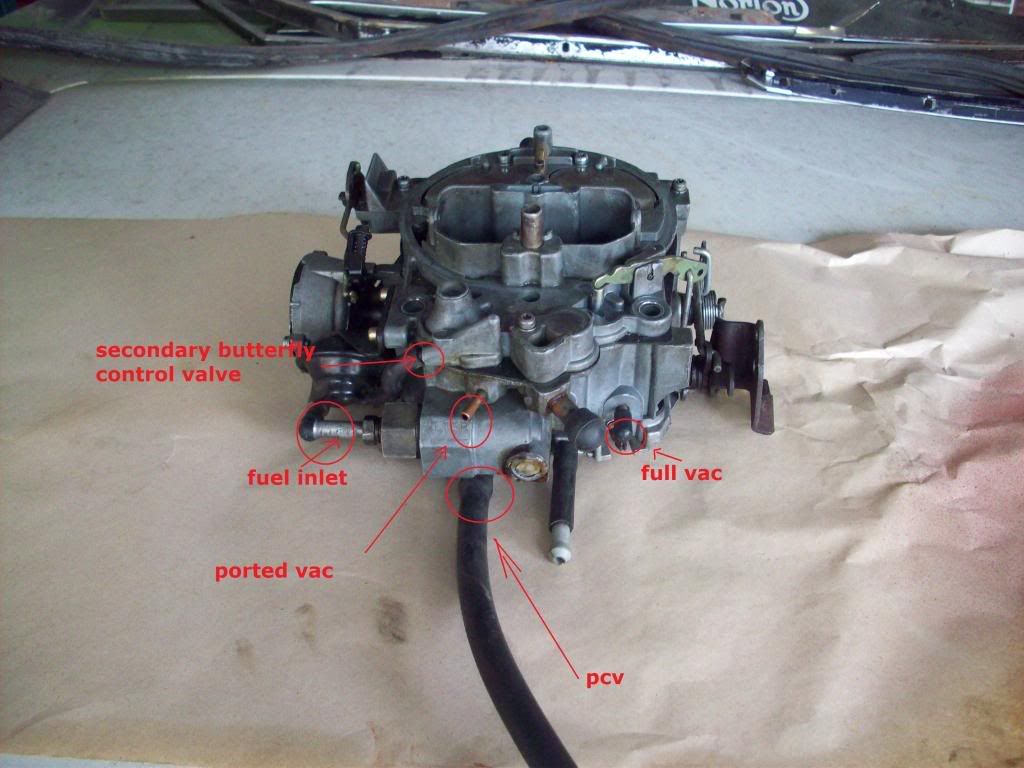
ok so here is my quaddy, the essential vac hoses are listed. this is basically all you will need for a system that isnt using TVS, charcoal can or EGR. i am not saying dont use them, am just saying these are the minimum.
a few checks before we start stripping her down are;
check that your accelerator pump arm contacts the center of the pump nicely and is a round shape. if the pump arm has worn flat on the bottom you will need to grind it so its round again. this is so the pump action works smoothly and you dont get a horrible 'bog' or flat spot when the pump suddley releases and shoots too much fuel after not giving it enough briefly.
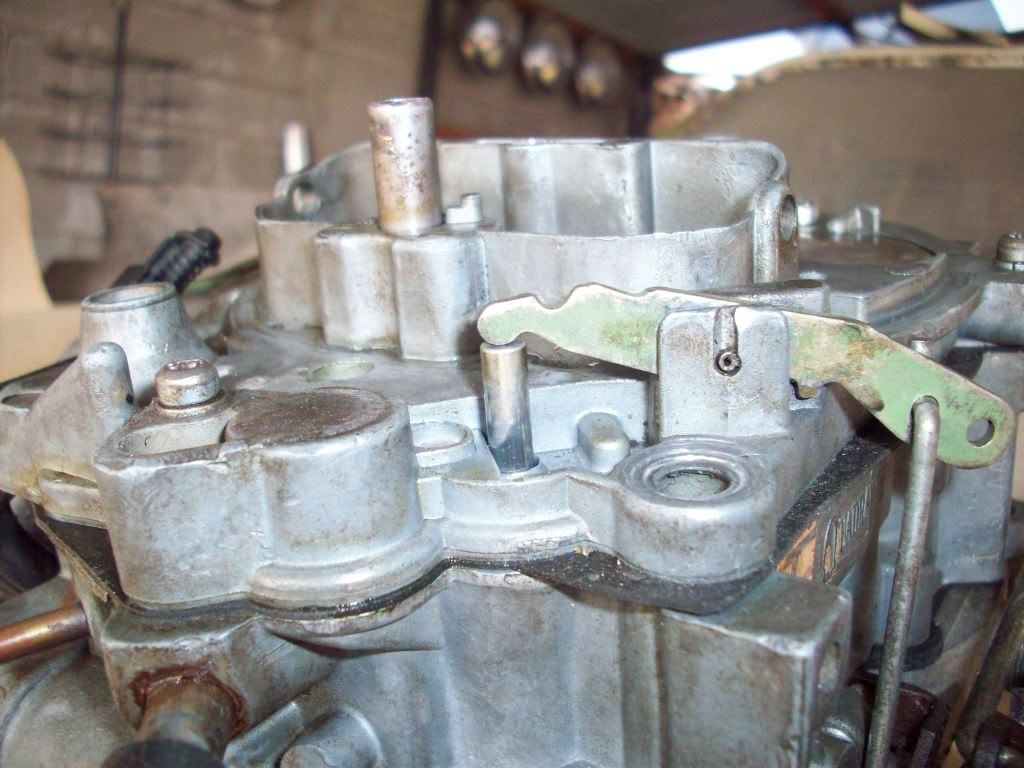
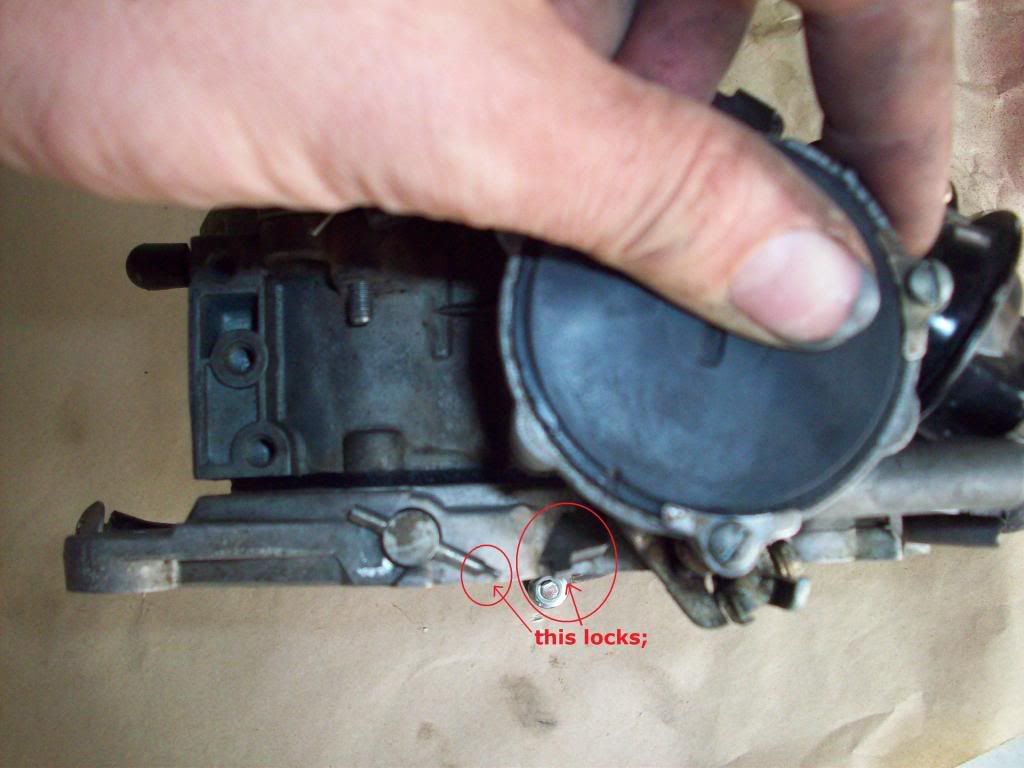
its a terrible photo but will edit it later to circle the bit that needs to be bent. anyway, there is a catch here which your auto choke locks onto and will not allow your secondary to open until it hits running temp. THIS will cause a lot of headaches, bend it out of the way. i suppose now would be a good time to mention that i have completely removed the top butterfly for the choke and zip tied up the choke assembly. i dont use it, i dont want it so its gone. i would suggest the same for all quaddys, but they do serve a purpose. so its up to you
check that your primarys and secondarys open up FLAT. they should open to 90 degrees and thats it. my mechanic told me it should be angled so that fuel atomises better but it is bullcrap, the upper needs to be angled not the lower. its important to remember that your butterflys WILL open up further than 90 degrees, but i am not talking about full movement, just movement when you apply the accelerator at WOT (wide open throttle)
your secondary upper butterfly should open up on a slight angle, i am not sure of the correct angle but i have tried a little modification which means i am getting full opening and full lift on the secondary metering rods and it seems to work a treat, this carb would now thump my 750 holley, and gets slightly better fuel.
so, to do it, check that your your flaps are stopping before 90 degrees, then kinda guess how much to grind off
now if you just ground off that bit and left it at that, you would prolly make it run a bit worse cos' when the fuel squirts out of the secondary squirty hole thingie, itll just hit that flap and trickle down to drip into your inlet. what you want is for it to splash everywhere and make a massive mess. cos then itll be atomising properley, so to help you out we do two things. one is make a nice hole directly above the 'squirty in bit' (god i am bad with names) and the other is to cut groves and depressions into the flap itself, kinda like when you port and polish your heads you leave nice grooves in the inlet ports so fuel vaporises more effectively, same principle here
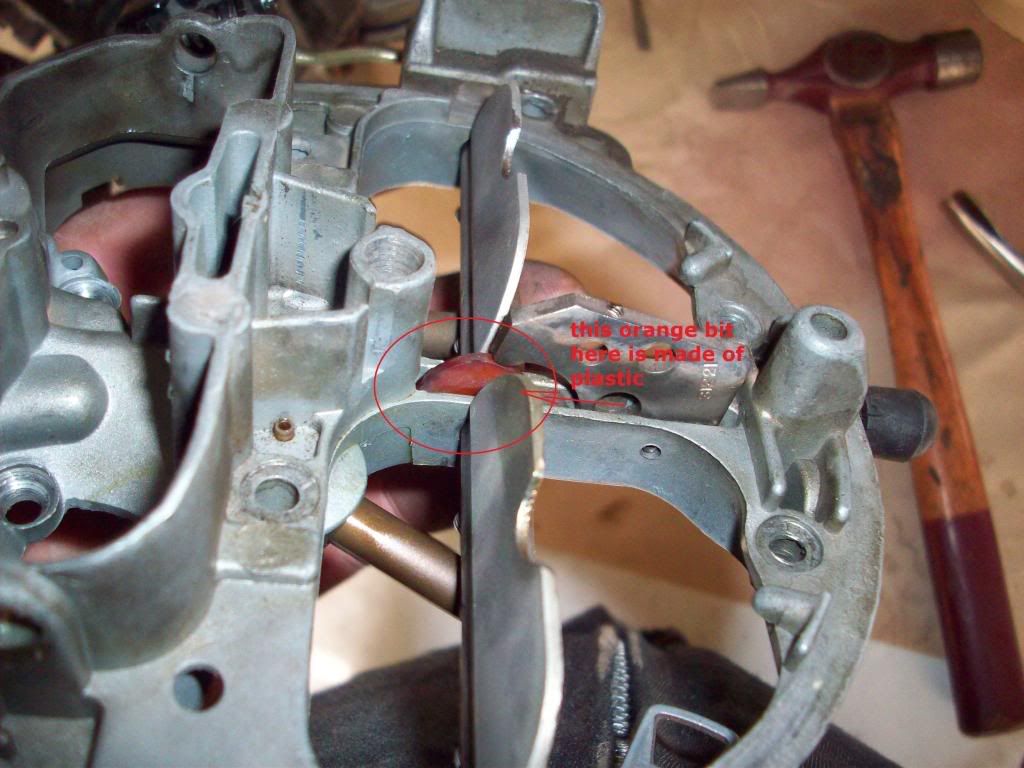
check your cam!!! lol, there is a little plastic cam on the secondarys flap which lifts the secondary metering rods as the butterflys open. this cam has a tendancy to melt and die especially if you are running your beast on LPG. so no cam, so secondary meter rods=no petrol going in at high rpm=pinging and engine death.
this bit will need to be adjusted on the car in real time cos there is no way of knowing where it should be set without the engine running but i will throw it in anyway so people know where and what it is.
the secondary flaps are vacum operated and open when the car sucks enough juice through the venturies. when the flaps open the hanger and rods lift letting more fuel in making you go faster. BUT if you set the spring rate too loose the secondarys will flop around, use BUCKETS of fuel (you have no idea how bad it will be, no point going on the freeway unless you have a full tank for a 20 min drive) flat sopt all over the place and leave clouds of black smoke behind you every time you put the boot in.
the way i adjust it is to do the 'tap test' so basically tap the flap with my finger, if it opens too easily, adjust it till it gives quite a lot of resistance. a stock or cammed 308 will not need much opening rate, so tighten it right up.
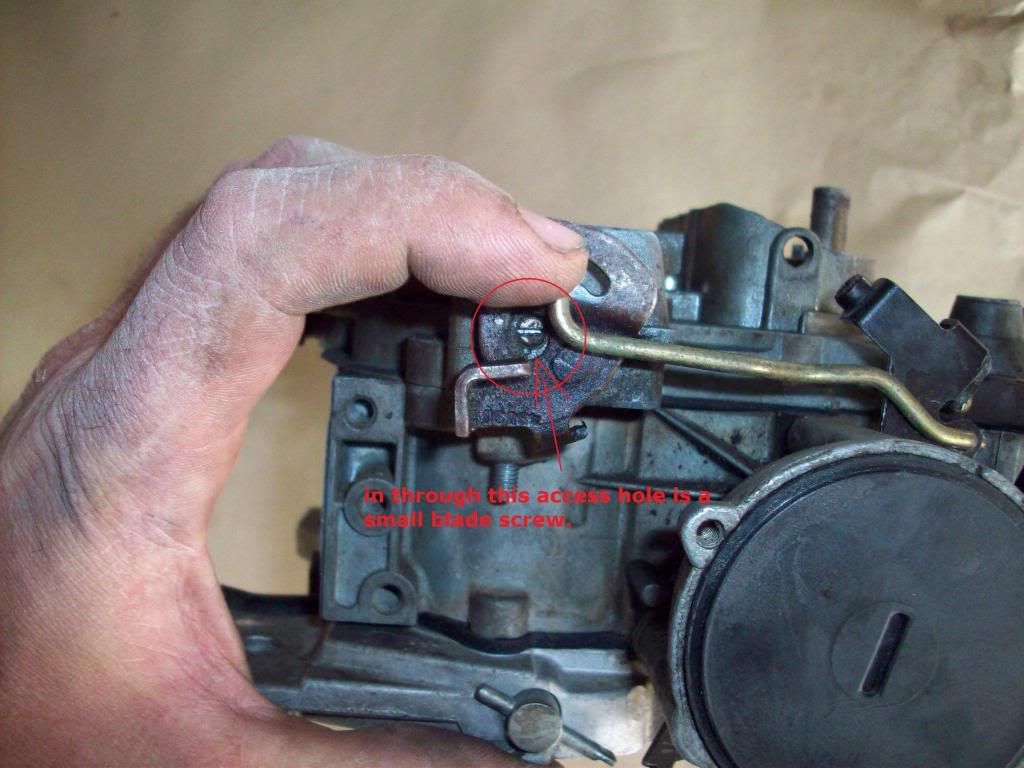
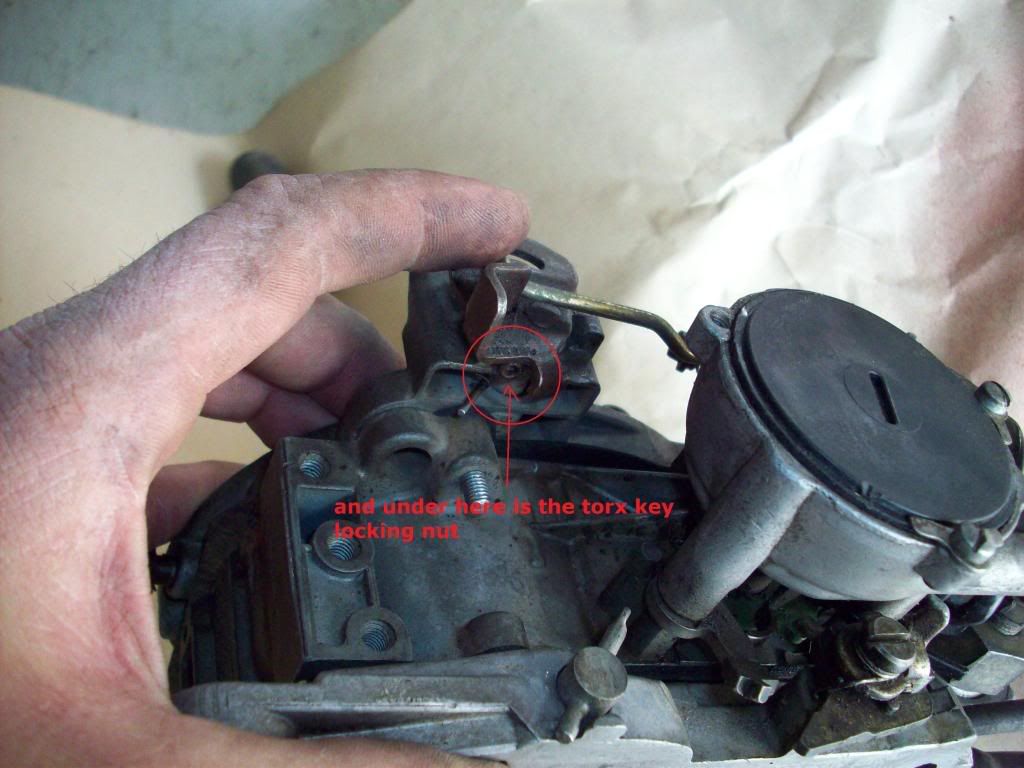
to tighten it you need two hands and a lot of patience. there are two stage, a locking torx key and a flat blade screw. the blade screw is the tensioning adjustment and the torx locks it in place. so. put your little blade screwdriver in the screw, hold it tight DONT LET GO or itll release the spring and you will have no idea where it is set at. so witht he screw held tight, loosen off the torx and either turn the screw clockwise or counter clockwise in 1/8th turns.
the driving test involves you moving off, traveling around 20kmph and putting the boot in at various degrees, wot, part and closed. you will be feeling for a flat spot or hesitation, if there is a flat sopt, stop, tighten the screw 1/8th of a turn. no flat spot, loosen till you get one, then go back 1/8th.
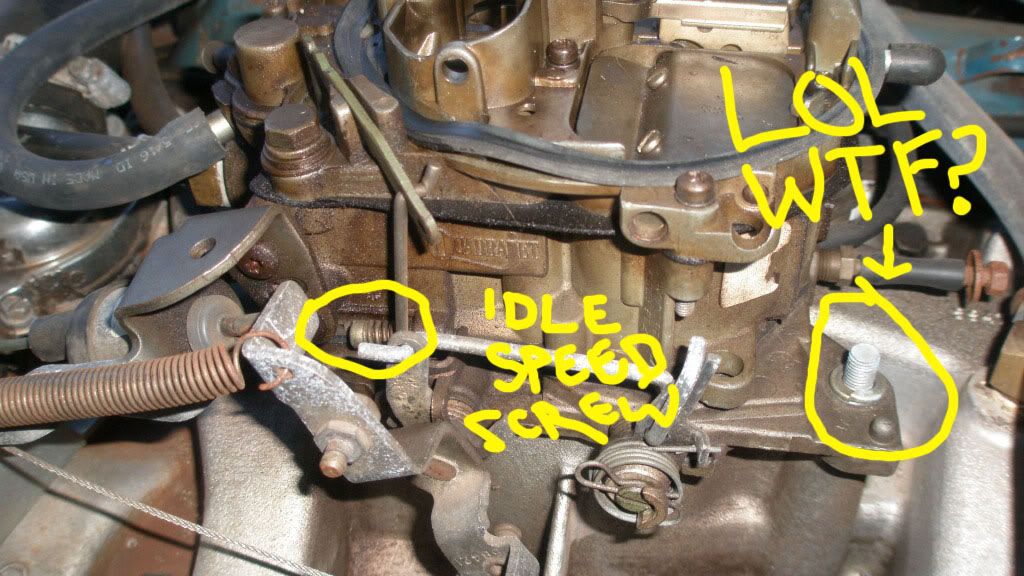
al right, dunno why i am mentioning this bit cos if you dont know what your idle speed screw is, you shouldnt be taking your carby off.
anyways, the idle circuit. i drilled 1/8th holes in my idle air bypass, cant remember at this stage why i did it, but it seemed like the thing to do at the time so i did. doesnt seem to have done any harm.
* lol, im such an idiot, i enlarged the idle air bypass so i could close my throttle blades further and expose less of the transfer slots (blue arrow) was having trouble getting a good vac reading cos' my cam means i am getting around 7 inches of vacuum. when i was playing with the idle screws to get the mixtures right it would have no effect on vacuum cos my tranfer slots were too exposed. enlarging the hole meant i could let down the idle speed screw (which closes the primary throttle blades) without it stalling and without having to advance the sh1t out of it, just to tune.... make sense?*
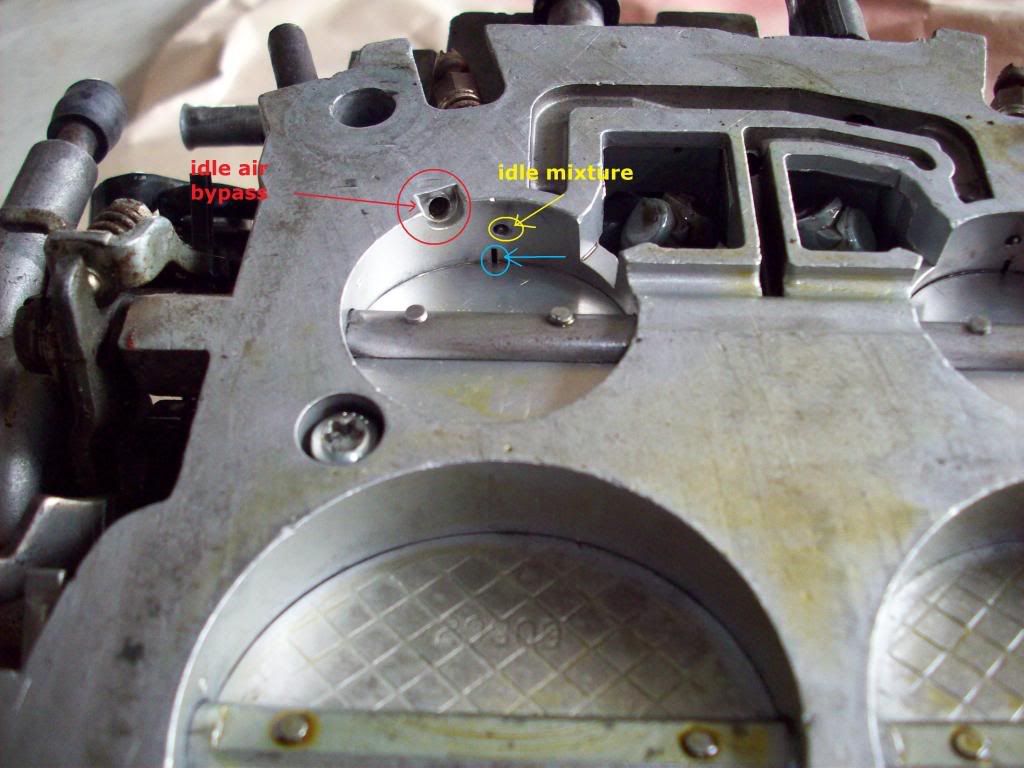
oh and make sure your idle mixture screws are exposed as on some models they are covered up by a little welch plug,
right, now onto some fun stuff. the secondary meter rods are really easy to change and can be done on the car, there is one screw on the top of the hanger which is a torx screw of unheard of size, so to get her off i just vice grips
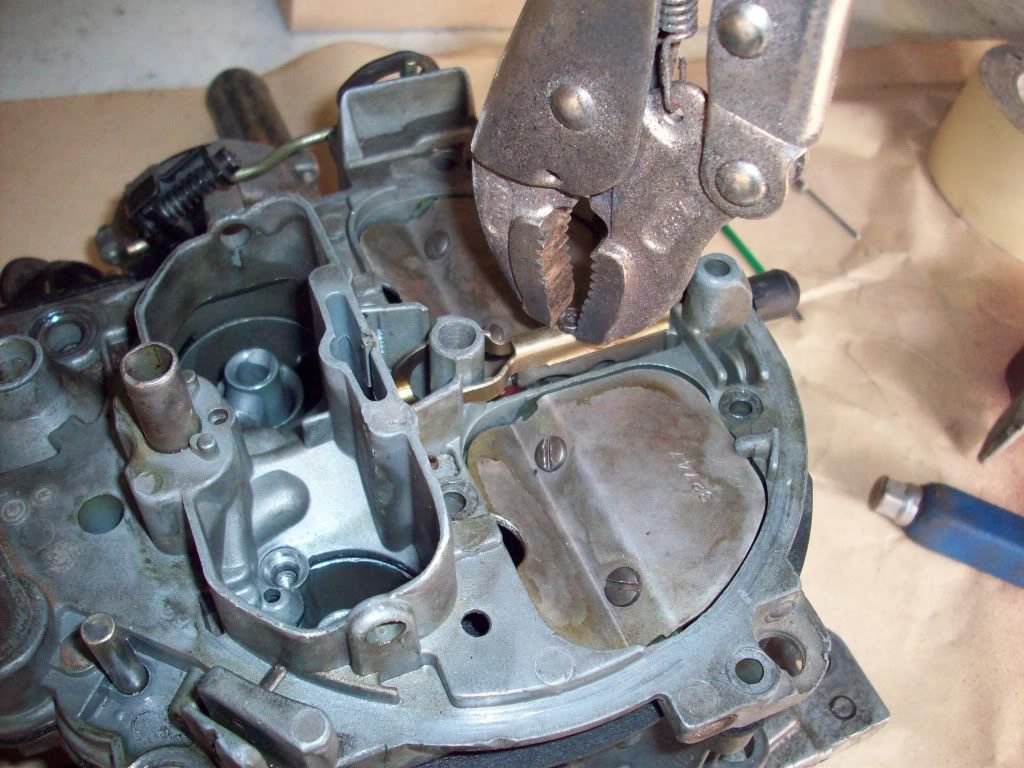
after taking off the screw, your hanger just lifts off and the rods come with it. there will be some letters on your rods which will tell you what rich-ness they are. take note of it and goolge it cos i cant remember which ones do what but the hanger is "the lower the letter, the better" my hanger is N i believe.
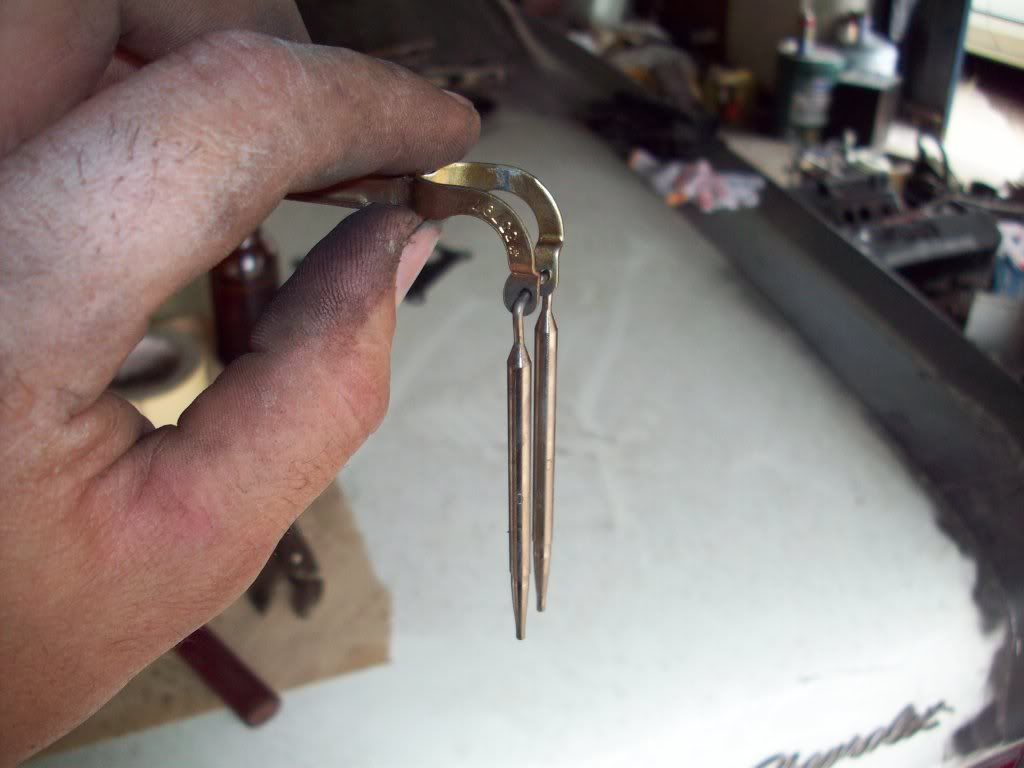
oh, there are no jets in the bottom, they just rest in holes on the base of the carb so dropping them back in is easy as pie, as long as the carb is level.
ok so holding the top of the carb on are nine screws. 7 are obvious as hell, so you dont need a pic but two are hidden ish in the venturys. pop them out. two are reeaaaly long so you may have to unscrew them for a long time. i find the beer comes in handy for that bit.
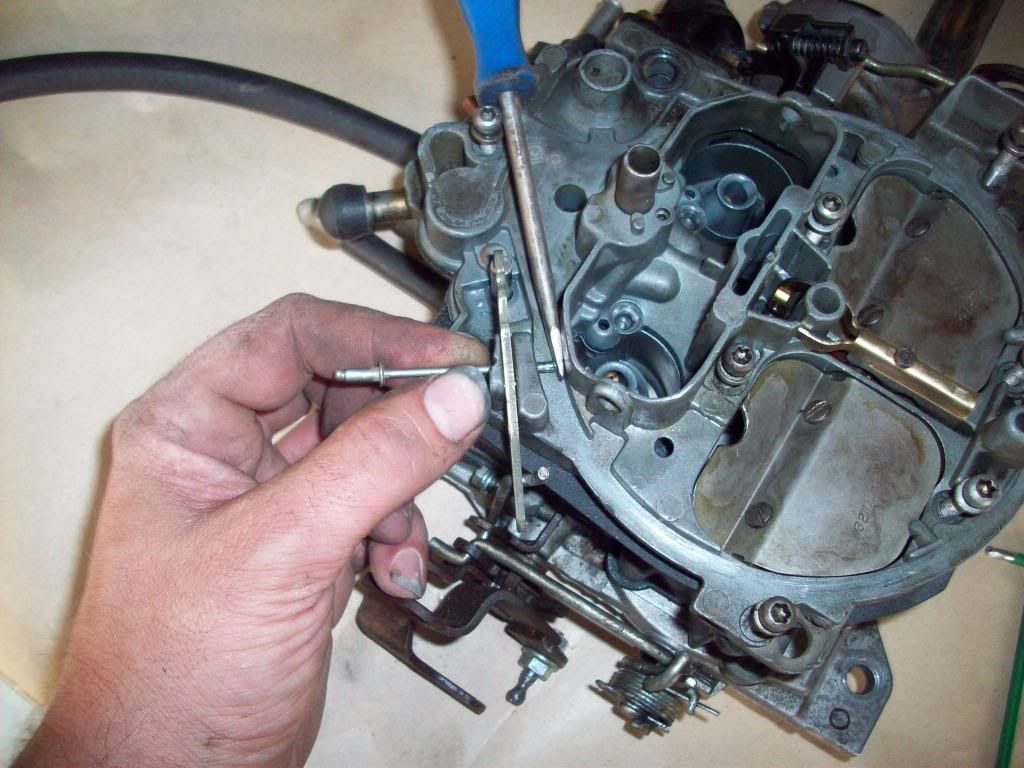
the tricky bit is taking off the primary pump arm. to do it you need three hands, a blade screw driver, hammer and a pop rivet, tap the pop rivet into the split pin holding the pump arm on till it starts to come out a little bit. if you are not careful, then last tap on the rivet will mean the split pin hits the choke horn and will be a right pain in the arse to get back. so to stop that happening, put your blade screw driver on the choke horn to stop the split pin.
now, the sucky part about this post is that you will need to mess with your choke horn, but because i ripped it all out, i cant show you how to do it, but you can figure it out
when you take the top off be real careful with the gasket, cos although you obviously bought a new carb kit, you dont wanna be scraping off old gasket stuck to the body. so when it comes off, the pump will spring out of place and so will a weird looking springy thing. dont worry, its fine that they fell out.

the primary metering rods are exactly the same principle as the secondarys, but they are operated via vacuum from primary venturies. there is a little rubber band around them which is the biggest pain in the recum to get right, but you need to get it perfect or it doesnt seal properley. but today i am not changing anything, so the rods and hanger are staying in the gasket.
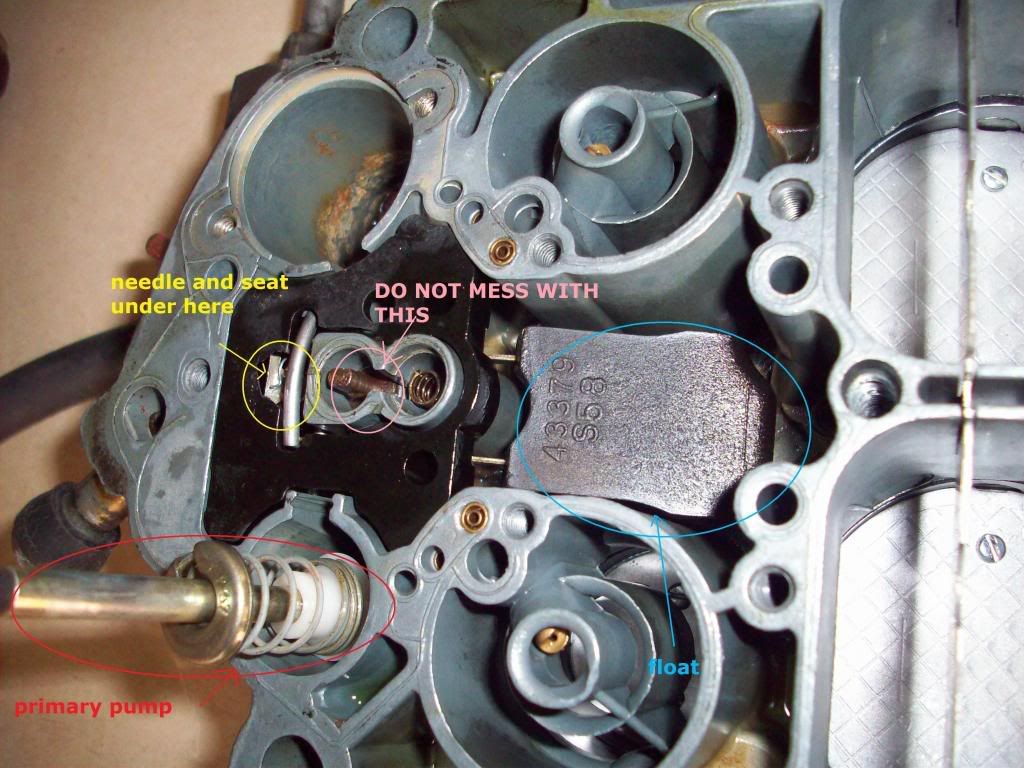
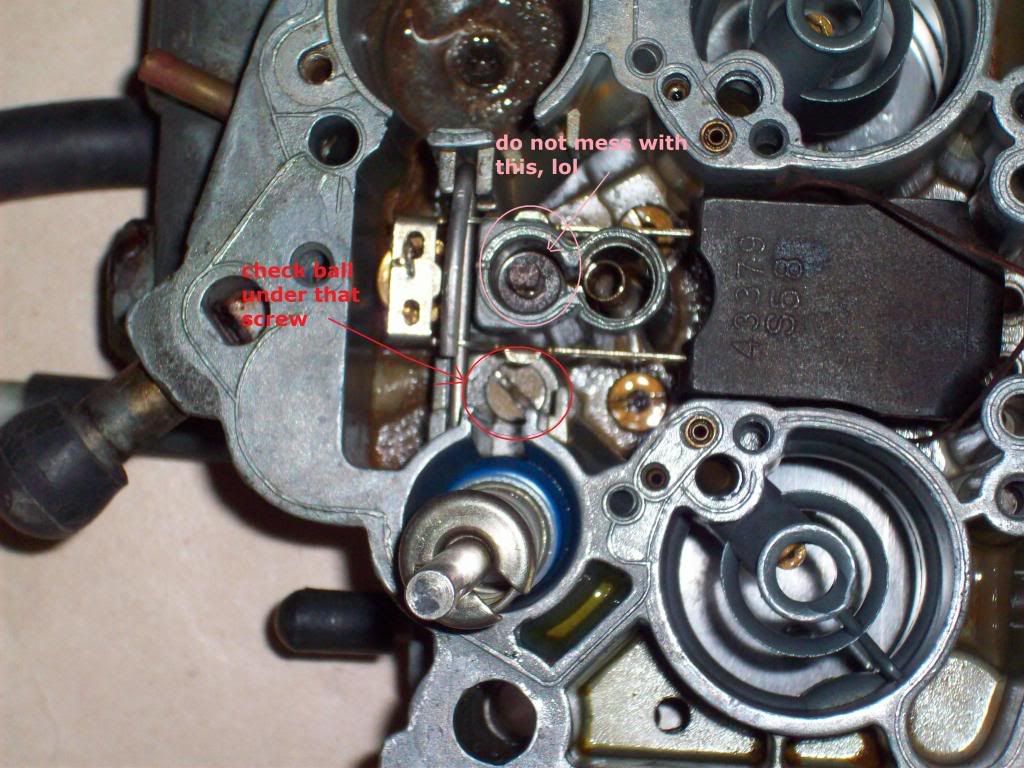
So now, there are a few things to look at here, the float/needle and seat, primary pump, and the "do not mess with" bit. lol. you can adjust your primary mixtures by turning that screw thing, but i wouldnt. its not like idle mixtures where you can just f' around with them for a laugh, this would be a pain to get wrong and pull apart to correct.
this is the reason i had to pull this b..ch apart again, the suction cup thingie came off completely, you can see the blue in the pump body? its meant to be attached to the white bit. shows you how crap non GM stuff is. i used a brand called "fuel miser" and wont be using them again. anyway i have the original at work so its a matter of getting a lift and going back to stock.
next we adjust the float level. needle and seat looks like this
adjusting it is a bit more tricky that it looks, but once you get the idea it isnt that hard, what you need to do is seat the needle and seat fully closed . so to do that, press down on the bit labelled above "needle and seat under here" wrap your piece of welding wire around the float and pull it up (bend the metal, dont worry its designed to do it) till it is level with the body of the carb, NOTE: it needs to be level with the carb, but not the same height. mine sits around 1mm lower than the body when it is fully level.
my next suggestion is to get a bit more juice to fit into the fuel bowl, so basically its just making some room. the plastic retainer for the float assembly is not completely used and it wont notice if you shave a bit off. sorry, i only have an 'after' pic cos' i cut this a while ago. once you get yours out you will see what i mean
you will also notice in your rebuild kit there is a little ball bearing and you will prolly wonder WTF, well it goes under here. think it helps in case of a backfire like the holley check ball that protects your power valve, but not 100 per cent sure.
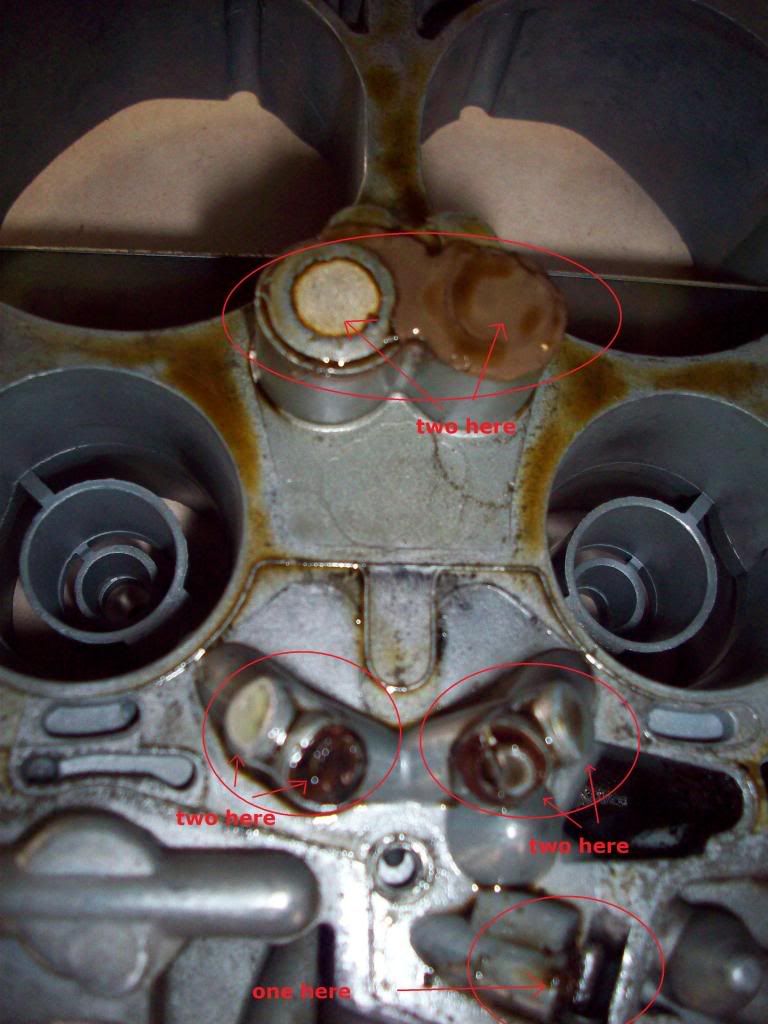
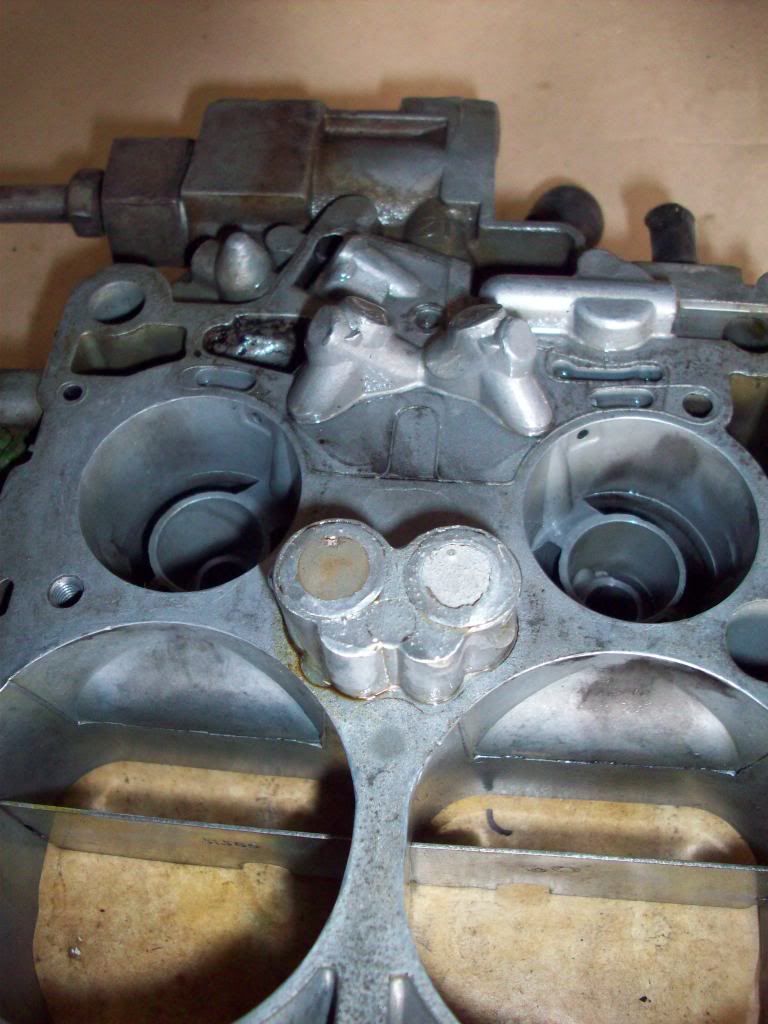
now one of the most important things to do to old quaddys is seal up these little welch plug type thingies. they are just lille bash on plugs and leak all the time. causeing drips of fuel where you dont want them, vacuum issues and almost impossible to get your idle mixtures set correctly.
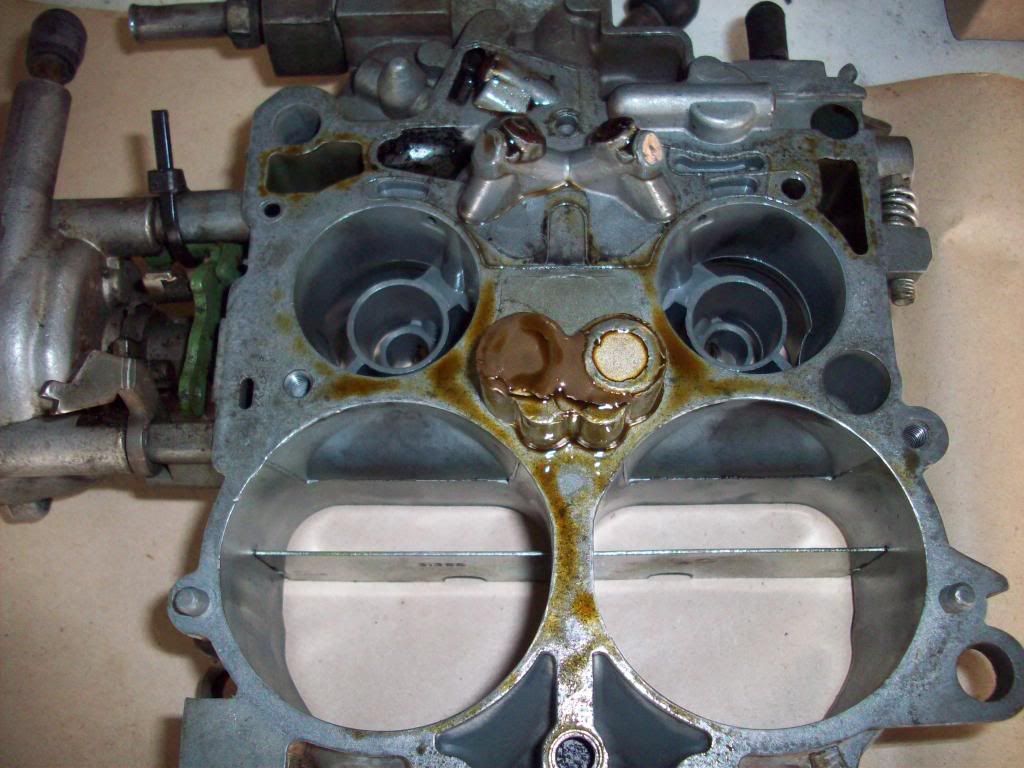
the brown crap in the middle is stagnant fuel that had dripped out and caused headaches.
these are the problem areas, it is said on the net that you only need to araldite it once cos its a permanant fix, but mine had been done before (years ago, previous owner) and they still leaked like a wet fart.
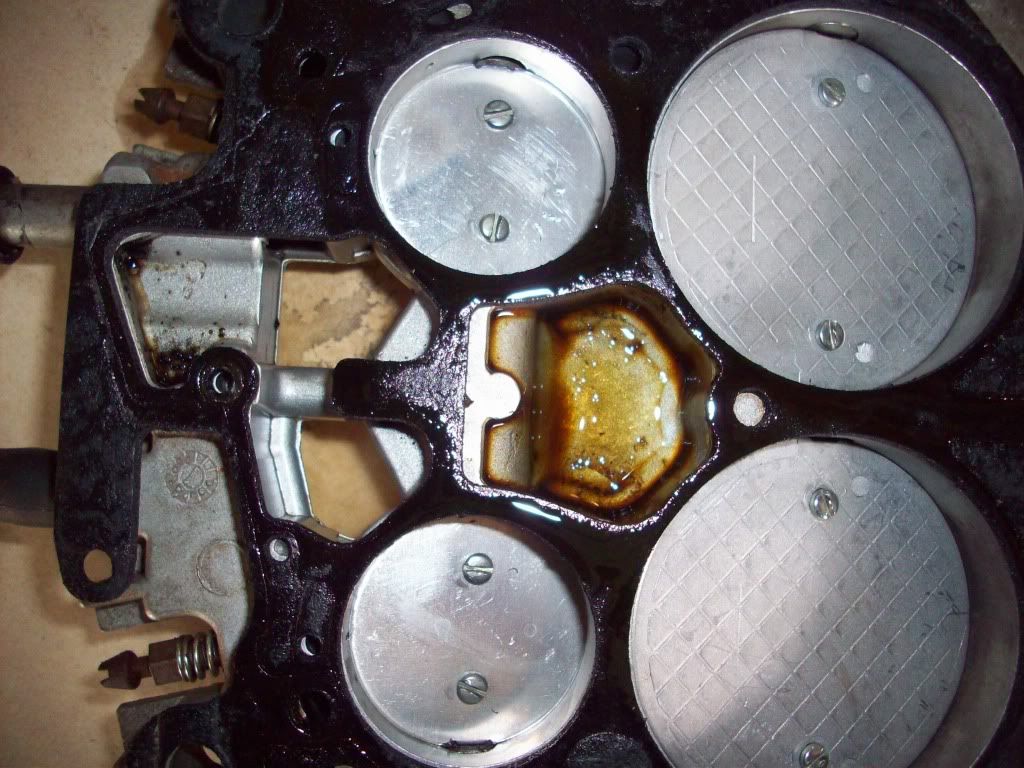
so basically clean them up. i used the rolec (or as i like to call it "the jew jew", cos thats the noise it makes) and once all the crap is off them, a couple of taps with your hammer to re seat them. please dont be an idiot and hit the carb on the bench. hold it in your arms like a little baby. its alloy, hitting it dents it. so be careful and give it some love. maybe apologise to it later for hitting it
and then buckets of prepsol. dont be a tightarse with your prepsol either it doesnt harm anything and is the best stuff cos it evaporates completely making it better then metho, kero or thinners.
dont be a tight arse with araldite either, remember, if you dont do it well enough the first time, you will be stripping it again to fix it.
now ya gotta wait 24 hours for it to dry, so i will be back tomorrow to finish.
lol, i need to preface this by saying that i am no expert, this is just a culmination of what i have read, and playing with 2 other quaddys before. if there is any misleading info i will be happy to make correction based of FACT and not people opinions or theorys.
ok to start you will need:
prepsol
araldite
small hammer
1/8th pop rivet
razor blade
torx keys. cant remember what sizes, some also may have been changed to either phillips screws or allen keys so they would depend on your carb.
blade screwdriver
30cm of welding wire or something similar
and a beer (optional)
ok so here is my quaddy, the essential vac hoses are listed. this is basically all you will need for a system that isnt using TVS, charcoal can or EGR. i am not saying dont use them, am just saying these are the minimum.
a few checks before we start stripping her down are;
check that your accelerator pump arm contacts the center of the pump nicely and is a round shape. if the pump arm has worn flat on the bottom you will need to grind it so its round again. this is so the pump action works smoothly and you dont get a horrible 'bog' or flat spot when the pump suddley releases and shoots too much fuel after not giving it enough briefly.
its a terrible photo but will edit it later to circle the bit that needs to be bent. anyway, there is a catch here which your auto choke locks onto and will not allow your secondary to open until it hits running temp. THIS will cause a lot of headaches, bend it out of the way. i suppose now would be a good time to mention that i have completely removed the top butterfly for the choke and zip tied up the choke assembly. i dont use it, i dont want it so its gone. i would suggest the same for all quaddys, but they do serve a purpose. so its up to you
check that your primarys and secondarys open up FLAT. they should open to 90 degrees and thats it. my mechanic told me it should be angled so that fuel atomises better but it is bullcrap, the upper needs to be angled not the lower. its important to remember that your butterflys WILL open up further than 90 degrees, but i am not talking about full movement, just movement when you apply the accelerator at WOT (wide open throttle)
your secondary upper butterfly should open up on a slight angle, i am not sure of the correct angle but i have tried a little modification which means i am getting full opening and full lift on the secondary metering rods and it seems to work a treat, this carb would now thump my 750 holley, and gets slightly better fuel.
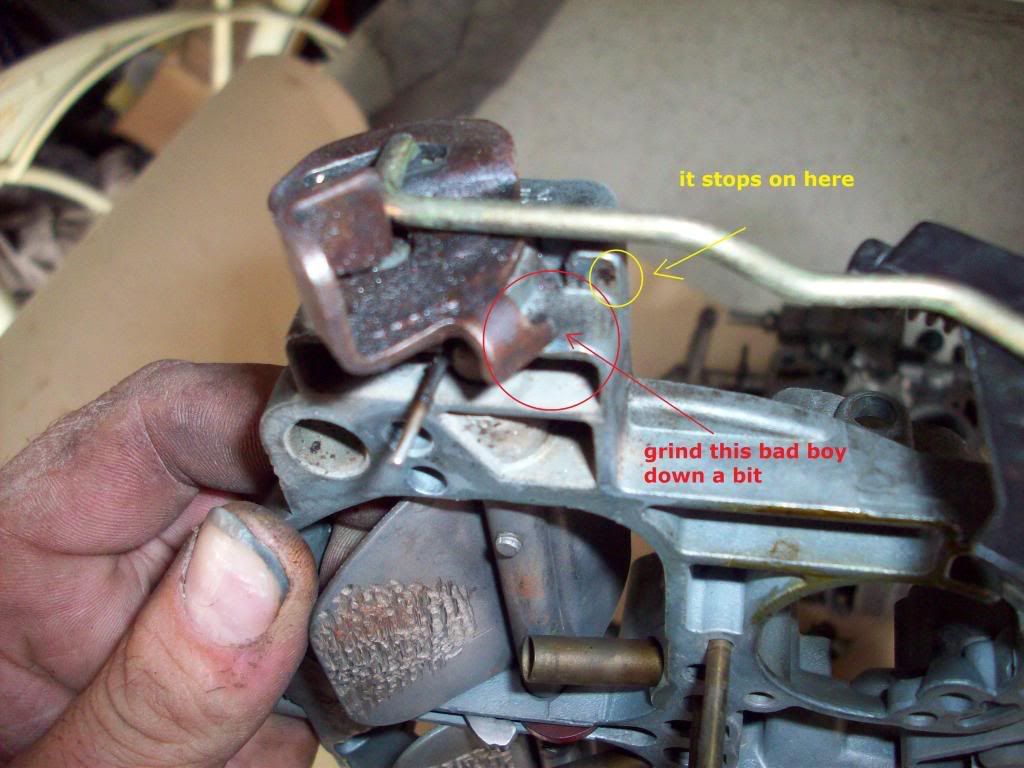
so, to do it, check that your your flaps are stopping before 90 degrees, then kinda guess how much to grind off
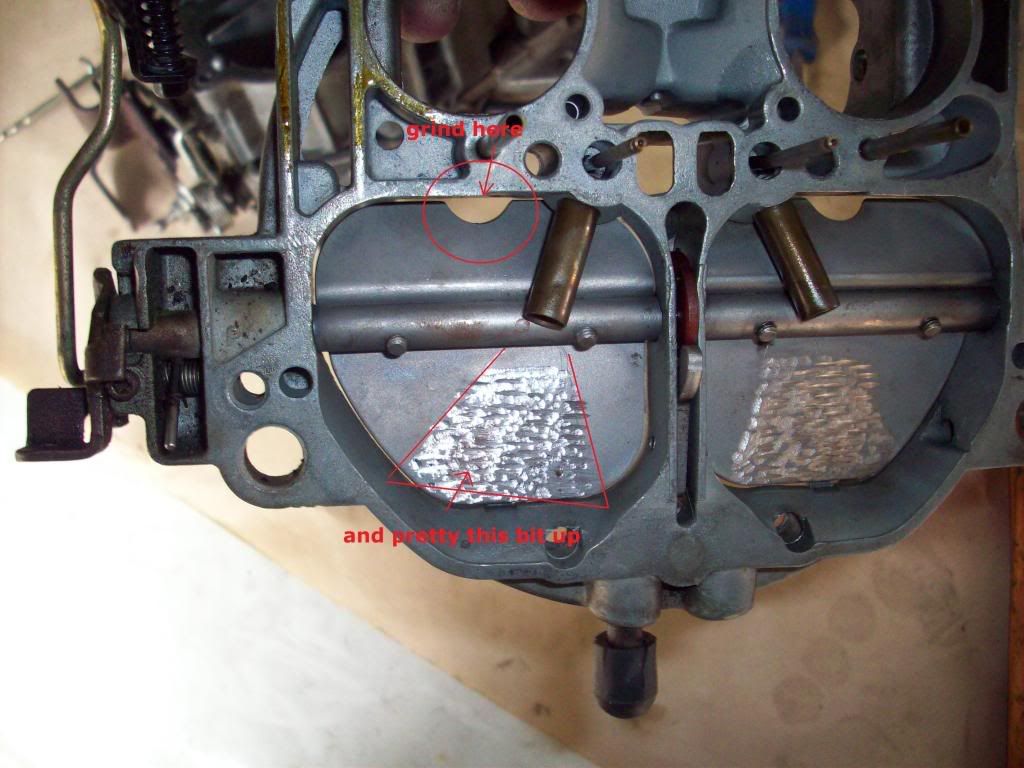
now if you just ground off that bit and left it at that, you would prolly make it run a bit worse cos' when the fuel squirts out of the secondary squirty hole thingie, itll just hit that flap and trickle down to drip into your inlet. what you want is for it to splash everywhere and make a massive mess. cos then itll be atomising properley, so to help you out we do two things. one is make a nice hole directly above the 'squirty in bit' (god i am bad with names) and the other is to cut groves and depressions into the flap itself, kinda like when you port and polish your heads you leave nice grooves in the inlet ports so fuel vaporises more effectively, same principle here
check your cam!!! lol, there is a little plastic cam on the secondarys flap which lifts the secondary metering rods as the butterflys open. this cam has a tendancy to melt and die especially if you are running your beast on LPG. so no cam, so secondary meter rods=no petrol going in at high rpm=pinging and engine death.
this bit will need to be adjusted on the car in real time cos there is no way of knowing where it should be set without the engine running but i will throw it in anyway so people know where and what it is.
the secondary flaps are vacum operated and open when the car sucks enough juice through the venturies. when the flaps open the hanger and rods lift letting more fuel in making you go faster. BUT if you set the spring rate too loose the secondarys will flop around, use BUCKETS of fuel (you have no idea how bad it will be, no point going on the freeway unless you have a full tank for a 20 min drive) flat sopt all over the place and leave clouds of black smoke behind you every time you put the boot in.
the way i adjust it is to do the 'tap test' so basically tap the flap with my finger, if it opens too easily, adjust it till it gives quite a lot of resistance. a stock or cammed 308 will not need much opening rate, so tighten it right up.
to tighten it you need two hands and a lot of patience. there are two stage, a locking torx key and a flat blade screw. the blade screw is the tensioning adjustment and the torx locks it in place. so. put your little blade screwdriver in the screw, hold it tight DONT LET GO or itll release the spring and you will have no idea where it is set at. so witht he screw held tight, loosen off the torx and either turn the screw clockwise or counter clockwise in 1/8th turns.
the driving test involves you moving off, traveling around 20kmph and putting the boot in at various degrees, wot, part and closed. you will be feeling for a flat spot or hesitation, if there is a flat sopt, stop, tighten the screw 1/8th of a turn. no flat spot, loosen till you get one, then go back 1/8th.
al right, dunno why i am mentioning this bit cos if you dont know what your idle speed screw is, you shouldnt be taking your carby off.
anyways, the idle circuit. i drilled 1/8th holes in my idle air bypass, cant remember at this stage why i did it, but it seemed like the thing to do at the time so i did. doesnt seem to have done any harm.
* lol, im such an idiot, i enlarged the idle air bypass so i could close my throttle blades further and expose less of the transfer slots (blue arrow) was having trouble getting a good vac reading cos' my cam means i am getting around 7 inches of vacuum. when i was playing with the idle screws to get the mixtures right it would have no effect on vacuum cos my tranfer slots were too exposed. enlarging the hole meant i could let down the idle speed screw (which closes the primary throttle blades) without it stalling and without having to advance the sh1t out of it, just to tune.... make sense?*
oh and make sure your idle mixture screws are exposed as on some models they are covered up by a little welch plug,
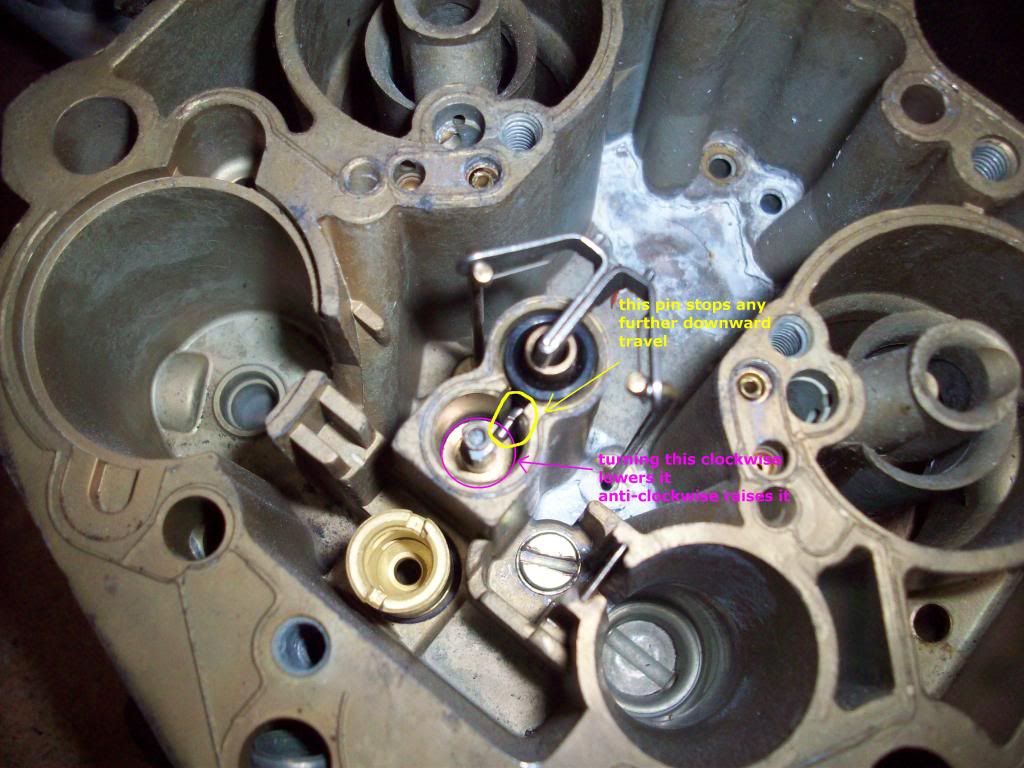
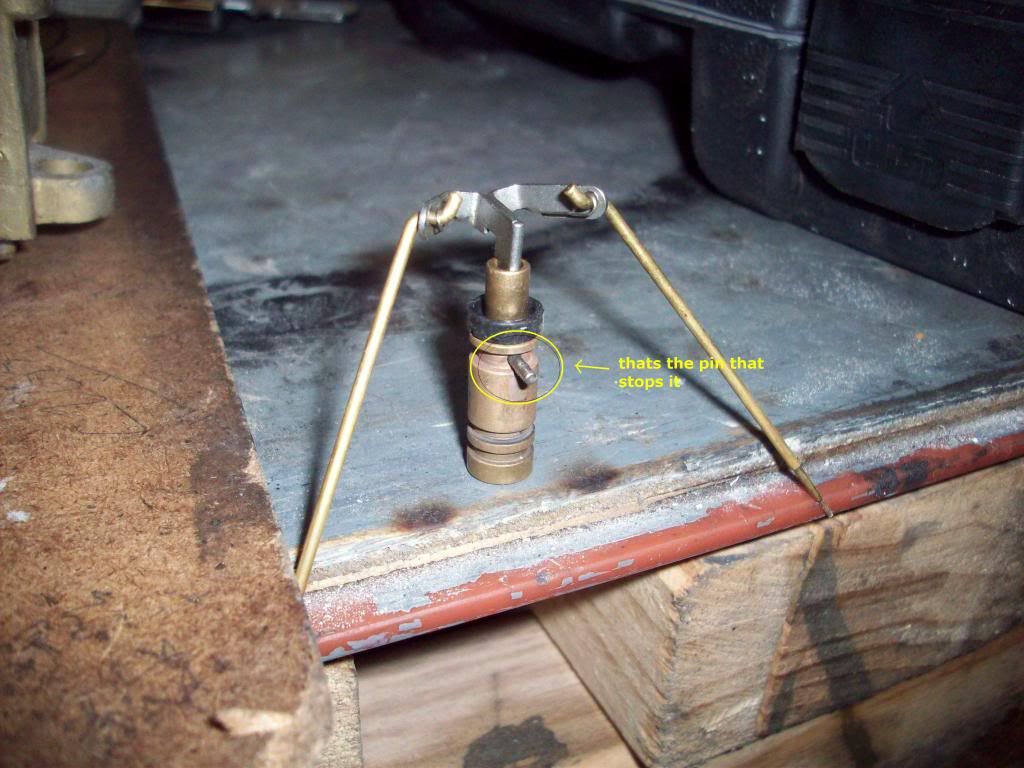
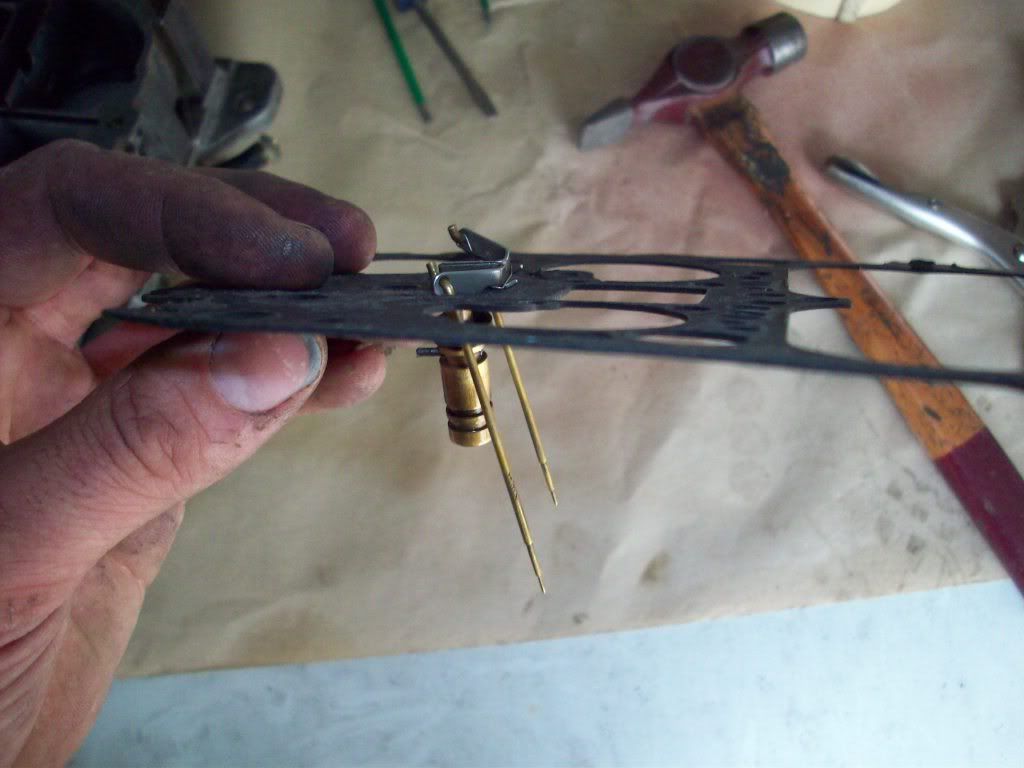
right, now onto some fun stuff. the secondary meter rods are really easy to change and can be done on the car, there is one screw on the top of the hanger which is a torx screw of unheard of size, so to get her off i just vice grips
after taking off the screw, your hanger just lifts off and the rods come with it. there will be some letters on your rods which will tell you what rich-ness they are. take note of it and goolge it cos i cant remember which ones do what
but the hanger is "the lower the letter, the better" my hanger is N i believe.
oh, there are no jets in the bottom, they just rest in holes on the base of the carb so dropping them back in is easy as pie, as long as the carb is level.
ok so holding the top of the carb on are nine screws. 7 are obvious as hell, so you dont need a pic but two are hidden ish in the venturys. pop them out. two are reeaaaly long so you may have to unscrew them for a long time. i find the beer comes in handy for that bit.
the tricky bit is taking off the primary pump arm. to do it you need three hands, a blade screw driver, hammer and a pop rivet, tap the pop rivet into the split pin holding the pump arm on till it starts to come out a little bit. if you are not careful, then last tap on the rivet will mean the split pin hits the choke horn and will be a right pain in the arse to get back. so to stop that happening, put your blade screw driver on the choke horn to stop the split pin.
now, the sucky part about this post is that you will need to mess with your choke horn, but because i ripped it all out, i cant show you how to do it, but you can figure it out
when you take the top off be real careful with the gasket, cos although you obviously bought a new carb kit, you dont wanna be scraping off old gasket stuck to the body. so when it comes off, the pump will spring out of place and so will a weird looking springy thing. dont worry, its fine that they fell out.
the primary metering rods are exactly the same principle as the secondarys, but they are operated via vacuum from primary venturies. there is a little rubber band around them which is the biggest pain in the recum to get right, but you need to get it perfect or it doesnt seal properley. but today i am not changing anything, so the rods and hanger are staying in the gasket.
So now, there are a few things to look at here, the float/needle and seat, primary pump, and the "do not mess with" bit. lol. you can adjust your primary mixtures by turning that screw thing, but i wouldnt. its not like idle mixtures where you can just f' around with them for a laugh, this would be a pain to get wrong and pull apart to correct.
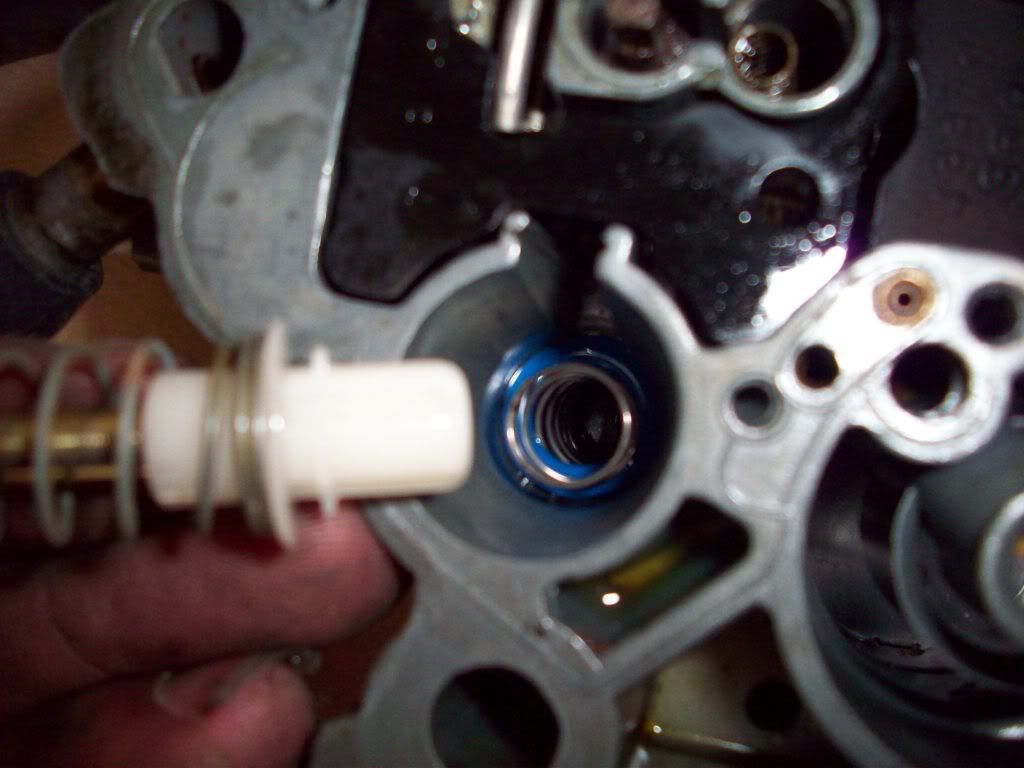
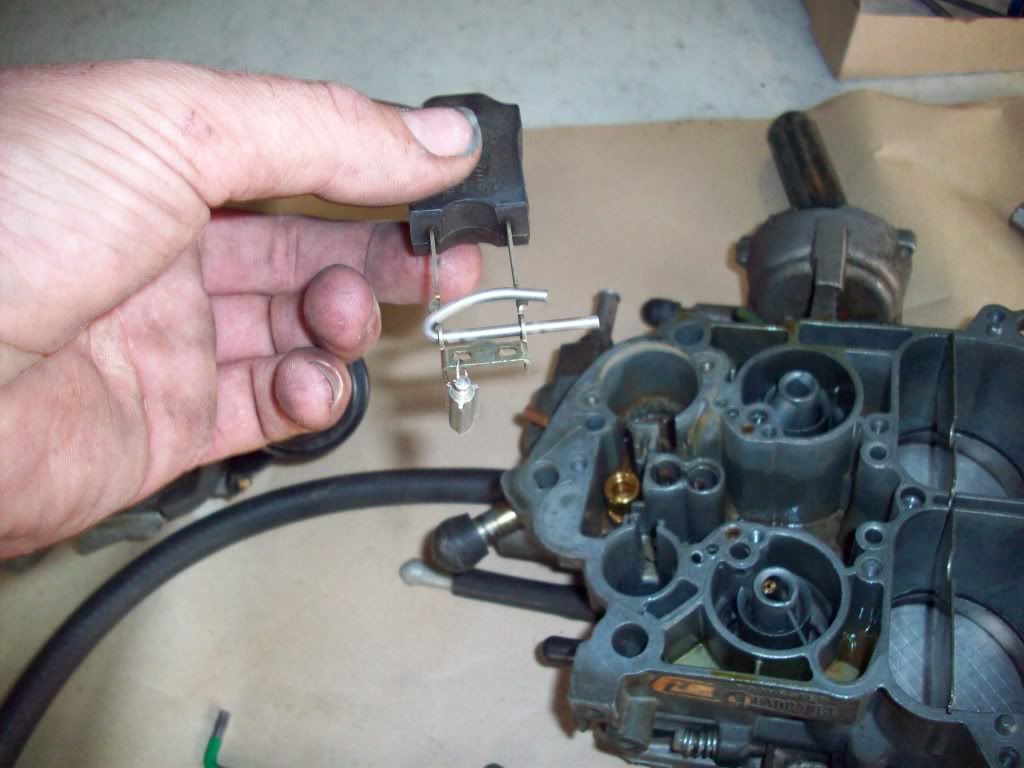
this is the reason i had to pull this b..ch apart again, the suction cup thingie came off completely, you can see the blue in the pump body? its meant to be attached to the white bit. shows you how crap non GM stuff is. i used a brand called "fuel miser" and wont be using them again. anyway i have the original at work so its a matter of getting a lift and going back to stock.
next we adjust the float level. needle and seat looks like this
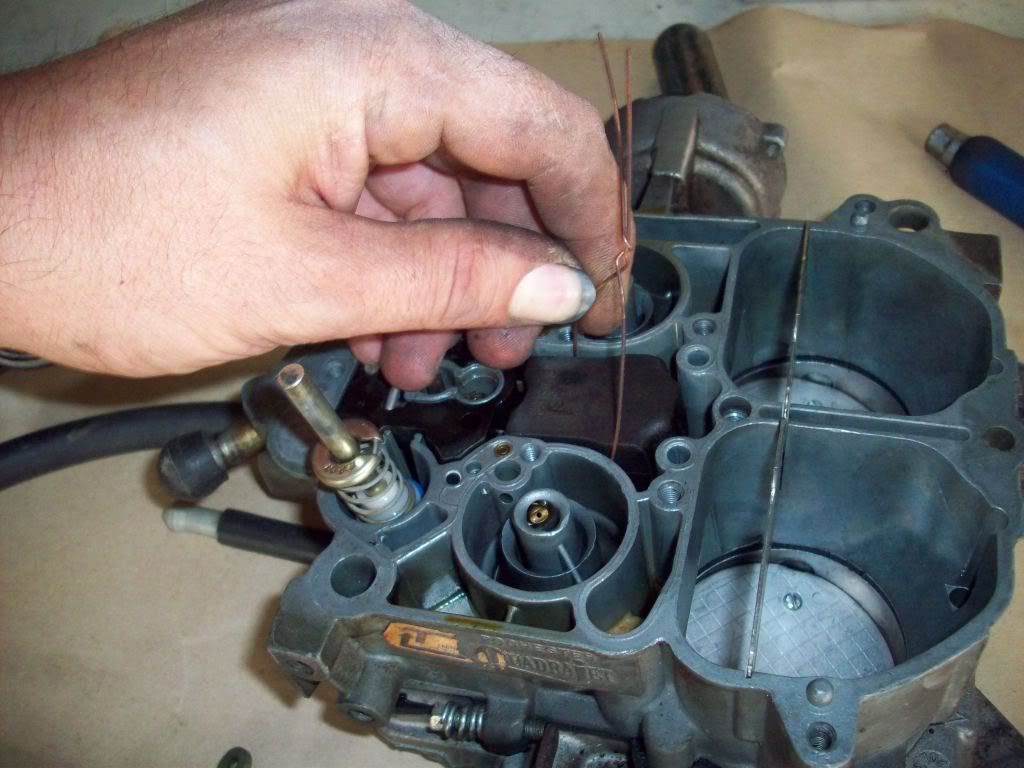
adjusting it is a bit more tricky that it looks, but once you get the idea it isnt that hard, what you need to do is seat the needle and seat fully closed . so to do that, press down on the bit labelled above "needle and seat under here" wrap your piece of welding wire around the float and pull it up (bend the metal, dont worry its designed to do it) till it is level with the body of the carb, NOTE: it needs to be level with the carb, but not the same height. mine sits around 1mm lower than the body when it is fully level.
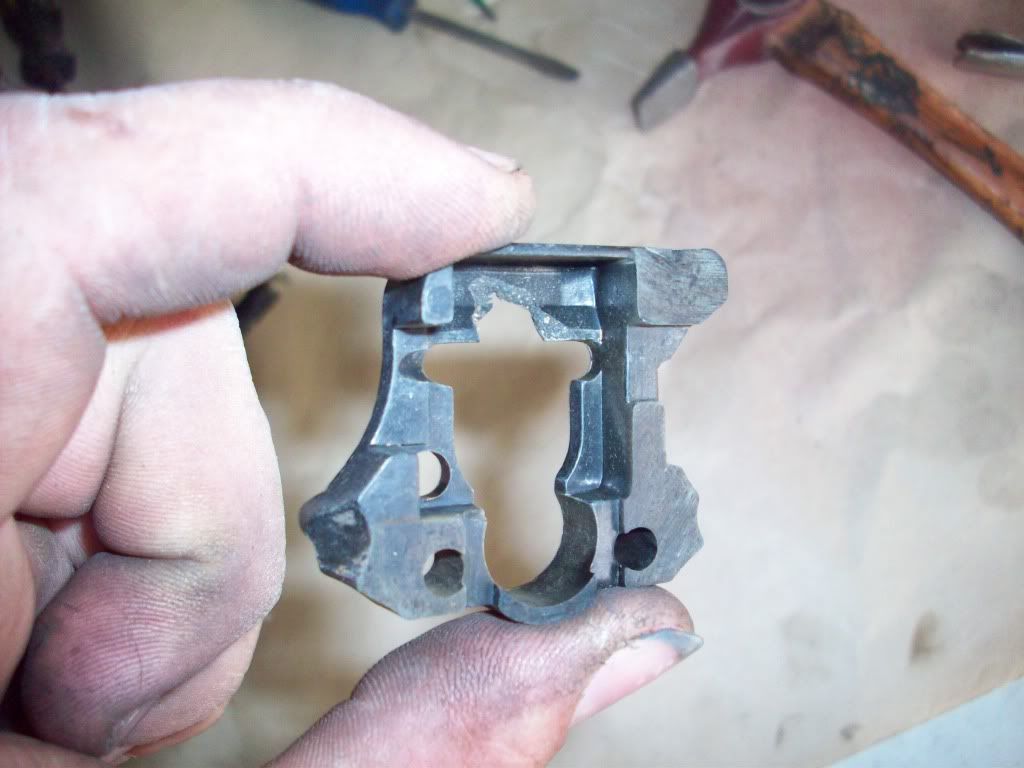
my next suggestion is to get a bit more juice to fit into the fuel bowl, so basically its just making some room. the plastic retainer for the float assembly is not completely used and it wont notice if you shave a bit off. sorry, i only have an 'after' pic cos' i cut this a while ago. once you get yours out you will see what i mean
you will also notice in your rebuild kit there is a little ball bearing and you will prolly wonder WTF, well it goes under here. think it helps in case of a backfire like the holley check ball that protects your power valve, but not 100 per cent sure.
now one of the most important things to do to old quaddys is seal up these little welch plug type thingies. they are just lille bash on plugs and leak all the time. causeing drips of fuel where you dont want them, vacuum issues and almost impossible to get your idle mixtures set correctly.
the brown crap in the middle is stagnant fuel that had dripped out and caused headaches.
these are the problem areas, it is said on the net that you only need to araldite it once cos its a permanant fix, but mine had been done before (years ago, previous owner) and they still leaked like a wet fart.
so basically clean them up. i used the rolec (or as i like to call it "the jew jew", cos thats the noise it makes) and once all the crap is off them, a couple of taps with your hammer to re seat them. please dont be an idiot and hit the carb on the bench. hold it in your arms like a little baby. its alloy, hitting it dents it. so be careful and give it some love. maybe apologise to it later for hitting it
and then buckets of prepsol. dont be a tightarse with your prepsol either it doesnt harm anything and is the best stuff cos it evaporates completely making it better then metho, kero or thinners.
dont be a tight arse with araldite either, remember, if you dont do it well enough the first time, you will be stripping it again to fix it.
now ya gotta wait 24 hours for it to dry, so i will be back tomorrow to finish.
Last edited: