Welcome to Just Commodores, a site specifically designed for all people who share the same passion as yourself.

New Posts Contact us

Just Commodores Forum Community

It takes just a moment to join our fantastic community

Register

[VB-VK] how to rebuild/ modify quadrajets (also vac hose diagram)

ari666

250,000 hits
Joined
Mar 10, 2009
Messages
11,835
Reaction score
128
Points
63
Location
melbourne
Members Ride
1966 impala, R32 GTR
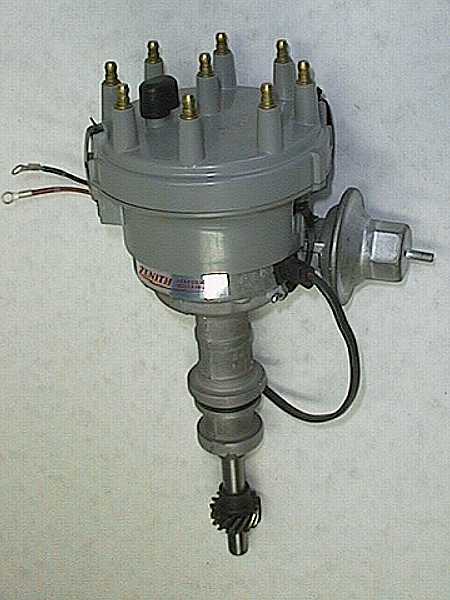
the vacuum advance hose is connected to the ... umm... the shiny thing attached to the dizzy?! gah! this is the only pic i could find sorta close. im pretty sure its a ford, but anyway, look at the shiny cylinder thingie on the side of it, pointed to the right? thats the vacuum advance module. when it gets vacuum (part throttle or deceleration) it advances the timing by pulling the internal trigger mechanism. now i dont know why i wrote that cos' it has nothing to do with what you want to do, so moving on:
zenith-ford-hide.jpg


take the vacuum hose off that shiny thing (yours prolly wont be shiny anymore) and plug the hose up with a bolt or screwdriver or something.

now do a final check of everything, make sure wires are not tangled up in stuff and will catch fire of get caught in anything and start the engine.

once its running, pick up the test light, stick you head in as close to where you made your timing marks and pull the trigger. the light will flash each time that 1 spark plug fires. what you want is your two little marks (0 on the timing cover, and the new line you drew on the balancer) to line up each time the light flashes. if it doesnt you need to turn the dizzy ever-so-slightly, anti clockwise will make the mark move backwards(advancing), clockwise will make it move forwards(retarding) once its lined up where you want it, tighten up the 14mm bolt on the dizzy RECHECK!!! its easy to knock the dizzy while doing up the bolt so make sure you recheck it after its tight. take off all your leads and put your vacuum hose back on the vac advnce module and take it for a bit of a drive :)
 

ari666

250,000 hits
Joined
Mar 10, 2009
Messages
11,835
Reaction score
128
Points
63
Location
melbourne
Members Ride
1966 impala, R32 GTR
ok, i got a bit more time on my hands now so shall we continue?

ok lets.

once you have set ur timing and you are happy with it, i.e. getting enough power and not pinging, you need to set your base idle. that is done via the idle screw that i labelled in the 2nd pic. base idle should be around 800 rpm IN DRIVE. its really important to remember that all the adjustments done to a carby MUST be done in D.

i use a plank of wood, wedged between the seat and the brake pedal, start the car, slip it in D and stand back for a second. :)

ok, so you take your vacuum guage and plug it into the full vacuum port on the front of your carby. you can use manifold vacuum (of the brake booster T) but its not as stable as the reading from the carby venturis, so stick with the port. what we are going to be looking for is the highest stable vacuum. the earliest point where you get the steadiest reading and vacuum no longer raises with adjustment.

pop your vacuum guage somewhere you can read it easily while you adjust your mixtures, get a blade screwdriver and stick it in the drivers side hole i labelled "idle mixtures" in the first pic. there are a few different theorys on how to do this, the way that has been most successful for me has been to tighten up the mixture screw untill the point where it will stall and back off 2 turns. repeat for the passenger side, then do the drivers side again to make sure passenger wasnt supplying too much or too little fuel. the 'proper way is to adjust with the car not running. screw in till they bottom out and unscrew 6 turns. my way is better though cos you only have to hunt in one direction (anti clockwise) rather than twisting in and out and in and out

OOOKKK. so now you have 2 turns out from stalling on both sides they should be equal, each time you turn the screw out, you need to turn the opposite side the exact same amount to keep both sides running the same mixtures.

to start with, you will be turning in 1/4 turns (90 degrees) so 1/4 turn on the drivers side, 1/4 turn on the passenger side, then check vacuum. you will need to keep a mental note of where the vacuum was, having a person turn while you watch is really handy, but all you got to do really is watch the fluctuations of the needle, estimate the average center of those fluctuations, then make a mental note. move on, turn 1/4, turn 1/4 watch the needle. vac changes dont always happen immediatly, they will be a lot easier to get in your car cos' its stock cammed. in mine i get 8 inches and it jumps anywhere from 6 to 10 so its a bitch.

ok, so to start with you will be getting a really erratic reading cos' your running too lean, as you turn the mixtures outwards itll start richening up and the needle should steady and slowly raise with each turn. eventually you will hit a point where the needle will be steady and will not raise further, that is the point you want. you will probably go past it without realising you passed it, so tighten up the mixtures to get back to it, then turn in smaller increments till you get it spot on.

something has come up at work, so GTG. will post more later. just quickly though its important to note that as you get closer to premium idle mixture, your idle speed will increase, so you will may need to keep backing it off to 800rpm.

anyways, stay tuned. get it?!?! stay tuned lol.
 

ari666

250,000 hits
Joined
Mar 10, 2009
Messages
11,835
Reaction score
128
Points
63
Location
melbourne
Members Ride
1966 impala, R32 GTR

RazzaCaine

Long Gone Now
Joined
Mar 20, 2010
Messages
424
Reaction score
2
Points
0
Location
---
Members Ride
---
that is a lot of information! great write up! ill get that photo of the TVS for you tomorrow
 

Bulldognz

New Member
Joined
May 25, 2012
Messages
8
Reaction score
1
Points
1
Location
Auckland,nz
Members Ride
Blue meanie replica
Any chance we can get this information in a PDF please? appears Photobucket has gone feral
 
Top