Pr3tzals
New Member
- Joined
- Sep 6, 2013
- Messages
- 9
- Reaction score
- 3
- Points
- 0
- Age
- 30
- Location
- Melbourne
- Members Ride
- VX Berlina S1
Hey guys after doing some research and searching the forums for similar threads while trying to install my WH clock into my VX Berlina I noticed that no one had gone into real detail on how to get the WH clock working so this will be my guide on installation.
As both the VT and VX don't come standard with the plug to connect to the clock in this tutorial we will be cutting the end of the plug and splicing some wires down to the stereo loom.
The wiring configuration on which wires to connect to each other are as follows.
Clock-Stereo
Red - Yellow
Yellow - Red
Black - Ground
Green - Ground
~ Requirements - What you'll need ~
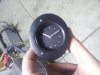
1x WH Clock
3x 40cm length of speaker wire
1x Electrical Tape
~ Recommended but not necessary ~
Male and Female wire ends to make connecting and disconnecting easier
Soldering iron and solder if you don't have the above and want something durable.
~ Guide - Steps ~
1) Remove your dash surround and fascia completely.
2) Remove the clock from the fascia by pressing the two metal clips inwards on the outside of the clock and push it out so you can work on it separately.
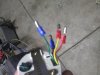
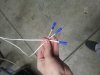
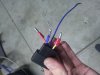
3) Cut the end of the WH clock and strip the ends so you have about 10mm of wire exposed on each one.
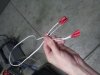
4) Now strip the length of wires you have laying around and either splice the two together and tape it up or attach one end of the male or female wire ends to both ends.
5) Now splice the cables into the stereo loom in my case I used a spare harness I had lying around and wired my connections into that so I could simply remove it if needed.
* So remember both the Green and Black go into the ground wire, and the Red from the clock goes into the yellow constant/memory on the stereo and the yellow illumination + on the clock goes into the red power + on the stereo. *
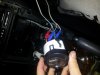
6) In the photos I have the green and black clock wires going into separate female adapters than ending into a single one which I attach to the ground on the stereo.
7) While the dash is off connect the all the wiring up and test it with the ignition off it should work but if not you may need to swap the red and yellow as you may have forgotten to swap them over earlier.
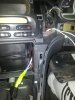
8) Once you've got it working feed the wiring through the two holes that come already installed as shown in my photo.
9) Now put the dash back together and enjoy your new working WH clock without needing a WH.
If there is anything I have failed to explain or that you need explained let me know and i'll do what I can to help.
~ Conclusion ~
This mod will allow the clock to always be running and as soon as you start the car or put it on accessories the light in the clock will light up which makes it even easier to see in the daylight.
As the illumination is yellow on the clock you should be able to connect this to your dimmer so you can adjust the lights via the BROWN/WHITE cable or even have them only light up with your headlights but i'm not 100% sure so any experts let me know if I'm completely wrong.
As both the VT and VX don't come standard with the plug to connect to the clock in this tutorial we will be cutting the end of the plug and splicing some wires down to the stereo loom.
The wiring configuration on which wires to connect to each other are as follows.
Clock-Stereo
Red - Yellow
Yellow - Red
Black - Ground
Green - Ground
~ Requirements - What you'll need ~
1x WH Clock
3x 40cm length of speaker wire
1x Electrical Tape
~ Recommended but not necessary ~
Male and Female wire ends to make connecting and disconnecting easier
Soldering iron and solder if you don't have the above and want something durable.
~ Guide - Steps ~
1) Remove your dash surround and fascia completely.
2) Remove the clock from the fascia by pressing the two metal clips inwards on the outside of the clock and push it out so you can work on it separately.
3) Cut the end of the WH clock and strip the ends so you have about 10mm of wire exposed on each one.
4) Now strip the length of wires you have laying around and either splice the two together and tape it up or attach one end of the male or female wire ends to both ends.
5) Now splice the cables into the stereo loom in my case I used a spare harness I had lying around and wired my connections into that so I could simply remove it if needed.
* So remember both the Green and Black go into the ground wire, and the Red from the clock goes into the yellow constant/memory on the stereo and the yellow illumination + on the clock goes into the red power + on the stereo. *
6) In the photos I have the green and black clock wires going into separate female adapters than ending into a single one which I attach to the ground on the stereo.
7) While the dash is off connect the all the wiring up and test it with the ignition off it should work but if not you may need to swap the red and yellow as you may have forgotten to swap them over earlier.
8) Once you've got it working feed the wiring through the two holes that come already installed as shown in my photo.
9) Now put the dash back together and enjoy your new working WH clock without needing a WH.
If there is anything I have failed to explain or that you need explained let me know and i'll do what I can to help.
~ Conclusion ~
This mod will allow the clock to always be running and as soon as you start the car or put it on accessories the light in the clock will light up which makes it even easier to see in the daylight.
As the illumination is yellow on the clock you should be able to connect this to your dimmer so you can adjust the lights via the BROWN/WHITE cable or even have them only light up with your headlights but i'm not 100% sure so any experts let me know if I'm completely wrong.
Attachments
-
 20130912_195533.jpg115.6 KB · Views: 713
 -
 20130912_195538.jpg149.6 KB · Views: 746
 -
 20130912_195551.jpg128.5 KB · Views: 571
 -
 20130912_195601.jpg114.9 KB · Views: 567
 -
 20130912_195611.jpg103.6 KB · Views: 664
 -
 20130912_200315.jpg105.8 KB · Views: 696
 -
 20130912_200651.jpg94.2 KB · Views: 682
 -
 20130912_200014.jpg121.4 KB · Views: 617
Last edited: