Welcome to Just Commodores, a site specifically designed for all people who share the same passion as yourself.

New Posts Contact us

Just Commodores Forum Community

It takes just a moment to join our fantastic community

Register

Punctures

Jack GS

Member
Joined
Aug 20, 2020
Messages
66
Reaction score
46
Points
18
Location
Metro Detroit, US
Members Ride
2019 Buick Regal GS
For reference, this is right from the horse's mouth:

https://www.opel-accessories.com/en-DE/opel/parts/13463434/vehicles/Insignia

Screenshot_20211008-053215.jpg
 

87VLCALAIS

Active Member
Joined
Feb 7, 2004
Messages
433
Reaction score
136
Points
43
Location
Hamilton, NZ
Members Ride
3.8 VY S Manual, ZB RSV
I have a RSV in Australia and it came with a space saver and all the tools.
I got round to trying the space saver wheel in the wheel well. It's a very tight fit against the plastic trim at the rear lip. I wonder if you'd noticed how much room there was with your wheel?

Also how level is the wheel (front to back) when it's in the well? I need to make up some packing to stop the metal to metal contact between the rim and the well floor and to also tilt the front of the wheel up a bit. The way it sits now with the front of the wheel much lower than the rear, the spigot for the lock down nut isn't centred in the hole in the rim.

If you have time to get some pictures of what ever your wheel sits on, that would be really appreciated. Even some dimensions would be handy. Thickness front and back. Length and width. Thanks in advance.

For anyone else contemplating getting a space saver it looks as if a VY jack and wheel spanner including the plastic cradle will work very well, after trying the one off my 2003 VY. The VY wheel spanner is the correct size and with a little bit of trimming the plastic cradle will fit quite nicely beside the left side of the wheel. The lifting pad on the jack needs about 5mm trimmed off it to fit the cut outs for where the jack lifts against the car chassis. I'll post photos when I've modded my jack when I get one for the ZB.
 

TeePee53

New Member
Joined
Oct 23, 2019
Messages
21
Reaction score
10
Points
3
Location
Melbourne
Members Ride
ZB RSV
I got round to trying the space saver wheel in the wheel well. It's a very tight fit against the plastic trim at the rear lip. I wonder if you'd noticed how much room there was with your wheel?

Also how level is the wheel (front to back) when it's in the well? I need to make up some packing to stop the metal to metal contact between the rim and the well floor and to also tilt the front of the wheel up a bit. The way it sits now with the front of the wheel much lower than the rear, the spigot for the lock down nut isn't centred in the hole in the rim.

If you have time to get some pictures of what ever your wheel sits on, that would be really appreciated. Even some dimensions would be handy. Thickness front and back. Length and width. Thanks in advance.

For anyone else contemplating getting a space saver it looks as if a VY jack and wheel spanner including the plastic cradle will work very well, after trying the one off my 2003 VY. The VY wheel spanner is the correct size and with a little bit of trimming the plastic cradle will fit quite nicely beside the left side of the wheel. The lifting pad on the jack needs about 5mm trimmed off it to fit the cut outs for where the jack lifts against the car chassis. I'll post photos when I've modded my jack when I get one for the ZB.
sorry for delay as I have been away.
The spare is extremely tight fit, to remove it I had to force the plastic trim away from the tyre tread and pull it hard.
 

Attachments

  • spare before removing.jpg
    spare before removing.jpg
    83.7 KB · Views: 164
  • tool compartment.jpg
    tool compartment.jpg
    85.5 KB · Views: 164
  • top of spaer inplace.jpg
    top of spaer inplace.jpg
    74.7 KB · Views: 173
  • under spare.jpg
    under spare.jpg
    68.7 KB · Views: 169
  • rear of spare touching trim.jpg
    rear of spare touching trim.jpg
    55.8 KB · Views: 164
  • spare in place.jpg
    spare in place.jpg
    73 KB · Views: 159

87VLCALAIS

Active Member
Joined
Feb 7, 2004
Messages
433
Reaction score
136
Points
43
Location
Hamilton, NZ
Members Ride
3.8 VY S Manual, ZB RSV
Thank so much for going to that trouble. Your experience with how tight the wheel is to remove mirrors my experience.

The photo of the area under the wheel is very informative, especially the two pads in front of ( EDIT these are to the rear of the crossmember - see post below) the crossmember at the bottom of the wheel well. I had figured there was some sort of support used there otherwise the wheel is able to flex up and down fore and aft. Without a support, eventually the area where the centre spigot mounts to the crossmember would crack.

I have been posting on the Buick forum about what I've been up to. I'll post some that stuff here too.

Do you mind if I post the picture of the support pads on that forum?
 
Last edited:

87VLCALAIS

Active Member
Joined
Feb 7, 2004
Messages
433
Reaction score
136
Points
43
Location
Hamilton, NZ
Members Ride
3.8 VY S Manual, ZB RSV
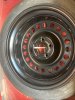
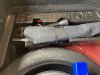
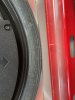
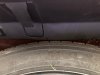
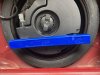
I've been looking at how the space saver wheel fits in the wheel well. Even though it's a tight fit it can still rock or wobble up and done fore and aft. There needs to be a support for the rim in front of the crossmember. I did some playing around and figured I needed a support about 16 mm thick so I tried a piece of particle board. See photo below. You will also notice the piece of 3mm thick rubber I used as a cushion between the rim and the crossmember.
Trial Wheel Well Packer (web).jpg

This made the wheel rock steady. The exact thickness may change by a mm or so depending on whether or not it sits on the black tape you can see. From TeePee53's post above the factory set up has two support pads which do the same thing. My final version will be made of rubber or similar and probably like in TeePee53's picture. I'll post photos once I have it all done. This lockdown is slowing up my progress.

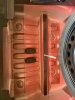
While doing all this I took out the plastic trim that runs across the rear lip of the hatch opening. This gave a good view of the spring loaded buttons that pop the hatch up when the release button is pressed. I noticed a detent on the buttons which when depressed fully and rotated anti clockwise about 20° would lock the buttons in the depressed position. I thought, why would they make it like that? Then I remembered how fiddly it was to remove the plastic trim past those buttons. With the buttons locked down the trim was so easy to remove/install.

Boot Latch 1 (web).jpg
Boot Latch 2 (web).jpg

If you look at the left hand button in the left hand photo you can see the detent at the right on the bottom of the vertical slot in the lower casing of the button.
 
Last edited:

87VLCALAIS

Active Member
Joined
Feb 7, 2004
Messages
433
Reaction score
136
Points
43
Location
Hamilton, NZ
Members Ride
3.8 VY S Manual, ZB RSV
On closer inspection the pads in TeePee53's picture are on the other side (to the rear) of the crossmember to where I put my support. Interesting.

That would tilt the wheel away from being perpendicular to the centre spigot and potentially make the sub woofer rub against the floor panel. My calculations show that the wheel needs supporting on the front side of the wheel well. This keeps the wheel almost perpendicular to the centre spigot and lowers the rear of the sub woofer away from the underside of the floor.
 

87VLCALAIS

Active Member
Joined
Feb 7, 2004
Messages
433
Reaction score
136
Points
43
Location
Hamilton, NZ
Members Ride
3.8 VY S Manual, ZB RSV
Just noticed TeePee53's plastic trim looks different to mine. His trim is straight whereas mine follows the curve of the tyre.


Tyre edge of wheel well. 50%.jpg
 

TeePee53

New Member
Joined
Oct 23, 2019
Messages
21
Reaction score
10
Points
3
Location
Melbourne
Members Ride
ZB RSV
Thank so much for going to that trouble. Your experience with how tight the wheel is to remove mirrors my experience.

The photo of the area under the wheel is very informative, especially the two pads in front of ( EDIT these are to the rear of the crossmember - see post below) the crossmember at the bottom of the wheel well. I had figured there was some sort of support used there otherwise the wheel is able to flex up and down fore and aft. Without a support, eventually the area where the centre spigot mounts to the crossmember would crack.

I have been posting on the Buick forum about what I've been up to. I'll post some that stuff here too.

Do you mind if I post the picture of the support pads on that forum?
that is fine
 
Top