myself and a mate (mischa)
we have both been doing manual conversions in the past few weeks and i have also noticed a lot of interest on the subject here so for all that are not sure here is the list of parts you need for a VN-VR V6 Manual Conversion.
- Manual Gearbox
- Manual Tail shaft (can be from a wagon/ute all that you need is the front half)
- Manual Starter Motor
- Manual Flywheel
- Bell housing
- Gear Plate (it is pop riveted to the transmission hole to make it the right size for either auto or manual)
- Manual Console Cover/Boot/Shifter
- Manual Pedal Box
- Clutch, Thrust Bearing and Pressure plate
- New Pressure Plate Bolts
- New Flywheel Bolts
- Clutch Cable
- Spigot Bush
For A Series 1 VN you Will require extra parts:
- Crank Adapter From Castlemaine Rod Shop Which Costs $338 or the special custom flywheel (around $600 last time i asked)
- But you will still require the manual flywheel from a Series 1 if you use the crank adapter.
And as Vr-Vs Use an electronic automatic gearbox they will require Some work to be done to either the loom or Memcal in the ecu.
there are 3 options.
- Find a Manual Vr Computer And Loom
- Get the auto Mem-Cal Re tuned to run the manual Gearbox
- Use the Manual Computer and Loom out of a vn-vp commodore which will still require a re programming of the mem cal
To Complete the Conversion yourself you will need a basic understanding of tools how to use them Here is a rough guide of what you will need.
- Socket Set Ranging from 17mm to 8mm
- Car Jack
- Axle Stands
- Car Ramps
- Basic Screw Drivers
- Clutch alignment tool
- Torque Wrench
- Funnel & Hose
How To:
Removing Automatic Transmission (VN – VR)
- Drive the front of the car up on ramps and jack the rear and support it on jack stands and remove the negative battery terminal.
- Remove the exhaust from the manifolds to the tip, remove the left manifolds as well as you need to reach the starter motor.
- Drain the oil from the automatic transmission by removing the pan.
- Remove the 4 bolts from the rear of the tail shaft as well as 2 bolts from the tail shaft mount, remove the tail shaft from the vehicle.
- Remove the filler tube from the transmission, it is held on with one bolt on the rear of the block. It is one of the bolts holding the bell housing to the motor. Then remove from the vehicle
- Disconnect the kick down cable from the throttle body.
- Disconnect the transmission cooler lines from above the box.
- Disconnect the speed sensor and reverse gear sensor from the box, and any other wiring.
- Detach the shifter linkage arm from the left side of the box.(VN - VP only)
- Reinstall the oil pan and use either a gearbox jack or a normal jack with a peice of wood on it to support the box.
- Remove the gearbox mounts and stiffener.
- Remove all the bolts from the bell housing bolts holding it to the block.
- With the Jack still suporting it slide the gearbox back enough so you can remove the converter housing cover and undo the 3 bolts holding the torque converter to the flywheel. You will need to rotate the engine to access all of them.
- Now slide the gearbox back with the torque converter then drop the gearbox down, remove it from the vehicle remembering the kick down cable needs to be guided out to from the engine bay. (it may be necessary to remove one of the rear wheels to fit the gearbox out)
- Now you can remove the flywheel (6 bolts VN S1, 8 bolts VN S2 - VR) and the locator bearing if it didnt already come out with the transsmision.
Modifying Gearbox Loom. to keep auto computer. (VR only)
On the manual gearbox there are two connectors One For the reverse lights and the other for the speed sensor.
- Connected to the auto shifter will be a white plug with four wires connected to it the grey and grey/black wires are for the neutral safety switch. they need to be shorted together to allow the car to start.
- The other two wires on this connector are pink and green, they are the wires for the reverse lights test this yourself by touching them together and looking at the reverse lights.
- To get the reverse lights working you will need some more wire to extend them to the gearbox. when you have enough length crimp a blade connector on each wire *Note they do not have to go onto the gearbox in a specific order (i had a spare loom sitting in the shed so i used the same colours to keep it factory looking.)
- To get the speed sensor working you will Need 3 things.
Positive
Negative
Signal Wire to the dash.
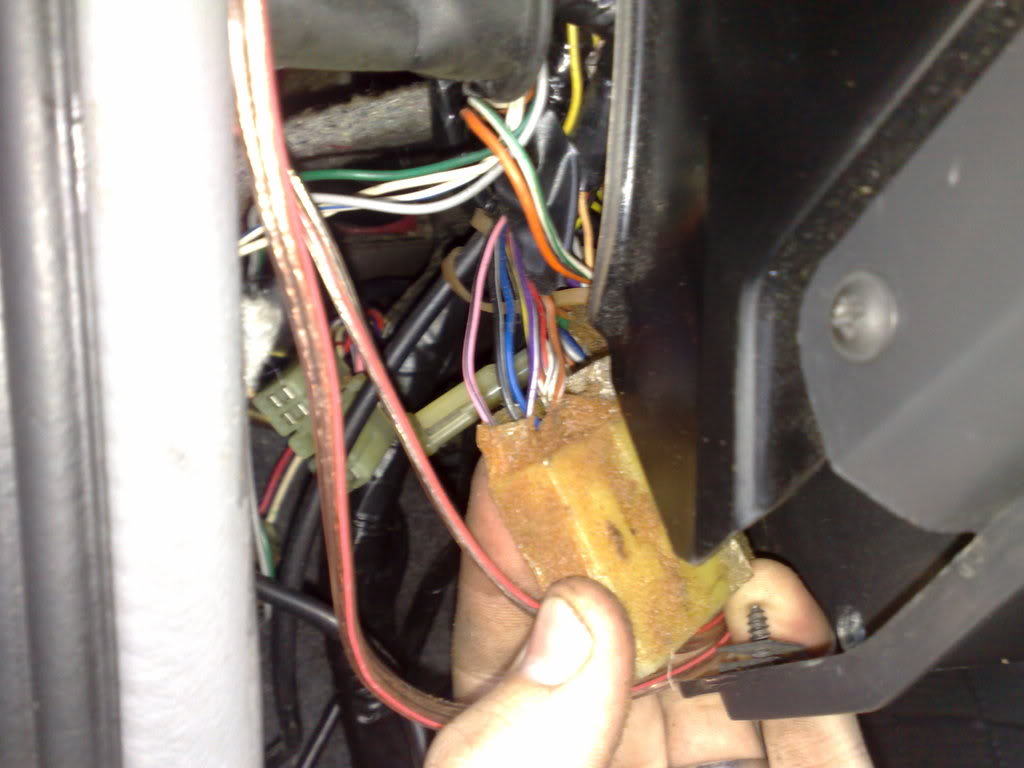
The signal wire is the Purple/White Cable this has to be extended over to just above the ecu. where you will also find a purple/white wire on a plug leading from the computer up into the dash. this is the wire you need to cut and connect your extended wire.
- For the Positive and Ground i used My spare Cigarette lighter Wiring but you could also use the wiring for the light around the auto shifter surround.
- Then drill a hole through your gearshift plate and put a grommet in and run the wires through to the connectors.( it is recommended you do this while the car is still up in the air.)
Here is a picture of where you should cut the purple/white wire as i know i was slightly confused when working it all out.
Removing all other auto associated parts. (VN – VR)
- Take the centre console and radio surround out, you will not need to reinstall the center console auto insert as you need to change this to manual.
- Drill out the pop rivets holding the automatic shifter panel in place and remove it from the vehicle
- Under the stereo there is a wiring loom that runs to the gearbox this needs to be removed. It will unplug from the loom in the car and easily pull out.
- On the Passenger side of the engine bay look down to where you have removed the header. You will see a 2 electrical connectors running to the starter motor 1 will clip out the other you will have to remove a 13mm bolt. (on the auto starters we found a extra bolt next to these connectors holding the starter motor in there, there isent one on the manual starter[to be confirmed]) Then get under the car and remove the two bolts holding the automatic starter motor in place.
- Remove auto pedal box. https://forums.justcommodores.com.au/threads/how-remove-pedal-box-vn-vr.75318
Installing the Manual Gearbox and Associated Parts
- First install the manual pedal box as per this thread https://forums.justcommodores.com.au/threads/how-remove-pedal-box-vn-vr.75318
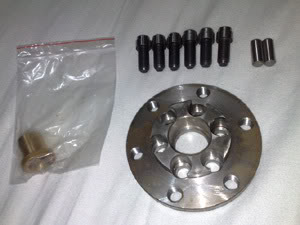
- If you have a S1 now is when you will have to install the adapter, instruction will be included with the adapter and are better then me explaining it here.
- Using NEW flywheel bolts attach the original GM 6 bolt flywheel to the crank adapter, there is only one way to put the flywheel on as the holes a slightly offset.
- Insert a new spigot bush into the crank, make sure its oiled up good. We put a little extra grease on it too.
- Using a clutch alignment tool to hold the clutch in place attach the pressure plate using either the old bolts or new ones if there not in the best condition. Once done up remove the clutch alignment tool.
- Attach the manual starter motor with the 2 MANUAL starter bolts, and connect the 2 electrical connectors. Now this is something people can do if they have never worked or have a limited knowledge of cars that the starter motor pops out to crank the engine and then pops back in. So even tho it looks like it won’t start the engine it will! Another thing we done is we pulled it out manually with our hands so it was sitting on the ring gear of the flywheel and do the bolts up. If you want you may test start it, warning the car will be very loud with no exhaust (VR’s will need to short the neutral safety switch)
- Now if the car doesn’t start or crank and you hear the starter going it’s either not ejecting and hitting the ring gear. If you hear nothing, you either haven’t shorted the neutral safety or the starter isn’t connected. Another thing to remember is that u have disconnected the battery.
- Now that it’s got the manual means of starting you can now install your gearbox! Disconnect the battery again and prepare the gearbox by greasing up the input shaft and thrust bearing. Place the thrust bearing on the input shaft on the clutch fork. You may need to replace the clutch rubbers. http://www.exedy.com.au/user_uploaded_files/pdfs/tech-notes/Tech Note F.pdf Make sure the manual gearbox mount is attached to the gearbox and is in 3rd gear.
- You will need a gearbox jack or a bit or wood and a normal jack, gearbox mount bolts at the ready, some lock tight and defiantly more then 1 person, we used 2 but 3 is a good number. Now get the gearbox under the car in the trans tunnel, we dragged it on a bit of wood and had to angle it under. Offcourse this all depends on how high the car is, another option is to remove on of the back wheels for more room we done this on one of the cars to.
- Now with the gearbox under where it needs to go place the jack behind it. With one person on either side of the gearbox lift it up and place the jack under it, just before the bell housing. Now you will need to work it out from hear, go up and forward as you get more room. Keep watch on the gear lever and the bell housing for room. Now that the input shaft is starting to go into the clutch u will need to rotate the crank to aligning the input shaft, this is the most annoying part as it seems to never be right and will take you a while. Once the gearbox slides in and goes flush with the engine do up the gearbox mount bolts with some lock tight and all the bell housing bolts.
- Insert the plate that belongs at the bottom of the bell housing to cover the flywheel and bolt it on.
- Install the manual tail shaft using lock tight on all nuts and bolts used.
- Guide the clutch cable down to the clutch fork, through the plastic cover and the clutch mount. Get someone the pull the clutch off the ground inside the car while you try and hook the cable onto the fork, once it’s on place the cover over it. Now using the adjustment on the clutch on the gearbox do it up so that u are tightening it as far as it will go. Now tell the person in the cab to let go and give it a push. If it’s too high, loosen the adjuster and if it’s too low tighten it, should be just higher the brake pedal but not by much.
- Replace the headers that where removed and the Y piece, then the cat back. (cat back doesn’t refer to a sports exhaust just everything ‘cat’ back)
- Now its time to fill the gearbox up with oil, your local car store will be happy to recommend a oil. We used dextron 75-85W gearbox oil if I remember right (heck up on that). To fill it we first used a pump that attaches to the top of the oil bottle but that was rubbish, second time round we used a funnel and a bit of hose. Guide the hose from the engine bay to the gearbox filler hole. Fill the gearbox up so that its starts to overflow, in other words flush with the filler hole. You can check by sticking your pinky in there, should be just under 2L.
- Now, the moment of truth, connect the battery and start her up. Make sure you start it in neutral and with your foot on the clutch. If it starts up fine, slowly release the clutch. If that goes fine put it into first and slowly release the clutch, make sure your rear wheels are clear from anything and the handbrake is off. If all goes well you’ve pretty much done all the under car work. Now onto electrical.
(
Still Editing)
For More info Regarding V6 Crankshafts refer to this thread
https://forums.justcommodores.com.au/threads/v6-crankshaft-info.63206
If you have any Problems or just want more info Pm Mischa or Myself.
Pivot Ball & Clutch adjustments.
http://www.exedy.com.au/user_uploaded_files/pdfs/tech-notes/Tech Note E.pdf
The Standard Ratios For the V6 t5 Are
1st: 3.25:1
2nd: 1.99:1
3rd: 1.29:1
4th: 1:1
5th: .72:1