Lex
Well-Known Member
- Joined
- Sep 19, 2012
- Messages
- 5,851
- Reaction score
- 5,210
- Points
- 113
- Location
- Geelong Victoria
- Members Ride
- VT Executive S1 V6 6 speed Auto Wagon
When l saw you were going to change pump, l wondered about the pump loom. Further reading & realised you were aware of it.11/1/2019
Dear Members, I said how I was looking for Fuel Control Module, and found it, as above,
However, the problem with the car cranking and not starting was causing error P023F,
Well after reading a few posts, and seeing where the fuel pump is located, I come to the assumption that the fuel pump was faulty, after a few attempts to get it going, what I did, was remove the back seat and hit the floor pan in the vicinity of the fuel pump
[like you had to do on the VN's in the early V series commodores],
and tried to start it, and it fired up ok.
So I ordered a new Fuel Pump, and decided to replace it myself,
What a job !, as they say, Don't try this at Home
[As I did on the floor of the garage, don't get me wrong, I have all the tools to do it, but not a hoist]
FIRST THING TO DO, IS DICONNECT THE BATTERY.
It was unable to siphon the fuel out, and is has 2 parts of the tank, part of it is on the drivers side and passengers side
as the tail shaft through the centre of it.
But I did work out the cables that supplied the Fuel pump, and made a LONG lead up with a inline switch, connected a hose to the Fuel Supply line, that went back to a jerry can, and that was the only way I was able to remove the fuel,
however, it only removed the fuel on the drivers side of the tank, so the passengers still had fuel in it. But wasn't that heavy
It started out Removing the -
Rear mufflers
Plastic under body protectors,
Exhaust [from cats back to the mufflers]
Heat shield [first one]
Tail shaft
Heat shield [second one on the tank]
Disconnect the hand brake cables [fold them back onto the K frame out of the way]
Support the K frame with a trolley jack, then Loosen the rear K frame bolts [about half way as they have very long bolts],
Remove the front K frame bolts and let the K frame hang
Disconnect the fuel supply to the engine
Undo the Tank straps and let it hang
Disconnect the filler pipe
Disconnect the filler pipe breather
Disconnect the charcoal canister breather [this one is right on top of the tank at the back], very hard to see, "but a must do"
Then finally removed the tank
Disconnected the fuel tank loom
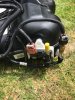
I blew the dust off it around the fuel pump,
Washed the tank down with a Karcher [made sure I didn't get any water in the inlet/outlets] blew the water off around the top of it where the fuel pump unit goes.
Then replaced the fuel pump unit. Part# Fuelmiser FPE-703
I then washed down the every other item that was removed, so it wont be such a dirty job putting all back together.
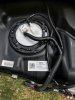
But before I refitted the loom plug, I checked for any foreign objects,
and found that PIN 2 was burnt [as per image], Fuel Tank [loom] Part 92250930 [it has 5 plugs on it]
I rang around a couple of wreckers I deal with, and when I asked the first one if he had a fuel tank loom for a VE,
He then asked without hesitation, "has the plug melted", then told me that its a common problem.
We both agreed, its a bit of a time bomb, "Melting Pins on the plug next to the volatile Fuel"
Because of the work involved to drop the tank and replace the loom, I bet there wasn't a recall.
However, very dangerous.
I did read that the Fuel Pump can draw up to 10 amps,
where GM have compensated for that, by using a larger conductor [cables] Grey + [positive] and Pink - [Negative]
I am not going to get into the exact depths of how to drop the tank, there is a Youtube clip about it, [link below]
12/1/2019
I have rung around a couple of Dealers and the part has to be ordered,
where the First Dealer said a couple of days,
I said to him that the plug had melted, He said that its pretty common fault.
So Holden is aware of this also, and do nothing about it.
I bet Holdens are not the only vehicles with a deadly faults like this.
Know wonder cars catch on fire.
And yes it did need changing.