Welcome to Just Commodores, a site specifically designed for all people who share the same passion as yourself.

New Posts Contact us

Just Commodores Forum Community

It takes just a moment to join our fantastic community

Register

VE HVAC actuator replacement.

Aquarius

New Member
Joined
Nov 2, 2015
Messages
12
Reaction score
5
Points
3
Location
Adelaide
Members Ride
MY11 VE Berlina 3.0 SIDI
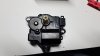
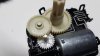
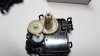
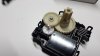
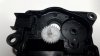
Yeah i actually took a few photos along the way. I also disconnected my battery for fear of wrecking something.
.View attachment 172024View attachment 172026View attachment 172030View attachment 172027View attachment 172028
The installation is just in reverse. Just make sure to connect the 2 actuator arms together.

Thanks very much for posting these detailed notes and photos - without them I probably wouldn't have felt confident enough to tackle the job myself. Managed to replace the damaged actuator in about an hour today and no more clicking noises or slow action.

One thing I did come across which might be useful for others contemplating this job. The actuator is capable of exerting quite a bit of pressure on the actuator arms and this remains even when power is off and the actuator is unplugged. Not surprising given that it's a worm drive with reduction gearing. I first removed the lower screw then set about undoing the hard to get at top one, which I noticed was very tight - almost like the thread had been stripped. It's hard enough to get out because of its awkward position but doubly so if it's tight in its hole. Having spent about 15 minutes turning it all of about two turns I realised that the actuator arm was putting quite a bit of pressure on the actuator body which in turn was binding on the screw thread. Solution - uncouple the two actuator arms before trying to remove the screws (or at least the second of the two). This takes the pressure off the actuator and makes screw removal much easier.
 
Last edited:

electrix

New Member
Joined
Dec 12, 2014
Messages
8
Reaction score
4
Points
3
Age
45
Location
Narre Warren
Members Ride
2011 VE Calais Series 2 Sportswagon
VE HVAC Actuator Replacement

Hi Guys and Girls

Thanks to Cruelass :clap: for the guide and the photos, Just thought I'd add my photos to show what actually went wrong with my actuator, which I replaced today.

Picture 1 is the part number for the actuator (there are 4 actuators in the HVAC system and all of them are the same part)
Picture 2 is the old faulty unit
Pictures 3-6 is the disassembled old faulty unit, (notice the white gear, has only half of the teeth?!?), the rest of the teeth were scattered in amongst the rest of the actuator and it's housing, causing it to bind up, which eventually caused the unit to fail and bring up the error code. The marks that Cruelass put on the new unit to show where the arm should line up, unfortunately did not work for me, as the main gear connects to the arm from the blend door span freely because of the missing teeth, hence could not position the arm in the exact same position, however, I put a mark on the blend door arm and the opposite end of the arm to realign the setup as best as I could. The HVAC Reset or Relearn procedure is, Close all doors and windows (so you can hear the actuators move), key in ignition, radio off, press and hold the rear demist button while turning the ignition on, but not start the vehicle. With 5-10 seconds you should hear the actuators move to their limits and back again. You're done.... Thanks again to Cruelass for the images.
 

Attachments

  • 20160613_173434.jpg
    20160613_173434.jpg
    68.2 KB · Views: 725
  • 20160613_173447.jpg
    20160613_173447.jpg
    107.9 KB · Views: 731
  • 20160613_173622.jpg
    20160613_173622.jpg
    103.4 KB · Views: 705
  • 20160613_173626.jpg
    20160613_173626.jpg
    104.9 KB · Views: 750
  • 20160613_173653.jpg
    20160613_173653.jpg
    104.1 KB · Views: 686
  • 20160613_173717.jpg
    20160613_173717.jpg
    94.6 KB · Views: 696

cruelass

Member
Joined
Aug 12, 2012
Messages
183
Reaction score
7
Points
18
Location
the shire
Members Ride
2007 VE SS
I think actuator arm piece must just go on the new one in the orientation in my picture. So transferring it from original may not matter. It might be the central position or rest position which allows it to do the full range of travel. I didn't really think about it as i just transferred it across and may have been luck it was in the right position. I would assume that the motor is sent power for a certain time which allows it to travel one way or the other. Interesting.. you wouldn't want to it to go further than its meant to as it would have to strip gears after awhile.
 

jonesla

New Member
Joined
Jul 14, 2016
Messages
3
Reaction score
0
Points
0
Age
26
Location
Melbourne
Members Ride
Holden VE ute SV6 2010 SIDI
I am getting mine done through holden on monday. Hopefully i don't get a stupid price after it
 

fitzusve09

New Member
Joined
Apr 23, 2016
Messages
1
Reaction score
0
Points
1
Location
Gold Coast
Members Ride
VE SS
Thank you for the pictures. I have replaced the LH side and took glove box out and heater tube and it was easy, RH side looks just as easy now I have seen your pictures. Great tip on lining up the arm, thanks again
 

Wagsthedog

New Member
Joined
Jul 29, 2016
Messages
1
Reaction score
0
Points
1
Location
Mid North Coast
Members Ride
2011 ve ssv wagon
Hi everyone,
Just bought a 11 ssv wagon and only the windscreen demister was working. So i did the relearn and got the dash vents working and no floor or windscreen anymore. Went to holden and got the last 2 actuators they had in stock so my question is as he said they have 5 actuators, should i just wait and replace all 4 as they dont know which ones do which function? Also i get heat on drivers side and only cool on passenger side. Any help would be very much appreciated.
 

Jas82

New Member
Joined
Oct 24, 2014
Messages
9
Reaction score
0
Points
0
Location
Newcastle
Members Ride
VE Series 2 SV6
Just wondering if anyone can clear something up for me. Had the no air from feet vent problem. Everything else's worked as it should. Tried the relearn, now demister only. Tried disconnecting battery. No different. Happy to change the feet vent actuators, but surely the relearn doesn't damage other actuators? What has been replaced when people have had this problem?
Thanks in advance
 
Top