Welcome to Just Commodores, a site specifically designed for all people who share the same passion as yourself.

New Posts Contact us

Just Commodores Forum Community

It takes just a moment to join our fantastic community

Register

VE HVAC System Info

lazyc

Active Member
Joined
Jul 28, 2016
Messages
252
Reaction score
160
Points
43
Location
Eagle Farm
Members Ride
VE SSV 6.0 M6
I had a black bracket that locks on the right side of the fan duct and over the tubes and clips on the left. Flat blade driver fixes that
 

Fu Manchu

We’ll get together. Have a few laughs.
Joined
Mar 18, 2006
Messages
17,904
Reaction score
22,560
Points
113
Location
WA.
Members Ride
VZ Crewman, VZ Cross 8, & ya mum.
It was the black plastic bit over the top of the pipes that I was thinking of. There was also 2 or 3 screws behind that seemed impossible to reach with it in the car.

When you did it, we’re any screws/tabs broken to do it?

A very ingenious way of doing it. The insulation was wrecked. He could have taken more care with that.
Clearly a technique developed after doing the job many times.

It’s where the fan section attaches to the firewall that can leak. Also from where those bolts attach it to the firewall. A dab of sealant sorts it.
 

Fu Manchu

We’ll get together. Have a few laughs.
Joined
Mar 18, 2006
Messages
17,904
Reaction score
22,560
Points
113
Location
WA.
Members Ride
VZ Crewman, VZ Cross 8, & ya mum.
Bloody mind blowing.
 

lazyc

Active Member
Joined
Jul 28, 2016
Messages
252
Reaction score
160
Points
43
Location
Eagle Farm
Members Ride
VE SSV 6.0 M6
The three you see are simple.
There is one behind that I had to feel for.
I will snot it up and use a foam tape as needed, but its a pretty good fit and all joints have lips etc.

Looking back you could undo the fan motor and split the fan duct into two bits. Could be slightly easier.

Looking at some form of filter sheet for the recirculation air... Even a mesh might work
 

Attachments

  • PXL_20210815_021654942~3.jpg
    PXL_20210815_021654942~3.jpg
    242.8 KB · Views: 230
Last edited:

lazyc

Active Member
Joined
Jul 28, 2016
Messages
252
Reaction score
160
Points
43
Location
Eagle Farm
Members Ride
VE SSV 6.0 M6
This one shows the four screw locations.
Yes I will clean it... Promise

Can see where ac temp sensor lives and the clip top right that I didn't know about.
Not broken... Yay
 

Attachments

  • PXL_20210815_021913051~2.jpg
    PXL_20210815_021913051~2.jpg
    191 KB · Views: 215

Fu Manchu

We’ll get together. Have a few laughs.
Joined
Mar 18, 2006
Messages
17,904
Reaction score
22,560
Points
113
Location
WA.
Members Ride
VZ Crewman, VZ Cross 8, & ya mum.
Screen Shot 2021-08-16 at 7.12.41 pm.png

I went back through my photos of the job.

Screen Shot 2021-08-16 at 7.15.49 pm.png

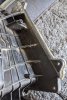
I found the two screws that had me dismiss this.

Screen Shot 2021-08-16 at 7.16.25 pm.png

And this one. It was a couple of years ago now. I recall wondering if it was possible but couldn't figure out how these two could be reached. They could be broken off but then the ducts would never meet up properly after.

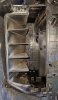
The heater core can not be removed the same way. Well, it might be. If the pipes were cut (not with a saw but a pipe cutter), super carefully cleaned, and had an AN fitting installed onto it and a suitable braided hose flexible hose attached and mated to the pipes coming in. I know people used to do that all the time and its crazy.
The method of cutting the pipes and sticking a rubber hose on is rediculously dangerous. Super dangerous. If the hose lets go, the driver will be instantly burnt in nasty ways and a crash would be likely. Other people going about their business become involved and would also be harmed unnecessarily. Perhaps a well fitted AN and braided hose would be suitable?

Screen Shot 2021-08-16 at 7.13.00 pm.png

The screw is hard to see here, but is just left of that tab on the floor.

*Of note, the after market Jayair evaporator did not come close to fitting. Bought genuine for the same price and It went straight in, no worries.
 

lazyc

Active Member
Joined
Jul 28, 2016
Messages
252
Reaction score
160
Points
43
Location
Eagle Farm
Members Ride
VE SSV 6.0 M6
Good to know about the evaporator. Will test fit later today hopefully.
I have gone into the "service manual" it keeps referring to removal of air intake assembly. But no actual section.
Gregory skirts around it.
Obviously an AC cartel thing...

First screw with black arrow I had to feel for, second one is a clamshell screw, so that ends the idea of splitting the fan assembly unless you can access with a stubby or right angle driver. I will try as I put it back in.
 
Last edited:

lazyc

Active Member
Joined
Jul 28, 2016
Messages
252
Reaction score
160
Points
43
Location
Eagle Farm
Members Ride
VE SSV 6.0 M6
Right, evaporator and all plumbing in.
No problems.
All cleaned too. Lots of spray and wipe.
Did a rough in with blower, I think I need a third hand to slide the blower up on the right hand side. Might use a bottle jack to hold the unit in place, could ask a kid but Sunday morning, who am I kidding.

Fu, you worried me with the aftermarket lineup... But all good in my case.,

100% not easy to split fan housing in place. Two screws are well hidden.

Will advise Sunday when job completed, regas Tuesday hopefully.
 

Fu Manchu

We’ll get together. Have a few laughs.
Joined
Mar 18, 2006
Messages
17,904
Reaction score
22,560
Points
113
Location
WA.
Members Ride
VZ Crewman, VZ Cross 8, & ya mum.
I didn’t write it to put you off. It’s a genius fix. I was trying to get my head around how in detail. The video is a bit vague. You know what would make it easier to reach the screw? A ¼” spring extension on a ¼” square drive screw drive handle with a Phillips head on the end. You could get some flex then to reach it easier. Use a mirror maybe?

I always said I’d do a write up on this. I have pages of notes. Loads of photos and the how to on getting all the plugs apart. I’m glad I dismantled everything. I liked seeing how it went together. Would never have found the firewall rust hole until an accident happened. Super clean ducts. Better seals. No air leaks.

Can appreciate just getting it done. This is an A grade Army style solution to a complex problem.
 

lazyc

Active Member
Joined
Jul 28, 2016
Messages
252
Reaction score
160
Points
43
Location
Eagle Farm
Members Ride
VE SSV 6.0 M6
Ok, I had a few minutes to think about it with no time pressure from anywhere.
Just popped the fan assembly back in, took 15 minutes, the last screw round the back, fresh air wiring and black clamp over ac lines took 45mins... Tested all fine, glovebox to go back in radio trims , and plastic under windscreen with fresh clips and the three bolts for the cabin filter frame etc.

Completely recommend a diy with Fu's photos, the video I linked and take your time.

Oh and with no debris on the evaporator the air fair moves.. might never need full bore again.
 
Top