trash.heap
New Member
- Joined
- Sep 13, 2019
- Messages
- 5
- Reaction score
- 3
- Points
- 3
- Age
- 48
- Location
- Australia
- Members Ride
- VF Evoke S2
Like many VF owners, I dont like the stereo. I have an Evoke wagon. The MyLink is reliable for me but the sound is garbage. I want to upgrade but there are well documented issues:
- Replacing the MyLink is either expensive or problematic.
- Indicators and parking assist all operates through the stereo. If you amplify it, you amplify the systems noises to excessive levels.
I wanted to leave the car as original as possible. I'm not looking for a powerhouse, I have another car for that") . But I wanted something with clarity, with at least some oomph! I had already replaced the speakers with some medium grade Alpines. This improved the clarity, but just left things still lacking. A sub is clearly needed. But I was also attracted to the Pioneer DEQ-s1000a sounds processor.
. But I wanted something with clarity, with at least some oomph! I had already replaced the speakers with some medium grade Alpines. This improved the clarity, but just left things still lacking. A sub is clearly needed. But I was also attracted to the Pioneer DEQ-s1000a sounds processor.
The main features I am interested in:
- A controlled, balanced, EQ'd sub output.
- Time Alignment for speakers (this is the secret sauce for great sound)
- MyLink output calibration
- Detailed EQ settings
- Through-mix. Can still use the MyLink, or input directly from phone.
- Maybe, just maybe, there will be a little more power than the stock average-ness from the MyLink.
I purchased the DEQ. I also purchased a compatible Mylink harness so I could make a cable in the comfort of my own workshop.
---------------------------------------------------------------------
NOTE: At this point I mentioned a commercial provider that makes a wiring harness. I only discovered them after I bought my gear. I did not buy anything from them nor represent their product. However I did link to thier youtube video that steps you through the installation of the DEQ in a VF. The kind moderators removed this link (without mention it in the post itself) and WITHOUT THIS VIDEO THIS POST DOESN'T MAKE AS MUCH OF SENSE. This post even refers to watching the video in the notes. You need to seek out this video and use it as an installation guide. PM me if you have to.
---------------------------------------------------------------------
But never the less, this is how you make your own harness. you will need to be competent with a soldering iron. You will also need heat-shrink.
1) You will need these wiring diagrams. Note the pin numbers you are interested in, as well as the wire colours. Also note the typo (front should be rear)


These are the wires you are interested in. Note the 38-44 numbering that aligns with the schematics. 38 is earth. 44 is +12. The remaining wires are the speakers and their colours match the schematics. Take note of the missing pin, its easy to get wrong later on.
.png")
2) Now its time to cut wires!
Cut the socket end of the pioneer harness. Leave it long, you will need most of the length. Separate the red wire (AUX Power) and the Blue/White. Bind the rest together. I used heatshrink. terminate the blue/white wire with heatshrink, you wont need them unless your are also installing an amplifier.
.jpg")
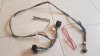
3) I separated the wires out first and cable tied.
Note: the wire colours of my harness DO NOT MATCH the factory colours.
.jpg")
Cut the wires you are interested in. You will need to spend time carefully tagging the wires you are interested in. I used a labeller. Be very careful to tag each pair of speaker wires correctly to match the schematics.
.jpg")
4) Find the 2 input (signal) speaker wires from the PLUG end. I used the front speakers for input as I wanted to retain the front parking sounds, as well as the bluetooth phone output etc. Solder these to the INPUT wires of the pioneer unit.
5) Find the speaker wires from the SOCKET end. Solder all the matching speaker wires from the pioneer to these.
6) Link in the +12 and ground wires to the harness (black and yellow pictured). you are NOT going to cut these wires, just connect in the pioneer to the existing wires.
7) Terminate the pioneer harness red wire with a simple automotive female spade-style connector.
8) Connect the Pioneer handbrake wire (green) to ground wire.
9) Extend one rear speaker output from head unit (PLUG end of harness) with some extension speaker wire. This will be connected to a new speaker setup in the centre console. (see the video)
10) You are done. Tie everything off nicely. I used cable ties.
.jpg")
.jpg")
.jpg")
Installation notes:
Removing the head unit is easy, see the video. I suggest you unplug the main connector from the headunit whilst installing the DEQ. You can power the DEQ up, play music and check all connections without having the MyLink connected at all. That way, if you screw any wiring up you wont blow any speaker outputs of the MyLink. if you test the DEQ and all the wiring is correct, speakers are the correct polarity etc, you can connect the MyLink and you should be in business.
Auxiliary switched 12v power is supplied by a connector behind the glovebox. This is the RED wire you put a spade connector on. Follow the video and connect it up.
Depending on how you plan to use the DEQ, you will probably want to install a small speaker in the top panel of the console. This is what will allow you to retain the system outputs (Indicators, parking beeps) when you are playing music directly from your phone. Connect the speaker wires you extended to this speaker.
Review
NOTE: this is an Android review using a Samsung Galaxy S7. YMMV with iPhone, please leave comments on your experience.
I have been running the DEQ for about 2 weeks now. It really needs the sub to get the full benefit but it will be a few weeks before I can get that built up.
The Good
- Sound quality is good. The EQ and time-alignment features work as expected and I have found clarity to be much better. I was able to boost the very lacking bottom end in just the right places to make things more powerful without the ugly mid-bass from the MyLink. The app is pretty good in this space and I found setting things up pretty easy.
- I run through the source calibration process. This worked quite nicely in the end and I find things are much more balanced when using the MyLink. The bass is rolled off somewhat, but this should help the subwoofer sound (when I get that setup). This leaves most of the added EQ setting pretty flat.
- The remote works pretty well. But changing the volume just gives a beep. you have no idea how much volume you have actually dialed in.
The Bad
- The manual is pathetic. Really bad. Sure you can work out what you need to know, but its hard work and Pioneer need have a proper rethink here. It says very little on how to set things up once its working. You are kind of left to figure it out yourself.
- Completing the source calibration is a nightmare. What is only made scantily clear is that you MUST have an OTG USB interface to complete it. Luckily I had one, but I did not have the USB A-A cable that is also required. So a visit to jaycar was required. I ended using a second Android device and playing the calibration file using MyLink USB. This initially threw an error code on the DEQ with no explanation as to what the code meant. An internet search also got nothing. Turns out you need to have the volume up quite loud for the calibration to work.
- Lacks power. This is to be expected. Its only 20w RMS, probably less. But its still louder than the MyLink, just. But its not hard to push the little amp and the sounds falls apart pretty quickly.
The REALLY bad!
- The Soundtune App. Its bad. its super-unreliable and disconnects constantly and randomly. The phone will be perfectly still, change the app to a new configuration screen, and BAM - disconnected. You need to unplug and replug to get it connected again, which only might work. plug. unplug. Plug. Unplug. Grrr. Do not do this whilst driving! it seems to be worst when you are moving through configuration screens, rather than simply playing music. But its a constant issue.
- The Soundtune App music player. For some reason using the Pioneer app is MUCH louder than using another player on the phone. Its not clear why this is but it makes me what to use it more. That would be OK but the Pioneer player is garbage. it has very few setting you can change or tweak and is just generally super-average and unhelpful.
Aside for the bad aspects above, the unit lack 2 things:
- More POWER. A 50w RMS per channel version would be killer and suit a massive amount of people who just want a decent average systems with some extra volume with all the extra amps. Why would I want to upgrade my system, but not have any extra power. I guess to sell me an amp as well. :-(
- Bluetooth. There is no apparent way to connect via Bluetooth directly, even with an add-on of some kind.
Overall I'm still glad I have it and it sounds good. I'm still pretty excited to see what it would all sounds like with a sub. I will probably continue to use the MyLink for casual listening and then connected my phone when I want to push things hard and crank it up. it allows you to get the best from your stock system (with upgraded speakers) without blowing the budget. But its really disappointing that Pioneer don't fill this market gap with something that is really good. They have played it really safe, not thought it all through and made it high quality. And it shows. The sound processor bits are really good, the rest of it basically isn't.
- Replacing the MyLink is either expensive or problematic.
- Indicators and parking assist all operates through the stereo. If you amplify it, you amplify the systems noises to excessive levels.
I wanted to leave the car as original as possible. I'm not looking for a powerhouse, I have another car for that
. But I wanted something with clarity, with at least some oomph! I had already replaced the speakers with some medium grade Alpines. This improved the clarity, but just left things still lacking. A sub is clearly needed. But I was also attracted to the Pioneer DEQ-s1000a sounds processor.The main features I am interested in:
- A controlled, balanced, EQ'd sub output.
- Time Alignment for speakers (this is the secret sauce for great sound)
- MyLink output calibration
- Detailed EQ settings
- Through-mix. Can still use the MyLink, or input directly from phone.
- Maybe, just maybe, there will be a little more power than the stock average-ness from the MyLink.
I purchased the DEQ. I also purchased a compatible Mylink harness so I could make a cable in the comfort of my own workshop.
---------------------------------------------------------------------
NOTE: At this point I mentioned a commercial provider that makes a wiring harness. I only discovered them after I bought my gear. I did not buy anything from them nor represent their product. However I did link to thier youtube video that steps you through the installation of the DEQ in a VF. The kind moderators removed this link (without mention it in the post itself) and WITHOUT THIS VIDEO THIS POST DOESN'T MAKE AS MUCH OF SENSE. This post even refers to watching the video in the notes. You need to seek out this video and use it as an installation guide. PM me if you have to.
---------------------------------------------------------------------
But never the less, this is how you make your own harness. you will need to be competent with a soldering iron. You will also need heat-shrink.
1) You will need these wiring diagrams. Note the pin numbers you are interested in, as well as the wire colours. Also note the typo (front should be rear)
These are the wires you are interested in. Note the 38-44 numbering that aligns with the schematics. 38 is earth. 44 is +12. The remaining wires are the speakers and their colours match the schematics. Take note of the missing pin, its easy to get wrong later on.
2) Now its time to cut wires!
Cut the socket end of the pioneer harness. Leave it long, you will need most of the length. Separate the red wire (AUX Power) and the Blue/White. Bind the rest together. I used heatshrink. terminate the blue/white wire with heatshrink, you wont need them unless your are also installing an amplifier.
3) I separated the wires out first and cable tied.
Note: the wire colours of my harness DO NOT MATCH the factory colours.
Cut the wires you are interested in. You will need to spend time carefully tagging the wires you are interested in. I used a labeller. Be very careful to tag each pair of speaker wires correctly to match the schematics.
4) Find the 2 input (signal) speaker wires from the PLUG end. I used the front speakers for input as I wanted to retain the front parking sounds, as well as the bluetooth phone output etc. Solder these to the INPUT wires of the pioneer unit.
5) Find the speaker wires from the SOCKET end. Solder all the matching speaker wires from the pioneer to these.
6) Link in the +12 and ground wires to the harness (black and yellow pictured). you are NOT going to cut these wires, just connect in the pioneer to the existing wires.
7) Terminate the pioneer harness red wire with a simple automotive female spade-style connector.
8) Connect the Pioneer handbrake wire (green) to ground wire.
9) Extend one rear speaker output from head unit (PLUG end of harness) with some extension speaker wire. This will be connected to a new speaker setup in the centre console. (see the video)
10) You are done. Tie everything off nicely. I used cable ties.
Installation notes:
Removing the head unit is easy, see the video. I suggest you unplug the main connector from the headunit whilst installing the DEQ. You can power the DEQ up, play music and check all connections without having the MyLink connected at all. That way, if you screw any wiring up you wont blow any speaker outputs of the MyLink. if you test the DEQ and all the wiring is correct, speakers are the correct polarity etc, you can connect the MyLink and you should be in business.
Auxiliary switched 12v power is supplied by a connector behind the glovebox. This is the RED wire you put a spade connector on. Follow the video and connect it up.
Depending on how you plan to use the DEQ, you will probably want to install a small speaker in the top panel of the console. This is what will allow you to retain the system outputs (Indicators, parking beeps) when you are playing music directly from your phone. Connect the speaker wires you extended to this speaker.
Review
NOTE: this is an Android review using a Samsung Galaxy S7. YMMV with iPhone, please leave comments on your experience.
I have been running the DEQ for about 2 weeks now. It really needs the sub to get the full benefit but it will be a few weeks before I can get that built up.
The Good
- Sound quality is good. The EQ and time-alignment features work as expected and I have found clarity to be much better. I was able to boost the very lacking bottom end in just the right places to make things more powerful without the ugly mid-bass from the MyLink. The app is pretty good in this space and I found setting things up pretty easy.
- I run through the source calibration process. This worked quite nicely in the end and I find things are much more balanced when using the MyLink. The bass is rolled off somewhat, but this should help the subwoofer sound (when I get that setup). This leaves most of the added EQ setting pretty flat.
- The remote works pretty well. But changing the volume just gives a beep. you have no idea how much volume you have actually dialed in.
The Bad
- The manual is pathetic. Really bad. Sure you can work out what you need to know, but its hard work and Pioneer need have a proper rethink here. It says very little on how to set things up once its working. You are kind of left to figure it out yourself.
- Completing the source calibration is a nightmare. What is only made scantily clear is that you MUST have an OTG USB interface to complete it. Luckily I had one, but I did not have the USB A-A cable that is also required. So a visit to jaycar was required. I ended using a second Android device and playing the calibration file using MyLink USB. This initially threw an error code on the DEQ with no explanation as to what the code meant. An internet search also got nothing. Turns out you need to have the volume up quite loud for the calibration to work.
- Lacks power. This is to be expected. Its only 20w RMS, probably less. But its still louder than the MyLink, just. But its not hard to push the little amp and the sounds falls apart pretty quickly.
The REALLY bad!
- The Soundtune App. Its bad. its super-unreliable and disconnects constantly and randomly. The phone will be perfectly still, change the app to a new configuration screen, and BAM - disconnected. You need to unplug and replug to get it connected again, which only might work. plug. unplug. Plug. Unplug. Grrr. Do not do this whilst driving! it seems to be worst when you are moving through configuration screens, rather than simply playing music. But its a constant issue.
- The Soundtune App music player. For some reason using the Pioneer app is MUCH louder than using another player on the phone. Its not clear why this is but it makes me what to use it more. That would be OK but the Pioneer player is garbage. it has very few setting you can change or tweak and is just generally super-average and unhelpful.
Aside for the bad aspects above, the unit lack 2 things:
- More POWER. A 50w RMS per channel version would be killer and suit a massive amount of people who just want a decent average systems with some extra volume with all the extra amps. Why would I want to upgrade my system, but not have any extra power. I guess to sell me an amp as well. :-(
- Bluetooth. There is no apparent way to connect via Bluetooth directly, even with an add-on of some kind.
Overall I'm still glad I have it and it sounds good. I'm still pretty excited to see what it would all sounds like with a sub. I will probably continue to use the MyLink for casual listening and then connected my phone when I want to push things hard and crank it up. it allows you to get the best from your stock system (with upgraded speakers) without blowing the budget. But its really disappointing that Pioneer don't fill this market gap with something that is really good. They have played it really safe, not thought it all through and made it high quality. And it shows. The sound processor bits are really good, the rest of it basically isn't.
Attachments
Last edited: