Welcome to Just Commodores, a site specifically designed for all people who share the same passion as yourself.

New Posts Contact us

Just Commodores Forum Community

It takes just a moment to join our fantastic community

Register

what timing chain kit to buy?

troy sv6

Active Member
Joined
Jan 4, 2022
Messages
120
Reaction score
61
Points
28
Age
46
Location
adelaide, south australia
Members Ride
05 sv6, 04 berlina, 07 crewman
And that o-ring must be changed for the pickup too, in the other end. I found it is a really common one. No need to buy GM brand, which is like $20. They are $1 at the rubber bits for trucks shop here.

That Cloyes video is best one, but you need to refer to the manual too.

thank you for the reply
although that strainer was half blocked, i think there was still enough surface area to feed the pump properly.

i am reluctant to tackle the timing chains and sump on my first go. i really do just want to use compressed air and diesel to reverse flush it. and then use diesel to rinse/ flush out the sump.

is it possible to get to the pick up with a compressed air pipe through the drain hole?
and will i have good access to the pick up pipe once the oil pump is off?
i have been googling for images but i cant seem to find any detailed ones. im trying to work out where the pick up is in relation to the sump drain so i can mod a air compressor pipe to get in through the sump hole and blow alot of it out...

even if it leaves a bit there, ill be happy with 80% surface area cleaned
 

wannaeatyourbrains

Well-Known Member
Joined
Sep 24, 2019
Messages
591
Reaction score
544
Points
93
Age
52
Location
Mecca
Members Ride
VZ Executive
You are going to do all the work for the timing chains to get to the oil pump, so you will definitely be doing them at the same time. Timing chains have to come out to get to it. Don't be scared of the sump. It is a piece of piss. Just follow the instructions in the how to on here. I reckon torquing the pump bolts is really important because the manual says if you even go so far as to pull the lower timing chain guide off the pump, let alone pull it apart more in any way, you have to change the whole pump, so it is fussy.
 

troy sv6

Active Member
Joined
Jan 4, 2022
Messages
120
Reaction score
61
Points
28
Age
46
Location
adelaide, south australia
Members Ride
05 sv6, 04 berlina, 07 crewman
You are going to do all the work for the timing chains to get to the oil pump, so you will definitely be doing them at the same time. Timing chains have to come out to get to it. Don't be scared of the sump. It is a piece of piss. Just follow the instructions in the how to on here. I reckon torquing the pump bolts is really important because the manual says if you even go so far as to pull the lower timing chain guide off the pump, let alone pull it apart more in any way, you have to change the whole pump, so it is fussy.
i might give the sump a go. see how i go once i get the front cover off.
 

Belmont1982

New Member
Joined
Feb 5, 2023
Messages
21
Reaction score
3
Points
3
Age
46
Location
New Zealand
Members Ride
2007 VE Commodore, 2008 BMW X5, 2002 VX Commodore
There is a fair few on eBay,
I did my Chains in October last year on my [LY7] Adventra, and the Oil Pump.
Also did all the seals on Timing Case/Cover and the Cam Covers,
It wasn't a hard job, time consuming in pulling it down, cleaning everything for re-assembly,
The hardest part was getting the harmonic balancer/pulley off,
Otherwise its straight forward.
To make the Job even Easier, I purchased the Cam Locking Tools, was worth every cent, save messing with stage 1 and stage 2 timing.

Since you will be doing 3 sets of chains, I can see a set will be beneficial, and save time.
I picked mine up on Market Place, paid a little more than I should have, but they were a quality set,
But I since seen cheaper sets that will suffice to do the job.

The Timing Kit I purchased had 3 missing bolts, so I used the originals bolts I removed,
They were for the 3 Chain Tensioner Arms [aka: Banana Tensioners]

Also, make sure you Torque ALL the bolts correctly, because you would hate one to come loose.

Below link maybe of assistance -
VZ Adventra Lockdown Project | Page 6 | Just Commodores
hi mate is I know it is better to use the smaller puller that grabs inside . is it ok to use the wide puller that's all I got and dont want to buy a puller for 200nz for one job .
 

krusing

Well-Known Member, Possibly for the wrong reasons
Joined
Jun 21, 2014
Messages
5,403
Reaction score
4,039
Points
113
Location
Melbourne, Bayside
Members Ride
2002 VY L67 Calais Sedan, 2012 VE L77 Calais Wagon
hi mate is I know it is better to use the smaller puller that grabs inside . is it ok to use the wide puller that's all I got and dont want to buy a puller for 200nz for one job .
The puller I used to remove the bottom pulley, was one from Supercheap, did the job perfectly, I think I paid $30 for it,
And have used it twice, and still looks new.
 
Last edited:

Immortality

Can't live without smoky bacon!
Staff member
Joined
Apr 15, 2006
Messages
22,624
Reaction score
20,506
Points
113
Location
Sth Auck, NZ
Members Ride
HSV VS Senator, VX Calais II L67
Sometimes cheap pullers are perfectly good for many jobs.
 

krusing

Well-Known Member, Possibly for the wrong reasons
Joined
Jun 21, 2014
Messages
5,403
Reaction score
4,039
Points
113
Location
Melbourne, Bayside
Members Ride
2002 VY L67 Calais Sedan, 2012 VE L77 Calais Wagon
hi mate is I know it is better to use the smaller puller that grabs inside . is it ok to use the wide puller that's all I got and dont want to buy a puller for 200nz for one job .

Sorry, I didn’t answer your question,
The pulley puller I purchased has bolts the screw into the spokes of the pulley,
Which is a better one, because the arm type might distort the pulley and body.
 
Last edited:

Belmont1982

New Member
Joined
Feb 5, 2023
Messages
21
Reaction score
3
Points
3
Age
46
Location
New Zealand
Members Ride
2007 VE Commodore, 2008 BMW X5, 2002 VX Commodore
There is a fair few on eBay,
I did my Chains in October last year on my [LY7] Adventra, and the Oil Pump.
Also did all the seals on Timing Case/Cover and the Cam Covers,
It wasn't a hard job, time consuming in pulling it down, cleaning everything for re-assembly,
The hardest part was getting the harmonic balancer/pulley off,
Otherwise its straight forward.
To make the Job even Easier, I purchased the Cam Locking Tools, was worth every cent, save messing with stage 1 and stage 2 timing.

Since you will be doing 3 sets of chains, I can see a set will be beneficial, and save time.
I picked mine up on Market Place, paid a little more than I should have, but they were a quality set,
But I since seen cheaper sets that will suffice to do the job.

The Timing Kit I purchased had 3 missing bolts, so I used the originals bolts I removed,
They were for the 3 Chain Tensioner Arms [aka: Banana Tensioners]

Also, make sure you Torque ALL the bolts correctly, because you would hate one to come loose.

Below link maybe of assistance -
VZ Adventra Lockdown Project | Page 6 | Just Commodores
hey mate yep I'm about to buy a kit through Mace and the locking tools , so you just locked the cams and done the chain switch over without rotating first to first stage then locking, removing rh bank chain and turning to stage 2 .

I have watched several videos for months and also have the hayes manual.

if you could look at this link and any advice or comments would be appreciated.


krusing

Well-Known Member, Possibly for the wrong reasons
Joined
Jun 21, 2014
Messages
5,403
Reaction score
4,039
Points
113
Location
Melbourne, Bayside
Members Ride
2002 VY L67 Calais Sedan, 2012 VE L77 Calais Wagon
hey mate yep I'm about to buy a kit through Mace and the locking tools , so you just locked the cams and done the chain switch over without rotating first to first stage then locking, removing rh bank chain and turning to stage 2 .

I have watched several videos for months and also have the hayes manual.

if you could look at this link and any advice or comments would be appreciated.


Those videos are a great source for reference,
Before you remove the old chains and lock the cams,
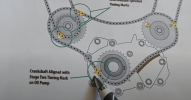
Rotate the crank gear so the markers line up at the 8 o’clock position, (Stage 2 Timing as per image below)
This lines up the dimple on the bottom sprocket to the dimple on the oil pump.

Then install the cam locks,
Depending which chain is stretched the most, you may need to jiggle either cam to install the cam locks, this can be achieved with a 19mm open spanner on the hex “on” the cams,
When the cam locks are installed,
You can proceed to removing the old chain tensioners, chains guides & chains from left to right. (looking at the front of the engine)

If you have compressed air on hand,
Give the oil supply holes to the tensioners a blast, keep in mind, it may spray oil from other oil ports,

At this point you can replace the oil pump if that is part of your project,
(And is advisable, you will see why)

Clean the front cam cover, and contact surfaces ready for refitting.

Install new crank sprocket,
Then the re-assemble is straight forward,
Starting from the right side (looking at the front of the motor)
And making sure you align ALL the markings up,
(Hint: I used a fluorescent marker on the gears/sprockets and chains)
And mine went back together perfectly both times.
Again, you may need to jiggle a cam into position for one of the chains to sit correctly on the sprocket/s.
Remembering to remove ALL the pins when your satisfied ALL the marking are in the correct position,
Double check the markings, Then remove the Cam locks.

"You DO NOT need to rotate the CAMS between Stage 1 and Stage 2 when you are using Cam Locks"
You First set it up on Stage 2 and Leave it there till your ready to remove the Cam Locks at the end,
As per my 3rd line comment up top.


*Important* “Torque ALL the bolts to Spec” not over Spec, not under Spec,
To the "Correct Spec" !

Hint: if you have an oil can, just give the new chains a drink, saves them running dry on start up.

And then install the water pump seal on the front cover with some RTV on it,
and enough RTV on the cam cover contact surfaces before you install the front cam cover,
Otherwise, the rest is straight forward.

But most importantly: Take your time, as you don't want to be doing it twice !!!

Side Note: Ice cream containers are a great item to use when pulling it down,
Place the items in them, with a bit of degreaser, and let things soak while working on it.

Good luck.
feedback is most welcome.

PS: Keep an eye on the 10mm sockets, as they seem to escape all the time !
 

Attachments

  • Stage 2 Crank Aligning Mark.png
    Stage 2 Crank Aligning Mark.png
    301.5 KB · Views: 71
Last edited:
  • Like
Reactions: Lex
Top