DannyboyDS
Just hand me the pliers.
- Joined
- Feb 26, 2007
- Messages
- 2,255
- Reaction score
- 38
- Points
- 0
- Age
- 39
- Location
- Melbourne
- Members Ride
- VS Berlina
Disclaimer:
I'm not a mechanic nor do I have any qualifications in the automotive industry, If you have
problems due to this information it's not my fault, I suggest paying for any work done to the steering system, safety first.
Materials:
2 X front radius rod bushes
2 X Rear radius rod bushes
These are both for the front of the vehicle front and rear refer to each end of the radius rod I believe.
A Radius Rod is also knowns as a Caster bar or a Z bar
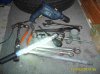
These are the tools I used

Jack
Stands
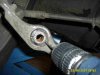
Sockets/wrenches -
Radius Rod to LCA (Lower Control Arm) 30mm or 1-3/16
Radius Rod to Chassi 24mm or 15/16
LCA to Chassi 19mm or 3/4
Power Drill with small drill bit
Soap (keep it moist, I left mine soaking in water, the gunk is good)
Sealed Worklight
Grips
Knife
Rubber mallet + some pipe or a rod
and an assortment of junk and other tools can help too, whatever makes you confortable.
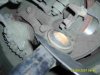
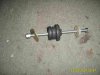
A special tool you will need to push the bushes in, here is a picture of it
Basically it a long threaded bolt, some large washers a large piece of pipe and a nut.
But this tool needs to be fairly long, mine was a bit too long, but you should get the idea, I reckon about 9 inches would suffice, maybe 10.

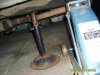
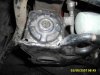
So firstly jack the car up, after reaching a comfortable height slap a stand under there too.

Next grab the spanners and loosen all the nuts, just crack them basically so they are a sinch to do later, a good start really.
Radius rod to Chassi

Radius Rod to LCA (This one is Super Duper Tight)

Lower Control Arm to Chassi


After cracking them all remove the nuts in the following order.
Radius rod to chassi
Radius rod to LCA (Lower Control Arm)
Lower Control Arm to chassi (Then I let it hang down)
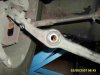
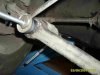
After removing the LCA to chassi bolt, pull the LCA down this allows room for the following Maneuver.

Then push with your foot against the front of the wheel and it will turn, use one of your hands to push the LCA this also gives you plenty of room to remove the Radius rod.
You could also just drop the lower control arm, by first undoing the pinch bolt on the hub end, placing a pipe onto the spike poking up from the balljoint mount plate on the lower control arm and then hitting the pipe, that will shock the LCA off of the HUB, then undo the chassi end.
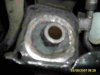
After doing that place the correct nuts and washers on each end of the radius rod and mark the end that fits to the chassi with some paint in either case it's the end with the longest thread fitting, I just like to be certain. place it to the side for later.
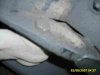
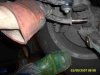
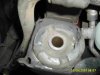
Then grab a knife and chop away at the bush on the chassi removing the front section leaves little resistance to tap it through with a piece of pipe and the rubber mallet, failing this grab the special tool we made above set it up and start tightening eventually you will get a bit of movement, after that its all down hill.
Make sure to cut that front section free of the metal pipe, that means cutting around the pipe too.


This is what it looks like all cut up

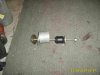
Then use that special tool created earlier and some soap to push the new bush in. there is a small alcove that the rear side of the bush ends up in, fit the end of the tool with the non moving nut or double nuts in there with only a washer, dont use the large piece of pipe, its up to you how you use this tool, this is just how I did it.
The Chassi Bush tool

The new bush going in

Now with the thread poking through slip the bush onto it, then a washer and a nut, slip a socket with an extender on it onto the rear end of the tool (In the alcove) grab your spanner and start tightening, try to make sure it's all lined up straight or the bush will skew on an angle and will be harder to get in, once the bush is half way to three-quarters in the tool doesn't have to
be used any more, you can generally push it the rest of the way from there.
The cracked/split bush
The finished product

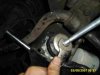
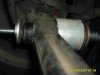
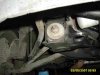
Now for the bush on the LCA

I had trouble getting my LCA off of the hub, I undid the pinch bolt but as I was tapping it down it got caught on something, So I gave up on that and tapped it back up and did the pinch bolt up again.
I had to drill the rubber on this one with a power drill, I just kept going at it around and around until I felt I had stuffed it up enough, I then used the grips on the metal center of the bush and twisted and pulled, the middle of the bush came out, I then scraped the rest out of the LCA.
Even easier still would be to use a bearing puller as the LCA bush has no metal outer bugger all force is really needed to push it out.

(Note I also cut the ends off of the bush that was in the LCA, which made it a bit easier too)

And here is the bush finally out

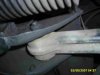
Fitting a new bush was much the same as the last one, use the nut/bolt washers and pieces of pipe to push it into place, keeping in mind one end should use a piece of pipe big enough for the new bush to slip into while the other end should just have a washer and a nut to push the new bush
in, remember to use plenty of soap.
The setup I used

The tool on the LCA notice that the pipe is on the other end, allowing enough room for the end of the new bush to pop in.


Then refit the Radius rod.
This was a tedious task, I found that putting the rod into the chassi bush first was easiest, but you need to push the wheel right out of your way and ensure the nuts and washers on the LCA end of the rod aren’t hitting anything thus stopping you from getting the perfect angle to get the rod
back home.
After fitting it into the chassi, raise the LCA arm with one hand or foot which ever you prefer and then shove the radius rod back home there, some wiggling and jiggling and poking around for the correct angle once again will take place.
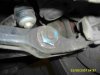
Then push the LCA back to its home, I needed to push the wheel a bit with my foot to finally line the holes up, then I slotted the bolt through and did that nut up really tight.
Next put both nuts on the radius rod along with the washers and tighten them up but don't tighten them up 100% leave them slightly loose.
Drop the car back onto the ground and bounce the car a little
(Put your weight on one corner and then release your weight much like checking your shockers)
now jump under the car without jacking it up, you CAN get under there it’s not that tight, I found turning the wheel helped get access to the nut on the LCA, tighten the bolts on each end of the radius rod completely.
F.Y.I the torque setting are as follows.
LCA Chassi Bolt - 95
Radius rod to LCA - 145
Radius Rod to Chassi - 110
(I didn’t do them to the torque settings and so far so good, too hard to get a torque wrench in There when it's on the ground)
Repeat on the other side and all is done, goodluck.
Any feedback welcome especially if you have easier ways of doing things.
Shouts go out to the following people for information given and information I took.
My Dad - for checking on me to make sure I wasn't dead and for he’s advice
Not_An_Abba_Fan - For being a champ and offering allot of advice and knowledge along the way
Markovr - for a push in the right direction and he’s special tool which this HOWTO uses
Just Commodores - For All Your Holden Commodore Needs - for being a good place to share information and learn WITH each other
P.S some tips
Keep your soap moist, I left mine soaking.
Lube the end of the bush, the sides slightly and the hole its going into as well.
If the bush goes askew, if you catch it early enough use a small flathead to gently assist the side that wont go in, in.
When making the tool, get some threaded rod that roughly fits snug and neat, too much play causes the bush to go askew during tightning, this caused one of my bushes to lose it's shape on the end I was trying to shove in, made it very hard, I got my rod from bunnings and some nuts too, they didn't have washers big enough though.
If a bush loses its shape, The big one at the front did on me, I used a large hose clamp on it and soaked it in some hot tap water for about 5 mins, then it regained its shape and was a bit easier to get in.
P.S I regret the lack of pictures but I was doing this solo and there are only so many things I can hold at once, in some of these pictures I am holding the worklight in my mouth, not an easy task, lets just say i'd do well in prison with an effort like that.
I'm not a mechanic nor do I have any qualifications in the automotive industry, If you have
problems due to this information it's not my fault, I suggest paying for any work done to the steering system, safety first.
Materials:
2 X front radius rod bushes
2 X Rear radius rod bushes
These are both for the front of the vehicle front and rear refer to each end of the radius rod I believe.
A Radius Rod is also knowns as a Caster bar or a Z bar
These are the tools I used
Jack
Stands
Sockets/wrenches -
Radius Rod to LCA (Lower Control Arm) 30mm or 1-3/16
Radius Rod to Chassi 24mm or 15/16
LCA to Chassi 19mm or 3/4
Power Drill with small drill bit
Soap (keep it moist, I left mine soaking in water, the gunk is good)
Sealed Worklight
Grips
Knife
Rubber mallet + some pipe or a rod
and an assortment of junk and other tools can help too, whatever makes you confortable.
A special tool you will need to push the bushes in, here is a picture of it
Basically it a long threaded bolt, some large washers a large piece of pipe and a nut.
But this tool needs to be fairly long, mine was a bit too long, but you should get the idea, I reckon about 9 inches would suffice, maybe 10.
So firstly jack the car up, after reaching a comfortable height slap a stand under there too.
Next grab the spanners and loosen all the nuts, just crack them basically so they are a sinch to do later, a good start really.
Radius rod to Chassi
Radius Rod to LCA (This one is Super Duper Tight)
Lower Control Arm to Chassi
After cracking them all remove the nuts in the following order.
Radius rod to chassi
Radius rod to LCA (Lower Control Arm)
Lower Control Arm to chassi (Then I let it hang down)
After removing the LCA to chassi bolt, pull the LCA down this allows room for the following Maneuver.
Then push with your foot against the front of the wheel and it will turn, use one of your hands to push the LCA this also gives you plenty of room to remove the Radius rod.
You could also just drop the lower control arm, by first undoing the pinch bolt on the hub end, placing a pipe onto the spike poking up from the balljoint mount plate on the lower control arm and then hitting the pipe, that will shock the LCA off of the HUB, then undo the chassi end.
After doing that place the correct nuts and washers on each end of the radius rod and mark the end that fits to the chassi with some paint in either case it's the end with the longest thread fitting, I just like to be certain. place it to the side for later.
Then grab a knife and chop away at the bush on the chassi removing the front section leaves little resistance to tap it through with a piece of pipe and the rubber mallet, failing this grab the special tool we made above set it up and start tightening eventually you will get a bit of movement, after that its all down hill.
Make sure to cut that front section free of the metal pipe, that means cutting around the pipe too.
This is what it looks like all cut up
Then use that special tool created earlier and some soap to push the new bush in. there is a small alcove that the rear side of the bush ends up in, fit the end of the tool with the non moving nut or double nuts in there with only a washer, dont use the large piece of pipe, its up to you how you use this tool, this is just how I did it.
The Chassi Bush tool
The new bush going in
Now with the thread poking through slip the bush onto it, then a washer and a nut, slip a socket with an extender on it onto the rear end of the tool (In the alcove) grab your spanner and start tightening, try to make sure it's all lined up straight or the bush will skew on an angle and will be harder to get in, once the bush is half way to three-quarters in the tool doesn't have to
be used any more, you can generally push it the rest of the way from there.
The cracked/split bush
The finished product
Now for the bush on the LCA
I had trouble getting my LCA off of the hub, I undid the pinch bolt but as I was tapping it down it got caught on something, So I gave up on that and tapped it back up and did the pinch bolt up again.
I had to drill the rubber on this one with a power drill, I just kept going at it around and around until I felt I had stuffed it up enough, I then used the grips on the metal center of the bush and twisted and pulled, the middle of the bush came out, I then scraped the rest out of the LCA.
Even easier still would be to use a bearing puller as the LCA bush has no metal outer bugger all force is really needed to push it out.
(Note I also cut the ends off of the bush that was in the LCA, which made it a bit easier too)
And here is the bush finally out
Fitting a new bush was much the same as the last one, use the nut/bolt washers and pieces of pipe to push it into place, keeping in mind one end should use a piece of pipe big enough for the new bush to slip into while the other end should just have a washer and a nut to push the new bush
in, remember to use plenty of soap.
The setup I used
The tool on the LCA notice that the pipe is on the other end, allowing enough room for the end of the new bush to pop in.
Then refit the Radius rod.
This was a tedious task, I found that putting the rod into the chassi bush first was easiest, but you need to push the wheel right out of your way and ensure the nuts and washers on the LCA end of the rod aren’t hitting anything thus stopping you from getting the perfect angle to get the rod
back home.
After fitting it into the chassi, raise the LCA arm with one hand or foot which ever you prefer and then shove the radius rod back home there, some wiggling and jiggling and poking around for the correct angle once again will take place.
Then push the LCA back to its home, I needed to push the wheel a bit with my foot to finally line the holes up, then I slotted the bolt through and did that nut up really tight.
Next put both nuts on the radius rod along with the washers and tighten them up but don't tighten them up 100% leave them slightly loose.
Drop the car back onto the ground and bounce the car a little
(Put your weight on one corner and then release your weight much like checking your shockers)
now jump under the car without jacking it up, you CAN get under there it’s not that tight, I found turning the wheel helped get access to the nut on the LCA, tighten the bolts on each end of the radius rod completely.
F.Y.I the torque setting are as follows.
LCA Chassi Bolt - 95
Radius rod to LCA - 145
Radius Rod to Chassi - 110
(I didn’t do them to the torque settings and so far so good, too hard to get a torque wrench in There when it's on the ground)
Repeat on the other side and all is done, goodluck.
Any feedback welcome especially if you have easier ways of doing things.
Shouts go out to the following people for information given and information I took.
My Dad - for checking on me to make sure I wasn't dead and for he’s advice
Not_An_Abba_Fan - For being a champ and offering allot of advice and knowledge along the way
Markovr - for a push in the right direction and he’s special tool which this HOWTO uses
Just Commodores - For All Your Holden Commodore Needs - for being a good place to share information and learn WITH each other
P.S some tips
Keep your soap moist, I left mine soaking.
Lube the end of the bush, the sides slightly and the hole its going into as well.
If the bush goes askew, if you catch it early enough use a small flathead to gently assist the side that wont go in, in.
When making the tool, get some threaded rod that roughly fits snug and neat, too much play causes the bush to go askew during tightning, this caused one of my bushes to lose it's shape on the end I was trying to shove in, made it very hard, I got my rod from bunnings and some nuts too, they didn't have washers big enough though.
If a bush loses its shape, The big one at the front did on me, I used a large hose clamp on it and soaked it in some hot tap water for about 5 mins, then it regained its shape and was a bit easier to get in.
P.S I regret the lack of pictures but I was doing this solo and there are only so many things I can hold at once, in some of these pictures I am holding the worklight in my mouth, not an easy task, lets just say i'd do well in prison with an effort like that.
Attachments
-
 ChassiBushAllCut.jpg59.7 KB · Views: 9,835
 -
 ChassiBushTool.jpg62 KB · Views: 12,400
 -
 CutChassiBush2.jpg71.5 KB · Views: 9,539
 -
 CutChassiBush.jpg47.1 KB · Views: 9,811
 -
 CutLCABush.jpg68.7 KB · Views: 9,363
 -
 DrillLCABush.jpg67.8 KB · Views: 9,699
 -
 JackNStand.jpg101.2 KB · Views: 9,883
 -
 LCABush.jpg68.3 KB · Views: 10,304
 -
 LCABushOut.jpg75.2 KB · Views: 9,833
 -
 LCABushTool2.jpg73.9 KB · Views: 12,154
 -
 LCABushTool.jpg49.7 KB · Views: 9,495
 -
 LCAToChassi2.jpg49.7 KB · Views: 9,654
 -
 LCAToChassi.jpg55.6 KB · Views: 10,248
 -
 NewChassiBush.jpg71.1 KB · Views: 9,632
 -
 OldBushChassi.jpg78.9 KB · Views: 14,440
 -
 Remove Rod1.jpg83.6 KB · Views: 10,423
 -
 RR2LCANut.jpg57.2 KB · Views: 13,066
 -
 SeeCrack.jpg65.3 KB · Views: 1,069
 -
 SpeshToolChassi.jpg105.5 KB · Views: 10,698
 -
 speshtoolLCA.jpg120.9 KB · Views: 9,355
 -
 SpeshtoolParts.jpg94.2 KB · Views: 9,669
 -
 Tools.JPG36.5 KB · Views: 10,391
Last edited:
")