Lewie
B Cast and flat topped!
- Joined
- Nov 6, 2006
- Messages
- 203
- Reaction score
- 5
- Points
- 18
- Location
- Adelaide, SA
- Members Ride
- Very thirsty VT & VH project under way! YAY!!
Jobs done. VT brakes to VH.
Gurus,
I finally got around to putting all the parts I'd gathered on to complete the front VT brake conversion on my VH. Thought I'd share my experiences. I did end up buying some parts that didn't/won't be going on but I'll mention them as I go.
Parts:
2 x VT slotted front rotors
2 x VH slotted rears
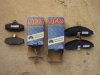
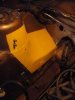
QFM HPX pads to suit + postage to Adelaide (very quick mind you!) $508 BIG thanks to GSL Rally Sport for those!:spot on:
2 x adapter hubs inc bearings and seals $262 from eBay
2 x braided lines $84ea
Full set of front and rear VT calipers, SS master cylinder and booster $300
re-flaring the ends of the rigid lines to suit the master cylinder $38
VS plastic booster from U-Pull-It $50ish
The battle... I can't figure out how to inbed the pics so I'll have to attach them one by one. I'll describe the process and the pictures should go hand in hand or at lease fill in the gaps hopefully.
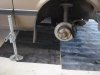
1. Car jacked up and on stands. Wheels off and ready for action.
2. Caliper removed via the 2 bolts from the back. Caliper moved out of the way with lines still attached to save on mess.
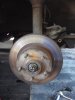
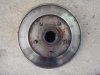
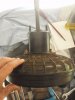
3. Remove the cap over the locking nut, remove the pin, nut, washer and then you should be able to pull off the rotor. You will have have a small bearing at the front that will fall out and onto your trackies leaving a big green greasy smudge that will spread, and a larger bearing at the back. Also a large black rubber seal. Pull all of these off and discard.
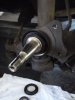
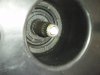
4. Give the exposed shaft (dunno what it's actually called) a good clean and inspect for damage.
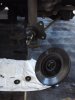
5. Install new rubber seal and pack bearings with grease. Install bearing cups into adapter hubs. They will be tight!
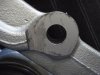
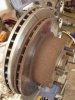
6. From here i test fitted the new caliper and found that I needed to mod it slightly. I had read this in another thread so I was half expecting it. The holes in the caliper bracket are the right distance apart but the way the brackets have been made stops them from sitting flush against their mount. You need to file/grind off about 2-3mm of material as shown in the pic off one end.
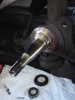
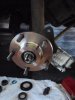
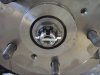
7. Once you know the caliper will fit install the large rear bearing, the hub, the smaller front bearing, the washer, the nut then pin in place. I tightened the nut to finger tight then tightened a little more to line up the holes for the pin.
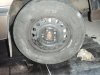
All downhill from here...
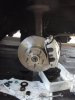
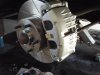
8. Stick your shiney new rotor on and replace the new caliper with the two bolts removed earlier. (make sure that the bleeding nipple is at the top. if it's not swap sides!)
9. With the bottom bolt removed that attaches the body of the caliper to the bracket (that screws into the back of the slides) pivot the body up so you can install your new pads.
10. With the new pads in close the caliper, replace the bolt and you're almost done.
The brake lines...
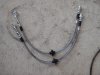
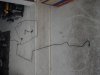
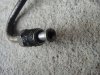
VH lines were dead. VT lines will NOT fit due to the not quite being long enough AND having the wrong flare AND the wrong attachment bracket where it joins the cars rigid lines. There is a specific shape required for the line to sit into a cup and be secured in place with a slide thing. This was one of the reasons why I went for the braded lines. I did try to make the VT hoses fit but it really was doomed from the start. My advice: don't bother. They're too important. Get some newbies. Luckily the brake place up the road from me had all the dimensions in their computer. This info includes not only the fittings required but the lengths above and below where the line runs through the bracket on the shock absorber and the degrees that the top fitting it off from the bottom so the lines won't have to be twisted changing the length. They made it a very painless process. PWR brakes Gilles Plains SA if anyones interested. Good bunch of blokes and, as you can see, they know their stuff.
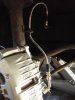
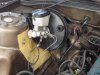
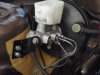
The Booster...
I had originally intended on using the metal VT Booster I had bought with the rest of the calipers and master cylinder but I'd been reading about how people had to heavily modify the mounting bracket. I have neither the skills or the tools (or the time) to do this so I found out that the VS booster would go in without any mods at all. I eventually found one at U-Pull-It that looked fine and made it my own. After a bit of trial and error I managed to get the old booster and master cylinder off. In retrospect it is probably easier to remove the booster while the master cylinder is still fitted via the 2 nuts in the footwell up next to the steering column. Needless to say I got there in the end and all was removed. I was a litttle more than impressed when I found that the VS booster bracket fit perfectly on the firewall without hitting anything. Now, on the booster itself where the master cylinder goes there is a small pushrod with a hex nut sticking out. I believe you can buy adapters for this to fit the VT master cylinder on but I opted for the option I saw in another forum on the net. I got my trusty dremel and ground off the head of the nut so it was flush with the top of the shaft it screws into. Great success. The master cylinder sits flush. From here I installed the master cylinder to the booster and, with the help of some wire, I poked the thread through the fire wall and held it in place while I got the nuts onto them next to the steering column. This can be a little fiddly but you need them. Get em on! The pin for the brake pedal was re-inserted into the pushrod of the booster and everything was tightened. On the front of the master cylinder there is a small bracket that attaches to the tower on the drivers side. The VT didn't have this so I swapped over the ends and re-fitted the bracket. Each to their own though. Also you can adjust the height of the pedal by drilling another hole in the push rod of the booster. Drilling another hole (10mm i think) right next to the existing one will slightly lower the pedal. I was happy with where mine was so I didn't bother.
The rigid brake lines...
The master cylinder I wanted to fit was a 1 1/4 in bore and from a VT SS. It also has a single flare as opposed to the VH double flare (i think. Or the other way around). I had 2 options. I could try to track down line adapters to screw into the cylinder saving me the trouble of taking the rigid lines out of the car or I could take the lines out and up to the good guys at PBR. I hated the idea of using the adapters and coupled with not being able to track any down in the 3 minutes I dedicated to the task I set about taking all the rigid lines out. It wasn't anywhere as hard as I thought. It was just a case of taking my time and moving things out the way where necessary. Obviously the lines for the back brakes took a little longer to get our but I got there in the end. No sweat. The re-install was no more painfull then before plus PBR has replaced 2 of the rounded threaded portions I'd stuffed prior.
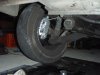
The final stretch...
Rotors calipers and braided lines are on and tight. Rigid lines are re-flared and back in. Booster and master cylinder is bolted up and ready to accept the rigid lines. With the lines going into the master cylinder I had to manipulate them a little to get them to sit right and not have any too sharp curves in them. And not brake them as I was putting them in. This took a little of patience and care to thread them through eachother but I'd come too far to get heavy fisted and snap one. I think I would have sh!t a kitten at this late stage in the game. With the rigid lined installed and tight all that is left was to bleed the brakes and try them out. Bleeding went fine (after I tightened up 1 fitting a little more) Time to try them out.
The result...
I'd heard people saying what a massive difference they've made. how they can pull up sooooo much better and how effortless the upgrade makes things. Now that I've done it I can safely say that those people...... are absolutly fuggin right!!! Holy cow! I am in heaven! I have literally come to a complete stop going down hills that I would normally ride my brakes down to stop at the traffic lights at the bottom. I'm VERY impressed with the result. Even the inertia of you initially putting your foot on the brakes is enough to slow you down even more. I am actually a little scared to push them too hard for fear of my wheels going in separate directions! I sh!t you not! I know there are cheaper ways of doing what I have done but I'm glad I did it this way. A little problem solving never hurt anyone and I learn't plenty along the way. All up, if I had all the parts that I needed there and waiting you could easily get this done in an arvo. Or a weekend with a few beers.
Now, I have a salisbury diff in the garage with another set of slotted rotors, QFM HPX pads and shiney calipers to replace the tired rusted drums I have on the back at the moment. Just need the right tail shaft! That's my next mission. Anyone got a VK V8 rear section!!
Hope this write up helps anyone considering or doing this mod. It's well worth it. Also, I know that I have spent more on the brakes than the car cost me and it's not the best looking machine but I have plans. Big plans. It was my Grandfathers car so this is only the begining.....:yeah:
Gurus,
I finally got around to putting all the parts I'd gathered on to complete the front VT brake conversion on my VH. Thought I'd share my experiences. I did end up buying some parts that didn't/won't be going on but I'll mention them as I go.
Parts:
2 x VT slotted front rotors
2 x VH slotted rears
QFM HPX pads to suit + postage to Adelaide (very quick mind you!) $508 BIG thanks to GSL Rally Sport for those!:spot on:
2 x adapter hubs inc bearings and seals $262 from eBay
2 x braided lines $84ea
Full set of front and rear VT calipers, SS master cylinder and booster $300
re-flaring the ends of the rigid lines to suit the master cylinder $38
VS plastic booster from U-Pull-It $50ish
The battle... I can't figure out how to inbed the pics so I'll have to attach them one by one. I'll describe the process and the pictures should go hand in hand or at lease fill in the gaps hopefully.
1. Car jacked up and on stands. Wheels off and ready for action.
2. Caliper removed via the 2 bolts from the back. Caliper moved out of the way with lines still attached to save on mess.
3. Remove the cap over the locking nut, remove the pin, nut, washer and then you should be able to pull off the rotor. You will have have a small bearing at the front that will fall out and onto your trackies leaving a big green greasy smudge that will spread, and a larger bearing at the back. Also a large black rubber seal. Pull all of these off and discard.
4. Give the exposed shaft (dunno what it's actually called) a good clean and inspect for damage.
5. Install new rubber seal and pack bearings with grease. Install bearing cups into adapter hubs. They will be tight!
6. From here i test fitted the new caliper and found that I needed to mod it slightly. I had read this in another thread so I was half expecting it. The holes in the caliper bracket are the right distance apart but the way the brackets have been made stops them from sitting flush against their mount. You need to file/grind off about 2-3mm of material as shown in the pic off one end.
7. Once you know the caliper will fit install the large rear bearing, the hub, the smaller front bearing, the washer, the nut then pin in place. I tightened the nut to finger tight then tightened a little more to line up the holes for the pin.
All downhill from here...
8. Stick your shiney new rotor on and replace the new caliper with the two bolts removed earlier. (make sure that the bleeding nipple is at the top. if it's not swap sides!)
9. With the bottom bolt removed that attaches the body of the caliper to the bracket (that screws into the back of the slides) pivot the body up so you can install your new pads.
10. With the new pads in close the caliper, replace the bolt and you're almost done.
The brake lines...
VH lines were dead. VT lines will NOT fit due to the not quite being long enough AND having the wrong flare AND the wrong attachment bracket where it joins the cars rigid lines. There is a specific shape required for the line to sit into a cup and be secured in place with a slide thing. This was one of the reasons why I went for the braded lines. I did try to make the VT hoses fit but it really was doomed from the start. My advice: don't bother. They're too important. Get some newbies. Luckily the brake place up the road from me had all the dimensions in their computer. This info includes not only the fittings required but the lengths above and below where the line runs through the bracket on the shock absorber and the degrees that the top fitting it off from the bottom so the lines won't have to be twisted changing the length. They made it a very painless process. PWR brakes Gilles Plains SA if anyones interested. Good bunch of blokes and, as you can see, they know their stuff.
The Booster...
I had originally intended on using the metal VT Booster I had bought with the rest of the calipers and master cylinder but I'd been reading about how people had to heavily modify the mounting bracket. I have neither the skills or the tools (or the time) to do this so I found out that the VS booster would go in without any mods at all. I eventually found one at U-Pull-It that looked fine and made it my own. After a bit of trial and error I managed to get the old booster and master cylinder off. In retrospect it is probably easier to remove the booster while the master cylinder is still fitted via the 2 nuts in the footwell up next to the steering column. Needless to say I got there in the end and all was removed. I was a litttle more than impressed when I found that the VS booster bracket fit perfectly on the firewall without hitting anything. Now, on the booster itself where the master cylinder goes there is a small pushrod with a hex nut sticking out. I believe you can buy adapters for this to fit the VT master cylinder on but I opted for the option I saw in another forum on the net. I got my trusty dremel and ground off the head of the nut so it was flush with the top of the shaft it screws into. Great success. The master cylinder sits flush. From here I installed the master cylinder to the booster and, with the help of some wire, I poked the thread through the fire wall and held it in place while I got the nuts onto them next to the steering column. This can be a little fiddly but you need them. Get em on! The pin for the brake pedal was re-inserted into the pushrod of the booster and everything was tightened. On the front of the master cylinder there is a small bracket that attaches to the tower on the drivers side. The VT didn't have this so I swapped over the ends and re-fitted the bracket. Each to their own though. Also you can adjust the height of the pedal by drilling another hole in the push rod of the booster. Drilling another hole (10mm i think) right next to the existing one will slightly lower the pedal. I was happy with where mine was so I didn't bother.
The rigid brake lines...
The master cylinder I wanted to fit was a 1 1/4 in bore and from a VT SS. It also has a single flare as opposed to the VH double flare (i think. Or the other way around). I had 2 options. I could try to track down line adapters to screw into the cylinder saving me the trouble of taking the rigid lines out of the car or I could take the lines out and up to the good guys at PBR. I hated the idea of using the adapters and coupled with not being able to track any down in the 3 minutes I dedicated to the task I set about taking all the rigid lines out. It wasn't anywhere as hard as I thought. It was just a case of taking my time and moving things out the way where necessary. Obviously the lines for the back brakes took a little longer to get our but I got there in the end. No sweat. The re-install was no more painfull then before plus PBR has replaced 2 of the rounded threaded portions I'd stuffed prior.
The final stretch...
Rotors calipers and braided lines are on and tight. Rigid lines are re-flared and back in. Booster and master cylinder is bolted up and ready to accept the rigid lines. With the lines going into the master cylinder I had to manipulate them a little to get them to sit right and not have any too sharp curves in them. And not brake them as I was putting them in. This took a little of patience and care to thread them through eachother but I'd come too far to get heavy fisted and snap one. I think I would have sh!t a kitten at this late stage in the game. With the rigid lined installed and tight all that is left was to bleed the brakes and try them out. Bleeding went fine (after I tightened up 1 fitting a little more) Time to try them out.
The result...
I'd heard people saying what a massive difference they've made. how they can pull up sooooo much better and how effortless the upgrade makes things. Now that I've done it I can safely say that those people...... are absolutly fuggin right!!! Holy cow! I am in heaven! I have literally come to a complete stop going down hills that I would normally ride my brakes down to stop at the traffic lights at the bottom. I'm VERY impressed with the result. Even the inertia of you initially putting your foot on the brakes is enough to slow you down even more. I am actually a little scared to push them too hard for fear of my wheels going in separate directions! I sh!t you not! I know there are cheaper ways of doing what I have done but I'm glad I did it this way. A little problem solving never hurt anyone and I learn't plenty along the way. All up, if I had all the parts that I needed there and waiting you could easily get this done in an arvo. Or a weekend with a few beers.
Now, I have a salisbury diff in the garage with another set of slotted rotors, QFM HPX pads and shiney calipers to replace the tired rusted drums I have on the back at the moment. Just need the right tail shaft! That's my next mission. Anyone got a VK V8 rear section!!
Hope this write up helps anyone considering or doing this mod. It's well worth it. Also, I know that I have spent more on the brakes than the car cost me and it's not the best looking machine but I have plans. Big plans. It was my Grandfathers car so this is only the begining.....:yeah:
Attachments
-
 Too small.jpg86.1 KB · Views: 730
 -
 caliper un-bolted.jpg52.1 KB · Views: 764
 -
 Disc off.jpg52.3 KB · Views: 728
 -
 cleaned shaft.jpg45.9 KB · Views: 673
 -
 Rear seal on.jpg47.7 KB · Views: 695
 -
 Test fit.jpg50.4 KB · Views: 829
 -
 Moded area.jpg101.2 KB · Views: 723
 -
 Bearings in hub on.jpg48.6 KB · Views: 952
 -
 Another test fit.jpg51.2 KB · Views: 717
 -
 Disc comparison 1.jpg110.2 KB · Views: 1,007
 -
 Disc comparison 2.jpg62.4 KB · Views: 736
 -
 Shiney and new.jpg125.5 KB · Views: 714
 -
 Washered nutted and pinned.jpg89.1 KB · Views: 754
 -
 All on.jpg94.3 KB · Views: 1,017
 -
 Lines on.jpg51.6 KB · Views: 709
 -
 QFM treasures.jpg119.6 KB · Views: 922
 -
 VS booster setup.jpg44.3 KB · Views: 1,109
 -
 Ground off nut.jpg85.8 KB · Views: 1,012
 -
 Rigid lines out.jpg81.4 KB · Views: 786
 -
 The wrong flares.jpg111.4 KB · Views: 774
 -
 Quick cleanup.jpg44.4 KB · Views: 701
 -
 Check fit.jpg109.2 KB · Views: 855
 -
 Lines and bracket on.jpg91 KB · Views: 1,095
 -
 Underneath.jpg79.7 KB · Views: 821
 -
 Done.jpg100 KB · Views: 854
") should put it in the "how to " section.
should put it in the "how to " section.