stockies
Bannana
- Joined
- Aug 28, 2007
- Messages
- 1,011
- Reaction score
- 53
- Points
- 48
- Location
- S/E Suburbs
- Members Ride
- G6E Turbo
Hey guys, How many of you have been driving along at night, only to need to read the melways or find something in the dark and your stock interior light doesn't provide enough light.
The answer is a set of map lights! I installed a set of Skyline R31 front map lights to my VN commodore, its quite easy.
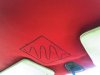
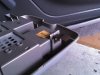
Step 1: Buy a interior map light from the wreckers, mine came from Jollys wreckers in South Dandenong, cost me $17. Mark out on your headling the hole you will need to cut. My hole was 12.5cm by 12.5cm. (picture 1)
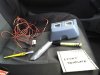
Step 2: This all the materials you will need. Wire, black texta, ruler, template for hole and a knife or two. For the wire just extend the positive and negative wires from the plug, please use solder people!
Step 3: Cut away the headlinging to reveal the cardboard underneath.
Step 4: Cut the cardboard away so you can now see the metal roof.
Step 5: These metal tabs will have to bent so the light will stay in the roof, skyline roofs are made of stronger stuff. Not bending these WILL cause the light to fall out or crack/rip the cardboard roof.
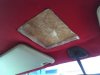
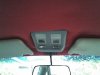
Step 6: This the light test fitted to the roof, as you can see its a bit wonky, Make sure to tuck in all the trim to make it look nice.
Step 7: Wire up the light. Run the wire down the A piller on the drivers side into the fuse panel underneath the dash. Ground goes to and unpainted surface and positive to a free opening in the first five spots (means the light will work when the ignition is off) Use a inline fuse for safety. (10 amp)
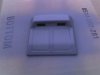
Step 8: Now to make it look pretty undo the 4 screws on the back of the light and seperate the casing. Mask up the clear plastic parts.
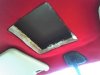
Step 9: Spray with some plastic primer, then once dry, spray it any colour you want. (mines red because it matches the roof.)
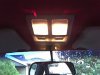
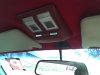
Step 10: Reinstall and your done!!
The answer is a set of map lights! I installed a set of Skyline R31 front map lights to my VN commodore, its quite easy.
Step 1: Buy a interior map light from the wreckers, mine came from Jollys wreckers in South Dandenong, cost me $17. Mark out on your headling the hole you will need to cut. My hole was 12.5cm by 12.5cm. (picture 1)
Step 2: This all the materials you will need. Wire, black texta, ruler, template for hole and a knife or two. For the wire just extend the positive and negative wires from the plug, please use solder people!
Step 3: Cut away the headlinging to reveal the cardboard underneath.
Step 4: Cut the cardboard away so you can now see the metal roof.
Step 5: These metal tabs will have to bent so the light will stay in the roof, skyline roofs are made of stronger stuff. Not bending these WILL cause the light to fall out or crack/rip the cardboard roof.
Step 6: This the light test fitted to the roof, as you can see its a bit wonky, Make sure to tuck in all the trim to make it look nice.
Step 7: Wire up the light. Run the wire down the A piller on the drivers side into the fuse panel underneath the dash. Ground goes to and unpainted surface and positive to a free opening in the first five spots (means the light will work when the ignition is off) Use a inline fuse for safety. (10 amp)
Step 8: Now to make it look pretty undo the 4 screws on the back of the light and seperate the casing. Mask up the clear plastic parts.
Step 9: Spray with some plastic primer, then once dry, spray it any colour you want. (mines red because it matches the roof.)
Step 10: Reinstall and your done!!
Attachments
-
 01.jpg30.2 KB · Views: 647
 -
 02.jpg39.1 KB · Views: 630
 -
 03.jpg31.5 KB · Views: 560
 -
 04.jpg31.2 KB · Views: 603
 -
 05.jpg38.4 KB · Views: 637
 -
 06.jpg32.7 KB · Views: 727
 -
 07.jpg38 KB · Views: 805
 -
 08-09-07_1627.jpg70.5 KB · Views: 773
 -
 08-09-07_1713.jpg48.9 KB · Views: 593
 -
 09-09-07_1643.jpg73 KB · Views: 1,047
Last edited: