jetspin_vn
JetSpin Racing Team
- Joined
- Nov 13, 2003
- Messages
- 1,430
- Reaction score
- 8
- Points
- 0
- Age
- 39
- Location
- Mission Bay, Auckland, New Zealand
- Members Ride
- VN GTS
There comes a point in a boys life, where what he really wants are big f*** off brakes. 
This particular boy managed to get his hands on a set of newly rebuilt VL Turbo front calipers. Thus resulted in the obvious: building a set of kickass VL turbo brakes on my N/a VL.
Parts Required
1x Pair of VL Turbo brake calipers and retainers. It may pay to change all the seals etc, and if your like me you will clean them up and paint them.
1x Can VHT brake paint if you plan on painting them. TAKE YOUR TIME, mask the holes/seals, and give them two coats.
1x Set Brake Pads to suit VL/VLT. They are all the same size, but get a quality pad. I used Lucas.
1x Pair VLT Brake rotors. I used DBA Slotted rotors on mine, part number DBA017SL and DBA017SR. CAUTION: they only go one way, thats why there are left and right rotors!!
1x 1" Master Cylinder from any V8 Commodore, VL -> VR. After VR the design changed.
1x Bottle brake fluid. Again, don't skimp, this is ment to be a performance package!!
1x Can CRC BraKLEEN - miricle stuff, it can clean anything.
Tools, Rags, etc.
Doing the Job
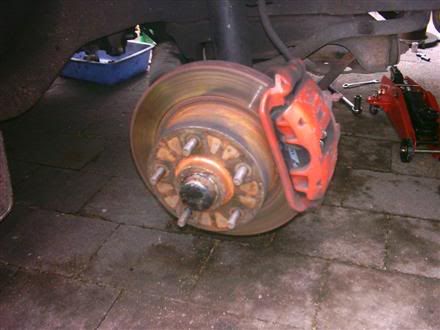
Before...
1. Make sure your work area is clear and level. Chock the rear wheels. Raise the front of the car and insert your axle stands. Remove both front wheels.
2. Pick the side you want to work on first. The photos are of the drivers side but they are identical so it doesn't matter. Clamp the rubber brake line with vicegrips.
3. Using a 17mm socket, remove the bolt retaining the brake line to the caliper. Be sure to have something to catch the brake fluid!! Also be careful, there are copper washers on each end of the bolt that must be reused or the line will leak.
Brake line removed, showing clamped rubber section
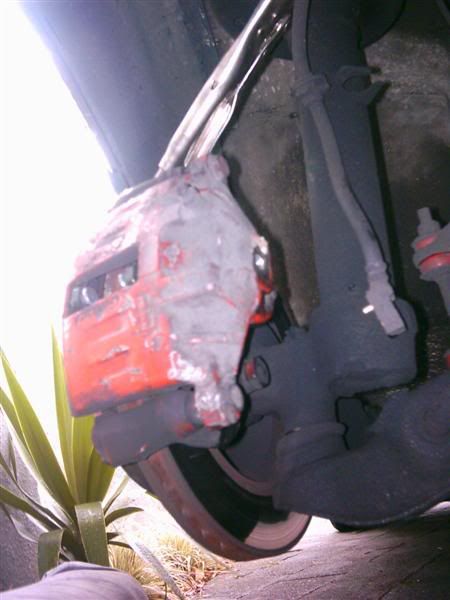
4.With the brake line out of the way, remove the calliper retaining bolts. You will need an open end spanner on the inside portion to stop it turning (you’ll see what I mean) Lift the calliper from the retainer and remove the brake pads.
Caliper and Pads removed
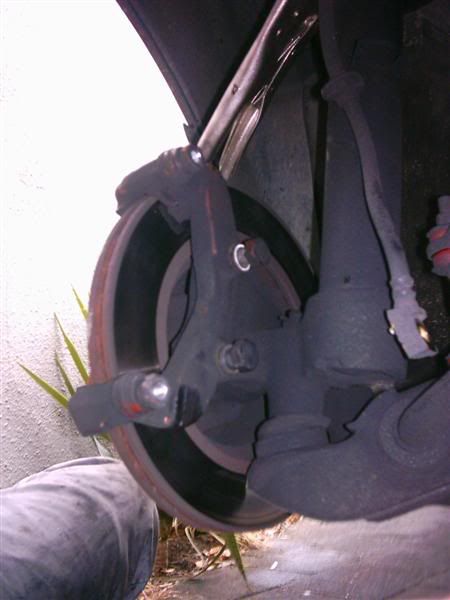
5. Remove the retainer bolts. They are big bastards, but should not need too much persuasion. Remove the retainer.
6. Remove the center cap from the hub. A light tap on the side with a hammer should get it starter and a flathead screwdriver or two should convince it the rest of the way. Clean a bit of the grease off the bolt.
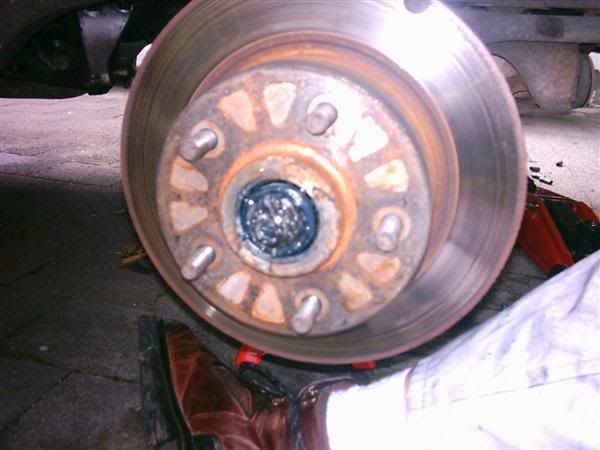
Cap removed, showing the greasy mess that is the hub pin and bolt
7. Remove the split pin and bolt. Remove the rotor and hub, noting which bearings go where. Soak the bolts, washers, and bearings in meths.
8. Prior to assembly, coat the hub in grease. Work grease into the bearings using the palm of your hand. Grease it all up!! Make sure you clean the grease seal at the back of the hub and apply a film of grease to it as well. And ALWAYS use a NEW SPLIT PIN!!
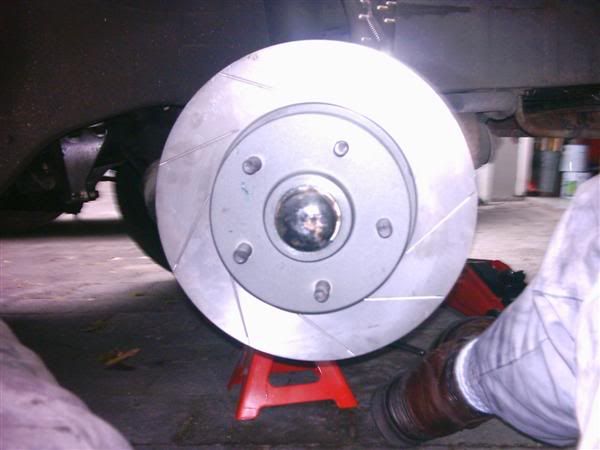
Shiny new rotor and hub installed
Installation of the new brakes is a basic reversal of the above, however where VLT brakes are being used, pay attention to the following…
* When using slotted rotors, NOTE THE DIRECTION OF ROTATION!! They will be marked left and right!!
* The cylinder size in both NA and Turbo brakes are the same, however turbos use a bigger master cylinder – go figure. To get the most out of your setup, upgrade the master.
* Make sure your wheels will fit over the setup!!
* For any kind of caliper, make sure you get the right side!! They are not interchangeable - the correct one will sit with the bleed valve towards the top.
Bleeding the system
1. Place a suitable size ring spanner on the bleed valve. Attach a suitible clear rubber hose to the nipple.
2. Have an assistant apply pressure to the brake pedal. As he/she does this, open the bleed valve by turning the spanner. Be sure the assistant holds the pedal down. Once it is on the ground, have them hold it till you have closed the valve.
3. Repeat until there are no bubbles in the line.
* Be sure there is sufficent fluid in the brake resevoir at all times.
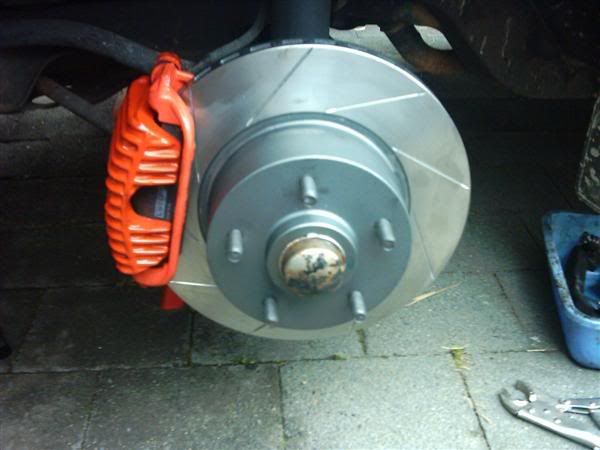
The very sexy finished product
The conversion is worth it, I have noticed a huge increase in braking power and overall braking control. Be sure to use quality parts, such as DBA rotors and Lucas pads.
Mike
****************
Any queries or troubles, get hold of me via PM or email [email protected]
This particular boy managed to get his hands on a set of newly rebuilt VL Turbo front calipers. Thus resulted in the obvious: building a set of kickass VL turbo brakes on my N/a VL.
Parts Required
1x Pair of VL Turbo brake calipers and retainers. It may pay to change all the seals etc, and if your like me you will clean them up and paint them.
1x Can VHT brake paint if you plan on painting them. TAKE YOUR TIME, mask the holes/seals, and give them two coats.
1x Set Brake Pads to suit VL/VLT. They are all the same size, but get a quality pad. I used Lucas.
1x Pair VLT Brake rotors. I used DBA Slotted rotors on mine, part number DBA017SL and DBA017SR. CAUTION: they only go one way, thats why there are left and right rotors!!
1x 1" Master Cylinder from any V8 Commodore, VL -> VR. After VR the design changed.
1x Bottle brake fluid. Again, don't skimp, this is ment to be a performance package!!
1x Can CRC BraKLEEN - miricle stuff, it can clean anything.
Tools, Rags, etc.
Doing the Job
Before...
1. Make sure your work area is clear and level. Chock the rear wheels. Raise the front of the car and insert your axle stands. Remove both front wheels.
2. Pick the side you want to work on first. The photos are of the drivers side but they are identical so it doesn't matter. Clamp the rubber brake line with vicegrips.
3. Using a 17mm socket, remove the bolt retaining the brake line to the caliper. Be sure to have something to catch the brake fluid!! Also be careful, there are copper washers on each end of the bolt that must be reused or the line will leak.
Brake line removed, showing clamped rubber section
4.With the brake line out of the way, remove the calliper retaining bolts. You will need an open end spanner on the inside portion to stop it turning (you’ll see what I mean) Lift the calliper from the retainer and remove the brake pads.
Caliper and Pads removed
5. Remove the retainer bolts. They are big bastards, but should not need too much persuasion. Remove the retainer.
6. Remove the center cap from the hub. A light tap on the side with a hammer should get it starter and a flathead screwdriver or two should convince it the rest of the way. Clean a bit of the grease off the bolt.
Cap removed, showing the greasy mess that is the hub pin and bolt
7. Remove the split pin and bolt. Remove the rotor and hub, noting which bearings go where. Soak the bolts, washers, and bearings in meths.
8. Prior to assembly, coat the hub in grease. Work grease into the bearings using the palm of your hand. Grease it all up!! Make sure you clean the grease seal at the back of the hub and apply a film of grease to it as well. And ALWAYS use a NEW SPLIT PIN!!
Shiny new rotor and hub installed
Installation of the new brakes is a basic reversal of the above, however where VLT brakes are being used, pay attention to the following…
* When using slotted rotors, NOTE THE DIRECTION OF ROTATION!! They will be marked left and right!!
* The cylinder size in both NA and Turbo brakes are the same, however turbos use a bigger master cylinder – go figure. To get the most out of your setup, upgrade the master.
* Make sure your wheels will fit over the setup!!
* For any kind of caliper, make sure you get the right side!! They are not interchangeable - the correct one will sit with the bleed valve towards the top.
Bleeding the system
1. Place a suitable size ring spanner on the bleed valve. Attach a suitible clear rubber hose to the nipple.
2. Have an assistant apply pressure to the brake pedal. As he/she does this, open the bleed valve by turning the spanner. Be sure the assistant holds the pedal down. Once it is on the ground, have them hold it till you have closed the valve.
3. Repeat until there are no bubbles in the line.
* Be sure there is sufficent fluid in the brake resevoir at all times.
The very sexy finished product
The conversion is worth it, I have noticed a huge increase in braking power and overall braking control. Be sure to use quality parts, such as DBA rotors and Lucas pads.
Mike
****************
Any queries or troubles, get hold of me via PM or email [email protected]
Last edited: