Welcome to Just Commodores, a site specifically designed for all people who share the same passion as yourself.

New Posts Contact us

Just Commodores Forum Community

It takes just a moment to join our fantastic community

Register

Installing Microphone - Wire through A Pillar?

Joined
Feb 16, 2015
Messages
70
Reaction score
4
Points
8
Location
New Zealand
Members Ride
Statesman WK 03 - LS1
Grrr getting tired of this now

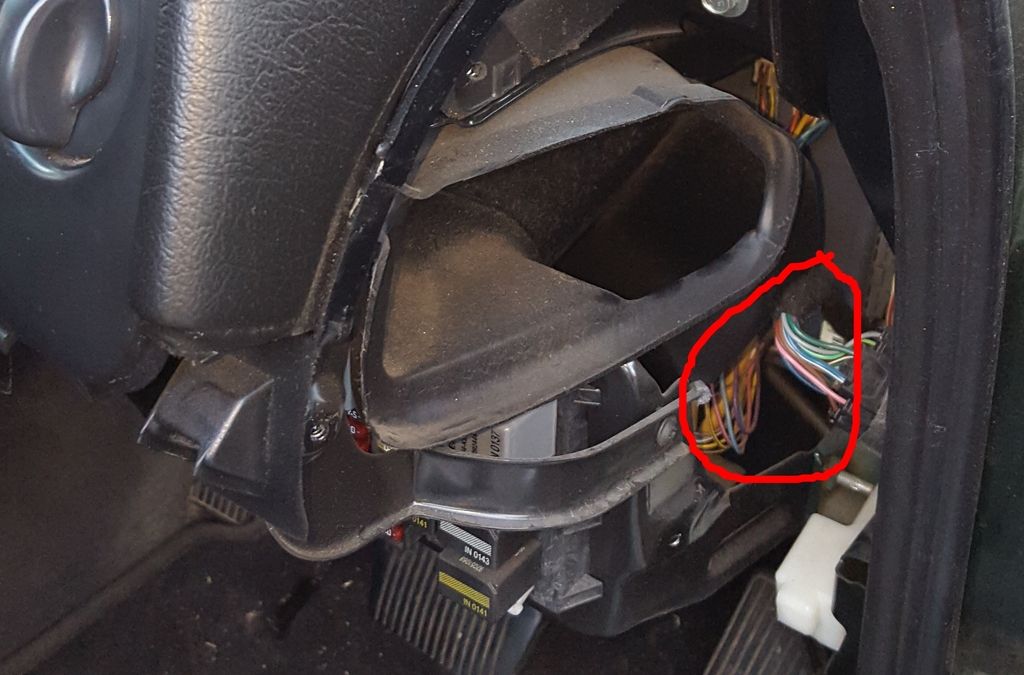
Got the driver side vent and windshield trim off. I have no idea where I'm meant to push the wires through to get them to the head unit area. Everything looks blocked off. I removing the glove box to give it a go from the other side but can't get the globe box out as there are screws in impossible angles. There's probably a special way to getting it out. I'll put some photos up of where I am.
 
Joined
Feb 16, 2015
Messages
70
Reaction score
4
Points
8
Location
New Zealand
Members Ride
Statesman WK 03 - LS1
Remove the plastic trim, on the left hand side of the centre console and
you will see the radio harness (see picture below).

It would be easier to run your wire(s) down the left side 'A' Pillar.
Then you don't have to try and get your wire(s) under the centre console.

The only difference in removing the left side 'A' Pillar is....
You will need to remove the glove box door and
the small trim panel that runs down and under, the left side of the glove box.
That's so as you can remove the door air vent.

While you have the glove box door off, remove the trim on the other side of the glove box,
that runs down and under it.
You'll need to remove that to get to the radio harness.
View attachment 179083

Attn nutcracker
 

Nut Kracker

Donating Member
Joined
Oct 18, 2012
Messages
4,760
Reaction score
151
Points
63
Age
64
Location
Echuca Vic.
Members Ride
VT SS 304ci (195i)
That attachment I put up, is the stereo harnesses that's arrowed.
It's under the trim cover in the first picture below.

You don't have to remove the whole glove box, just the door, the side air vent and the trim on the right of the glove box.
You can't remove the side air vent and the trim on the other side on the glove box, without removing the door, as you can't get to the screws.

If you use a pull through as I previously described, you can get the wire through from the driver's side.
You have to push the pull-through, through towards the fire wall.
If you just jiggle it while gently pushing it, it will go through.


Joined
Feb 16, 2015
Messages
70
Reaction score
4
Points
8
Location
New Zealand
Members Ride
Statesman WK 03 - LS1
That attachment I put up, is the stereo harnesses that's arrowed.
It's under the trim cover in the first picture below.

You don't have to remove the whole glove box, just the door, the side air vent and the trim on the right of the glove box.
You can't remove the side air vent and the trim on the other side on the glove box, without removing the door, as you can't get to the screws.

If you use a pull through as I previously described, you can get the wire through from the driver's side.
You have to push the pull-through, through towards the fire wall.
If you just jiggle it while gently pushing it, it will go through.


Ohhhhhhhhhhhh I think I get you now.
I just looked up how to remove the glove box.

So once i've got the wire run under the center console into the passengers side the loom should be visible when I remove the glove box and center console trim. It makes sense now.

Final question. When I'm running the wire around the driver side footwell, where should i be running it / attaching it before it goes underneath the center console. Should the entry point be where I marked the photo?

Thanks for all your help, I'd buy you a beer if I lived in Aussie.
 
Joined
Feb 16, 2015
Messages
70
Reaction score
4
Points
8
Location
New Zealand
Members Ride
Statesman WK 03 - LS1
Untitled.jpg
 

Nut Kracker

Donating Member
Joined
Oct 18, 2012
Messages
4,760
Reaction score
151
Points
63
Age
64
Location
Echuca Vic.
Members Ride
VT SS 304ci (195i)
Try and keep the wire as high up and away from the pedals as you can.

You could start to run it through that hole in the centre of your circle.
Run it up over the steering column and use as many cable ties as want to, to attach it to what ever you can find.

I just had another thought, but I haven't done it this way before.
May be you could run the wire from the base of the driver's side 'A' pillar, around and under the windscreen vent covers,
coming out at the passenger's side air vent cover.
You could then, run the wire towards the firewall, in the passenger's foot well.
There are plenty of spots to cable tie the wire at the back of the upper foot well cover, before you run it to the radio loom.
This would eliminate the need to try and get the wire under the centre console.

If you are content on running the wire under the centre console.
There is another cover, the twin to the one I arrowed in the first picture, on the driver's side of the centre console.
Remove that (only a five minute job) and it makes it a lot easier to run the wire through the console.
You will need to pull down the fuse panel cover, below the steering wheel to access the screws for it and
there is also one at the other end of the cover.
Adjust the driver's seat as far back as it will go and you will see a screw near the hand brake lever.
 
Joined
Feb 16, 2015
Messages
70
Reaction score
4
Points
8
Location
New Zealand
Members Ride
Statesman WK 03 - LS1
Hey All!

Did this today to success.
NutCrackers instructions work perfectly as usual.

I actually ran out of cable length (my own fault), so instead ran the wire a completely different way.

Removed the fuse panel cover and ran it through around under the steering column. Removed the driver side center console trim panel as stated by NutCracker, which allowed me to easily get through to the head unit loom area through the drivers side area without even having to remove any of the passenger side stuff. It's a skinny fit and can be hard to see, is much easier to do if you have the head unit fascia off already so more light can get through.

The cables are all nicely hidden away when the trims are replaced. This would only be ideal if you don't have much cable to work with, as my cable fit perfectly so I didn't have to zip tie anything to prevent excess cable.

The preferable option would have been to mount above the rear view mirror and run down passenger side A pillar, down through the door vent and under the passenger footwell, then into the head unit area behind the Footwell trim. Note you need to remove the glove box door for this as stated by NutCracker.

Thanks for everyones help! Hope this helps someone in future.
 

Nut Kracker

Donating Member
Joined
Oct 18, 2012
Messages
4,760
Reaction score
151
Points
63
Age
64
Location
Echuca Vic.
Members Ride
VT SS 304ci (195i)
Hey All!

Did this today to success.
NutCrackers instructions work perfectly as usual.

I actually ran out of cable length (my own fault), so instead ran the wire a completely different way.

Removed the fuse panel cover and ran it through around under the steering column. Removed the driver side center console trim panel as stated by NutCracker, which allowed me to easily get through to the head unit loom area through the drivers side area without even having to remove any of the passenger side stuff. It's a skinny fit and can be hard to see, is much easier to do if you have the head unit fascia off already so more light can get through.

The cables are all nicely hidden away when the trims are replaced. This would only be ideal if you don't have much cable to work with, as my cable fit perfectly so I didn't have to zip tie anything to prevent excess cable.

The preferable option would have been to mount above the rear view mirror and run down passenger side A pillar, down through the door vent and under the passenger footwell, then into the head unit area behind the Footwell trim. Note you need to remove the glove box door for this as stated by NutCracker.

Thanks for everyones help! Hope this helps someone in future.
Good to here it all worked out for you.
 

BadDad62

Member
Joined
May 30, 2008
Messages
73
Reaction score
0
Points
6
Location
Adelaide
Members Ride
VU SS Gen3 UTE
I'm glad you got it done but have to ask why you needed to put it in that position in the first place?
 
Joined
Feb 16, 2015
Messages
70
Reaction score
4
Points
8
Location
New Zealand
Members Ride
Statesman WK 03 - LS1
I'm glad you got it done but have to ask why you needed to put it in that position in the first place?

Heya!

I mentioned earlier, it was because the microphone that I bought had a really short cable. Was forced to put it right next to the A pillar rather than the RVM simply because I didn't have enough cable.
 
Top