Welcome to Just Commodores, a site specifically designed for all people who share the same passion as yourself.

New Posts Contact us

Just Commodores Forum Community

It takes just a moment to join our fantastic community

Register

ECOTEC Rebuild. The complete story

P

portercg

Guest
OK here goes. Chapter 1

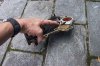
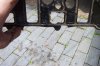
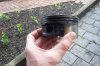
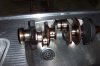
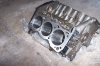
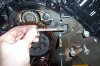
The reason I pulled the engine down at 220k was because of high oil consumption (normal for early Ecotec) and oil was getting into the coolant (not normal) The most likely spot was the rear main seal cover where the gallery that feeds pressurised oil to the back cam bearing and the balancer bearing runs close to a water gallery. Seems that a "rock ape" had worked on the car and changed the rear main seal on the engine early in the car's life and did a bad job of it as seen by the crust formed by a slow coolant leak along the side. The little rat can't have been confident of his skills because he also sealed up the breather hole in the bottom of the torque converter cover. ( the trick to a good seal on the rear main for these motors is to make sure the seal is perfectly lined up on the end of the crank and not be too fussed with how the match-up looks at the join wher the sump bolts on)
 

Attachments

  • ECOTEC Rebuild 010.jpg
    ECOTEC Rebuild 010.jpg
    256.1 KB · Views: 1,291
P

portercg

Guest
Chapter 2
this is the other thing that causes the coolant and the oil to mix. the inlet manifold gaskets are plastic with neoprene/silicone inserts. Over time the plastic deteriorates and the neoprene seal can't hold it's shape and lets coolant dump into the sump.
 

Attachments

  • ECOTEC Rebuild 012.jpg
    ECOTEC Rebuild 012.jpg
    162.3 KB · Views: 919
P

portercg

Guest
Chapter 3
Main reason for the oil consumption was the oil control rings on the pistons were totally gummed up. the valve guides were a bit worn too. As the pic shows, plenty of tension left in the compression rings. This engine still made great power, made no odd noises, it just burnt oil and put some extra in the radiator!
 

Attachments

  • ECOTEC Rebuild 033.jpg
    ECOTEC Rebuild 033.jpg
    172.5 KB · Views: 944
P

portercg

Guest
Chapter 4

the Buick/Holden crank is a very clever piece of work. In a normal vee configuration engine like all V8's the big end journals are shared. The magic of this engine is that the big end journals are offset so you can get smooth 120 degree firing in a narrow and compact 90 degree vee block. Look closely at the edges of each bearing surface and you will see a rounded edge. These "fillets" are hydraulically rolled and help make the crank very strong for it's weight.
 

Attachments

  • ECOTEC Rebuild 015.jpg
    ECOTEC Rebuild 015.jpg
    180.7 KB · Views: 1,016
P

portercg

Guest
Chapter 5
The bores had a tiny bit of wear so the block and heads went to Repco Engineering at Hendra. I'm happy to give them a plug they have good machines and have seen more Ecotecs than anyone else. This is how the finished block looks after a chemical clean, new Stainless steel welch plugs and a 20 thou re-bore. The final hone is done by a machine. I defy anyone to do a better job by hand these days. By now I'm feeling better because everything I'm touching from now on is CLEAN
 

Attachments

  • ECOTEC Rebuild 014.jpg
    ECOTEC Rebuild 014.jpg
    205.9 KB · Views: 1,502
P

portercg

Guest
Chapter 6
Assembly hints
Pic 1. be sure that you use a very fine emery paper (1200 grit) to polish the surface that the rear main seal spins inside, any gunk will make the seal wear out and the oil starts leaking prematurely.
Pic 2 these bolts are the ones for the rear main seal housing. You can see the plastic inserts are buggered. don't worry about it. they are there for factory assembly and have no other purpose.
Pic 3 When installing bearings, make sure that they are installed on the block or conrod DRY. The back of the bearing is not to be oiled or heat transfer and seating problems can result. OK?
Pic 4 flexiguage is quick & cheap insurance to ensure you have the right oil clearance.
 

Attachments

  • ECOTEC Rebuild 026.jpg
    ECOTEC Rebuild 026.jpg
    176.8 KB · Views: 1,120
  • ECOTEC Rebuild 017.jpg
    ECOTEC Rebuild 017.jpg
    236.1 KB · Views: 1,134
  • ECOTEC Rebuild 020.jpg
    ECOTEC Rebuild 020.jpg
    134.7 KB · Views: 1,061
  • ECOTEC Rebuild 016.jpg
    ECOTEC Rebuild 016.jpg
    182.8 KB · Views: 1,005
P

portercg

Guest
Chapter 7
I made up this simple dial guage out of an ice cream lid and cardboard. the pointer was a magnet with a straightened paper clip. cost nothing and worked great. Why did GM switch to dial guage tensioning? Because with normal torque methods, the torque wrench is dealing with tightness of the bolt and the friction of the bolt head and threads. using a dial guage to tension bolts does not account for the friction so the tightness or "stretch" you put on a bolt is more accurate and tensions overall are lots more even.
WARNING: My Gregory's shop manual (no. 268) has ambiguous wording on main bearing tension. It says:
step (e) tighten bolts to 20nm. step (f) tighten an "additional" 40nm (then it moves to angle guage settings)
Auto-tech refrence database says: tighten to 20nm, then tighten "to" 40nm
hmmm different.
I did have a point of difference with some other engine people. GM says the rocker arm bolts are not to be re-used as they are "stretched" when tensioned up and "re-stretching" them weakens them. Some guys feel that it's overkill and re-use them. No way! I got a new set from a dealer for only 40 bucks so just replace them and think nothing more of it.
 

Attachments

  • ECOTEC Rebuild 024.jpg
    ECOTEC Rebuild 024.jpg
    105.6 KB · Views: 781
P

portercg

Guest
Chapter 8
POWER PLAY! I have seen posts that make mention that re-positioning the cam angle sensor is worth an extra few kilowatts and different solutions centre around modifying the front cover. GM have superceded the early ECOTEC timing gearset with the magnetic sensor position already moved. I did not measure it but sitting the new gear on top of the old gear, it looks to be advanced by about 10-12 degrees, presumably to allow for timing chain stretch. By the way the timing chain on my engine was only stretched to half of it's limit. GM only sells the full set approx $350.00 trade please! It's pricey but if you want big mileage from your rebuild just do it. this is no time to cut corners!
 

Attachments

  • ECOTEC Rebuild 036.jpg
    ECOTEC Rebuild 036.jpg
    283.1 KB · Views: 648
P

portercg

Guest
Chapte 9
Home Strech
here's more from the "rock apes". I'm holding one of the bolts that holds the water pump and front cover on. Like most other GM engines the threads for the bolts go directly into the water jackets. Mr Rock Ape replaced the water pump before I bought the car and did not use any thread sealant when re-installing the bolts. result is a half corroded bolt and threads. You can see the thread tap in one of the holes to clean things up. Lesson is ALWAYS use thread sealant when replacing the water pump! If you ask your mechanic and he goes "duhhh" bet that he did no know this.

You can also see the old timing gear on the motor. Short story was I initially thought the dealer sold me the wrong part. I settled down after I got a satisfactory answer and then re-installed the new parts. PS I prefer if you used the GM thread sealant but other brands are available
 

Attachments

  • ECOTEC Rebuild 037.jpg
    ECOTEC Rebuild 037.jpg
    195.5 KB · Views: 1,162
P

portercg

Guest
Chapter 10
The cylinder heads got a full ovehaul, new K-line guides and re-seat of the valves. I know it's slightly overkill but I always smooth down the sharp edges around the combustion chambers before putting the heads on because I'm anal about having hot spots in the cylinders that can cause pinging (which will re-tard the timing and kill power in this type of engine) doing this 5 minute job takes one more worry out of it.
 

Attachments

  • ECOTEC Rebuild 029.jpg
    ECOTEC Rebuild 029.jpg
    154.7 KB · Views: 911
Top